March 14, 2024

Powerful vacuum deep cleans mattress, highlighting the cleaners head in action.

5 Simple Steps to Clean Mattress: How to Refresh Your Bed Easily

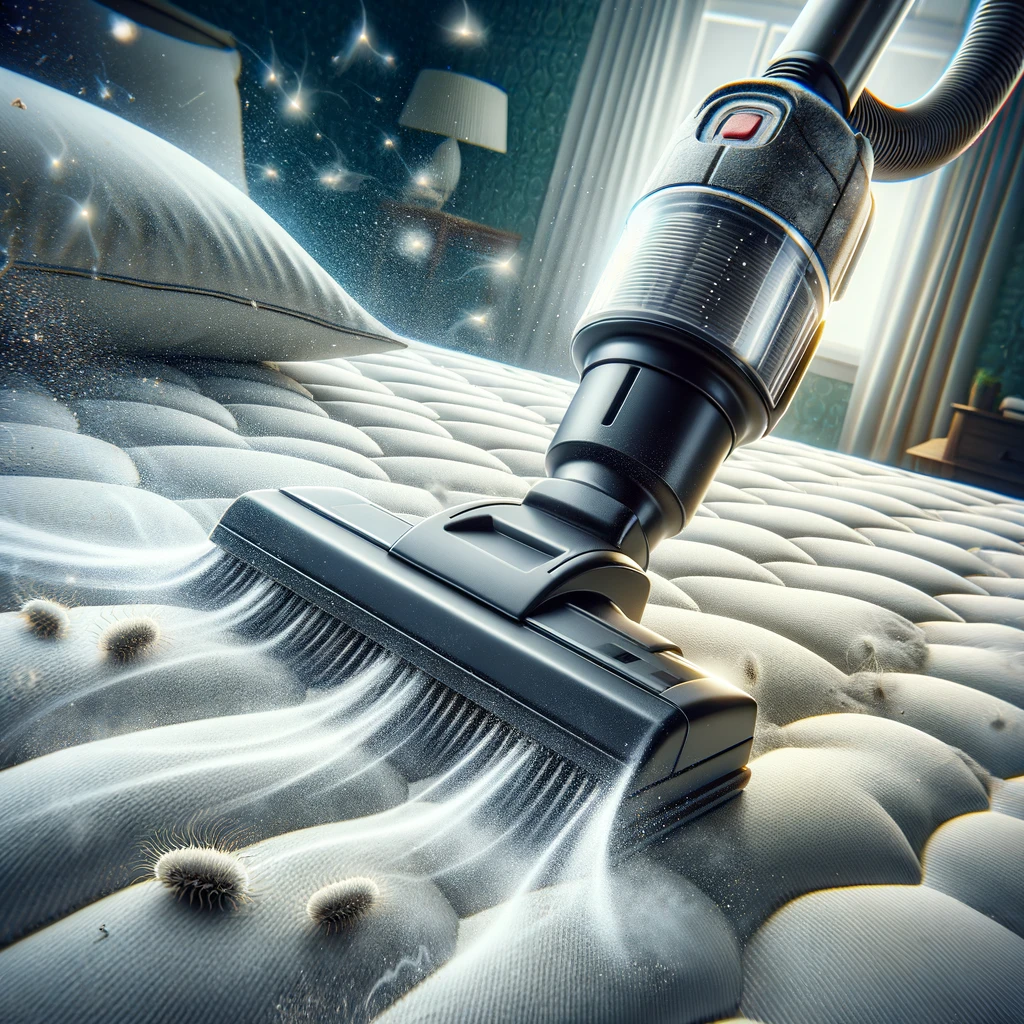
Oh, the joy of jumping into a fresh, clean mattress at the end of a long day! But when was the last time you gave your mattress a little TLC? If you can’t remember, it’s probably overdue for a refresh. Not to worry, though! I’ve got a super simple 5-step guide to help you make your mattress feel brand new again. Trust me, it’s easier than you think, and you don’t need any fancy gadgets or harsh chemicals. Let’s dive in and get your bed feeling like a dreamy cloud! 1. Strip and Wash When you start with stripping your bed, it’s not just about removing the sheets and covers; it’s about setting the stage for a thorough clean. Begin by peeling away every layer, including any decorative items like throw pillows and blankets that often get overlooked. These items collect dust and allergens just as much as your regular bedding, so giving them a clean (according to their care instructions) can really freshen up the whole bed. As you load your washing machine, make sure to separate items by color and material type. This is important because different fabrics require different washing temperatures and settings to avoid damage. For example, cotton sheets can generally handle a hot wash, which is great for killing germs, but more delicate materials might need a gentler approach. If your washing machine has a sanitize cycle, using it for your bed linens can be particularly effective in eliminating dust mites and other allergens. If you’re concerned about using too much heat or have items that are too delicate for hot temperatures, adding a laundry sanitizer to your wash can offer a similar level of deep cleaning without the risk. For duvets and comforters, consider their size and material before deciding whether to wash them at home or take them to a professional. Large or particularly bulky items might not fit properly in a standard washing machine and could benefit from the larger capacity of commercial machines at laundromats or from professional cleaning services that know how to handle them without causing damage. Drying your bedding is just as crucial as the washing process. Make sure to thoroughly dry sheets, pillowcases, and mattress covers to prevent any mildew or mustiness. Again, pay attention to fabric care labels. While many items can go in the dryer, others might be better off air-dried to preserve their quality and shape. 2. Vacuum the Mattress When you start vacuuming, it’s best to do so in a methodical manner. Begin at the top of the mattress and work your way down in overlapping, narrow paths to ensure you’re covering every inch of the surface. This systematic approach helps to make sure no spot is missed, especially since it’s easy to overlook areas that don’t seem dirty at first glance. The sides of your mattress are just as important as the top. Many people forget about this part, but the sides can harbor just as much dust and debris, particularly if you have a bed frame that allows dust to settle from the floor onto the mattress edges. Use the same careful, overlapping strokes here, and don’t rush. It’s these often-ignored areas that can make a significant difference in the overall cleanliness of your bed. Seams and crevices are indeed hotspots for dust and allergens. These areas provide the perfect hiding spots for particles to accumulate undisturbed. When you reach these parts, slow down and use the vacuum’s crevice tool if available. This attachment is specifically designed to get into tight spaces and remove debris that other tools might miss. Sometimes, giving these areas an extra pass or two can lift out dust that’s been compacted over time. If your mattress has any buttons, fabric folds, or embroidery, these are areas where dust can easily be trapped. Carefully vacuum around these decorations, being careful not to damage the mattress. The goal is to remove dust without harming the mattress’s structure or appearance. This vacuuming process not only helps in removing visible dust and particles but also aids in reducing the number of allergens, such as dust mites and pet dander, that can cause nighttime allergies and affect sleep quality. Moreover, removing dead skin cells lessens the food supply for dust mites, contributing to a healthier sleeping environment.     3. Spot Clean Stains When mixing your cleaning solution, it’s important to consider the type of stain you’re dealing with. A general mixture of dish soap and water is a great starting point for most stains, as it’s gentle enough not to damage the fabric but effective enough to tackle light to moderate stains. However, the ratio of soap to water should be low to avoid creating too much suds, which can be difficult to rinse out. A teaspoon of dish soap to two cups of water is a good guideline. For more stubborn stains, such as blood or urine, you might need a different approach. Hydrogen peroxide, for example, can be effective for blood stains, but it should be used sparingly and tested on a small, inconspicuous area of your mattress first to ensure it doesn’t bleach the fabric. Always dab the stain rather than rub, as rubbing can spread the stain further or embed it deeper into the mattress fibers. Applying the cleaning solution should be done with a light hand. Use a clean, white cloth to avoid any color transfer from the cloth to the mattress. Dab the stain gently, working from the outside in to prevent the stain from spreading. Allow the solution to sit for a few minutes to break down the stain, then dab again with a dry cloth to absorb the solution and lifted stain. This may need to be repeated several times for tougher stains. For oil-based stains, such as makeup or greasy food, a solution of baking soda and water can be effective. Make a paste and apply it directly to the stain, letting it sit for 30 minutes to an hour.

5 Simple Steps to Clean Mattress: How to Refresh Your Bed Easily Read More »

Person decluttering room with basket in hand.

How to Declutter Your Home for Spring: A Step-by-Step Guide

It’s not just a time for the flowers to bloom but also the perfect season to Declutter Your Home for Spring, giving it a fresh, vibrant feel. If the thought of tackling this task feels daunting, worry not! I’ve got a step-by-step guide to make decluttering your space as breezy as a beautiful spring day. So, let’s roll up our sleeves and dive in! Step 1: Set Your Goals Starting with the end in mind transforms the process from a daunting task into an exciting journey towards your ideal living space. Think about what you want each room to look like and how you want to feel when you’re in them. Is your goal to create more space in your living room for family activities? Or perhaps you’re aiming to transform your home office into a productivity haven, free from distractions and unnecessary clutter. Understanding your motivation is key. Whether it’s the desire for a serene environment where you can unwind and relax or the need for a functional space that supports your daily activities, your underlying reasons will guide your decluttering efforts and keep you motivated even when the going gets tough. Setting goals that are specific and achievable is also about realism. Acknowledge the time and effort it will take. If you’re juggling a busy schedule, consider setting smaller, more focused goals. Maybe start with decluttering a single drawer or shelf a day. This approach keeps the task manageable and helps build momentum as you see your efforts paying off day by day. Setting goals is also about envisioning a lifestyle. Decluttering is more than just getting rid of things; it’s about making room for what truly matters. By having clear goals, you not only transform your space but also take a step towards the life you want to lead—a life less cluttered with things and more filled with meaning and joy. Step 2: Create a Plan Start by taking a walk through your home, notebook in hand, and assess each room. Note the areas that feel most cluttered and those that simply need a quick tidy. This walkthrough gives you a bird’s eye view of the task ahead, helping you prioritize areas that will make the biggest impact on your daily life once decluttered. Once you’ve identified the key areas to focus on, it’s time to set a timeline. Be realistic about what you can achieve in each decluttering session. For example, sorting through a wardrobe or a bookshelf might take a few hours, while organizing a junk drawer might be done in less than one. Scheduling these sessions into your calendar makes decluttering a part of your routine, rather than a sporadic activity that’s easy to postpone. Consider the rhythm of your week when you plan your sessions. If your energy levels are higher in the morning, schedule decluttering sessions for then. If you’re someone who finds decluttering therapeutic, perhaps an evening session would be a relaxing way to end your day. And about those breaks—don’t underestimate them. Decluttering can be physically and emotionally taxing. Finding mementos or deciding what to part with can stir up memories and emotions. Breaks are not just pauses but moments to reflect, recharge, and celebrate the progress you’ve made. They can be as simple as a cup of tea in your newly organized living space or a walk outside to clear your mind. In your plan, also consider the disposal of items. Knowing in advance where to donate clothes, recycle electronics, or sell valuable items can make the process smoother and prevent piles of discarded items from cluttering up your space post-declutter. Lastly, involve your household in the planning process. Decluttering can affect everyone in the space, and their buy-in can make the journey more enjoyable and less of a chore. Whether it’s assigning tasks or deciding together what stays and what goes, a team effort not only lightens the load but also brings a sense of shared accomplishment.     Step 3: Gather Your Supplies Firstly, consider the types of containers you’ll need for different categories of items. For donations, sturdy bags or boxes that can be easily transported to a charity shop are ideal. For items you plan to sell, you might want clear bins or bags to keep them in good condition and separate from donations or trash. And for those things that have reached the end of their life, have recycling bins and trash bags ready to go. But your toolkit needs more than just containers for sorting. Labeling your boxes and bags can save you a ton of time and confusion later on. Simple sticky labels or a marker pen will do the job. Mark each container with its destination—donate, sell, recycle, or trash—to keep your items organized as you declutter. Cleaning supplies are the unsung heroes of the decluttering process. Once you clear a space, you’ll likely uncover dust and grime that’s been hiding. Have a basic cleaning kit ready with supplies like all-purpose cleaner, dusting cloths, and a vacuum cleaner. This allows you to clean as you go, ensuring that each area is not only decluttered but also sparkling clean. Consider having some maintenance tools at hand. A screwdriver, for example, can help dismantle items that need to be broken down for disposal or recycling. Scissors or a box cutter can open packages or break down cardboard boxes for recycling. For those precious items you decide to keep, having organizing aids like shelf dividers, storage bins, or drawer organizers ready can immediately help you put everything in its right place. Investing in these tools upfront means you won’t delay the final step of organizing your possessions. Step 4: Sort Your Items Sorting through your belongings requires a balance of practicality and sentimentality. While the one-year rule is a solid starting point, there are additional questions you can ask yourself to help with the decision-making process. Consider the item’s usefulness, emotional value, and whether it contributes positively to your living space. If an

How to Declutter Your Home for Spring: A Step-by-Step Guide Read More »