Bronze Pot Care 101: 5 Amazing Tips For Caring For Your Brass Pots And Pans
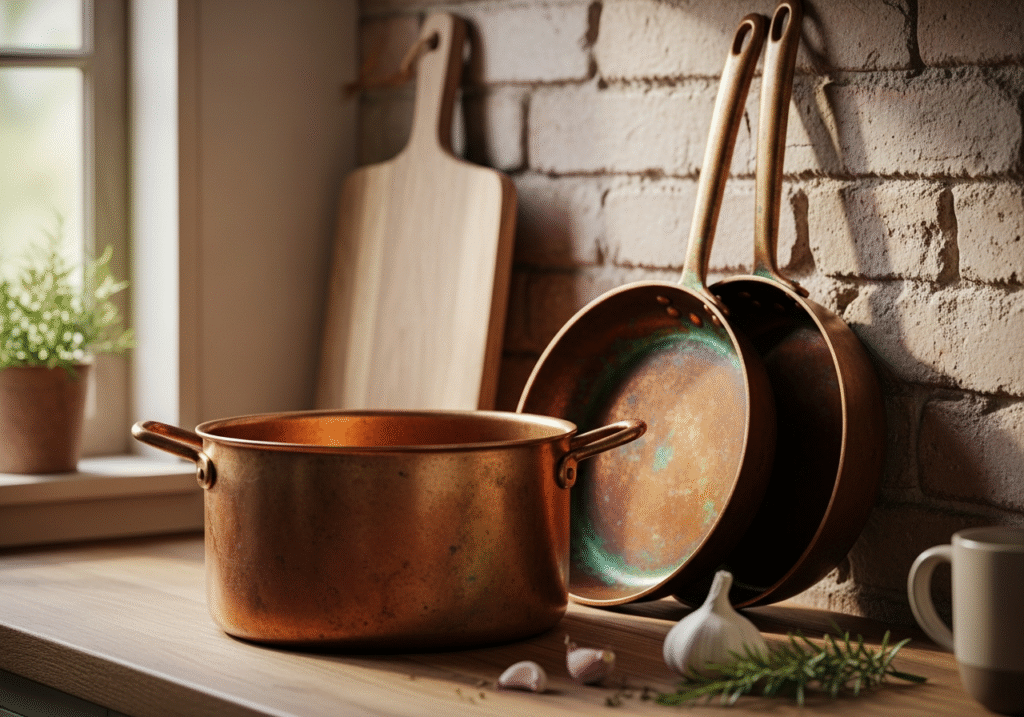
The bronze pot holds a singular, almost mythical place in the history of culinary arts. Long before the advent of stainless steel, aluminum, or non-stick Teflon, bronze was the metal of choice for civilizations ranging from the ancient Vedic societies of India to the kitchens of medieval Europe. Today, amidst a sea of disposable, synthetic cookware, the bronze pot—often referred to as “Kansa” in South Asian traditions—is experiencing a renaissance. This resurgence is not merely driven by nostalgia; it is fueled by a rediscovery of the metal’s unique thermal properties, its reported health benefits, and its undeniable aesthetic gravity. However, owning and cooking with bronze is not a passive experience. It is a relationship. Unlike modern materials designed for convenience and neglect, bronze requires understanding, maintenance, and a respect for chemistry. It is a heavy, lustrous alloy that demands to be treated as an heirloom rather than a utensil. Bronze, Brass, or Copper? To understand the value of the bronze pot, one must first understand its metallurgy. Bronze is an alloy consisting primarily of copper, usually with about twelve to fifteen percent tin, and often small additives of other metals to increase hardness. It is distinct from brass (which is copper and zinc) and pure copper. This combination creates a material that is significantly harder and more durable than copper alone, which is soft and prone to denting. The addition of tin gives bronze a lower melting point than copper but a much higher resistance to corrosion. Visually, it possesses a muted, golden-brown warmth that differs from the brash yellow of brass or the fiery red of copper. This structural integrity means that a bronze pot purchased today is, quite literally, a vessel that can be used by your great-grandchildren. It does not warp, it does not chip, and it does not degrade physically under normal kitchen conditions. The thermal dynamics of bronze are what make it a unique cooking medium. While it does not conduct heat as rapidly as pure copper or aluminum, it possesses immense thermal mass. It retains heat exceptionally well. Once a bronze pot reaches temperature, it holds that energy and radiates it evenly throughout the food. This makes it the supreme vessel for slow cooking, simmering, and “dum” style cooking where food steams in its own juices over low heat. It is particularly revered for cooking rice and boiling milk. In many traditional kitchens, milk boiled in a bronze vessel is said to have a sweeter, richer taste and a thicker texture due to the slow, steady evaporation that the metal facilitates. It prevents the rapid scorching that often happens in thin steel pans, allowing for a gentle caramelization of natural sugars. Acidic Ingredients However, the chemistry of bronze introduces a strict set of rules regarding ingredients. Copper, the primary component of the alloy, is reactive. When it comes into contact with acidic ingredients—tomatoes, vinegar, lemon juice, wine, or tamarind—a chemical reaction occurs. The acid dissolves a small amount of the metal, which can leach into the food. In small quantities, this results in a metallic, bitter taste that ruins the dish. In larger quantities over time, it can lead to copper toxicity. Therefore, unlined bronze pots are strictly reserved for neutral pH cooking: boiling water, making rice, cooking milk-based desserts (like kheer or payasam), or preparing vegetables that do not require souring agents. If one wishes to cook acidic curries or stews in bronze, the pot must be lined with tin, a process known as “kalai.” This thin layer of tin acts as a non-reactive barrier between the food and the bronze. This lining is sacrificial; it wears away over time and must be reapplied by a skilled artisan, a trade that is sadly becoming extinct in the modern world. Beyond the culinary mechanics, the allure of bronze is deeply rooted in wellness traditions, particularly Ayurveda. In this ancient system of medicine, “Kansa” is considered a healing metal. It is believed that eating from bronze plates or cooking in bronze vessels helps to alkalize the food, reducing the acidity in the body and promoting gut health. The metal is thought to possess antibacterial properties—a fact supported by modern science, which recognizes the “oligodynamic effect” of copper alloys to kill bacteria on contact. Water stored in bronze vessels is said to remain fresh and positively charged. While the scientific community debates the extent of these health transfers during the cooking process, the psychological and tactile experience of using bronze aligns with a philosophy of mindful consumption. It forces the cook to slow down, to pay attention to the ingredients, and to engage with the process of nourishment. Aesthetically Pleasing The aesthetic contribution of bronze cookware to a kitchen cannot be overstated. In an era dominated by clinical chrome and black plastic, the presence of a heavy bronze pot on the stove adds a layer of texture and history. It reflects light with a soft, diffuse glow that feels organic and grounding. It transforms the act of serving. Bringing a bronze pot directly to the table makes a statement; it elevates a simple meal into a banquet. The weight of the vessel conveys substance and permanence. However, maintaining this aesthetic is where the true labor of owning bronze lies. Bronze is a living finish. It interacts with the oxygen in the air and the moisture in the kitchen to develop a patina. The maintenance of bronze is the primary reason many home cooks shy away from it. It is not dishwasher safe. Placing a bronze pot in a dishwasher is a catastrophic error. The harsh, abrasive detergents and the high-heat humidity will strip the metal of its luster instantly, turning it a dull, lifeless grey and potentially pitting the surface. Bronze must be washed by hand, and even then, it requires more than just soap and water. Over time, bronze oxidizes, turning dark brown or developing greenish spots known as verdigris. While a uniform dark patina is often prized by collectors for its antique look,
Bronze Pot Care 101: 5 Amazing Tips For Caring For Your Brass Pots And Pans Read More »