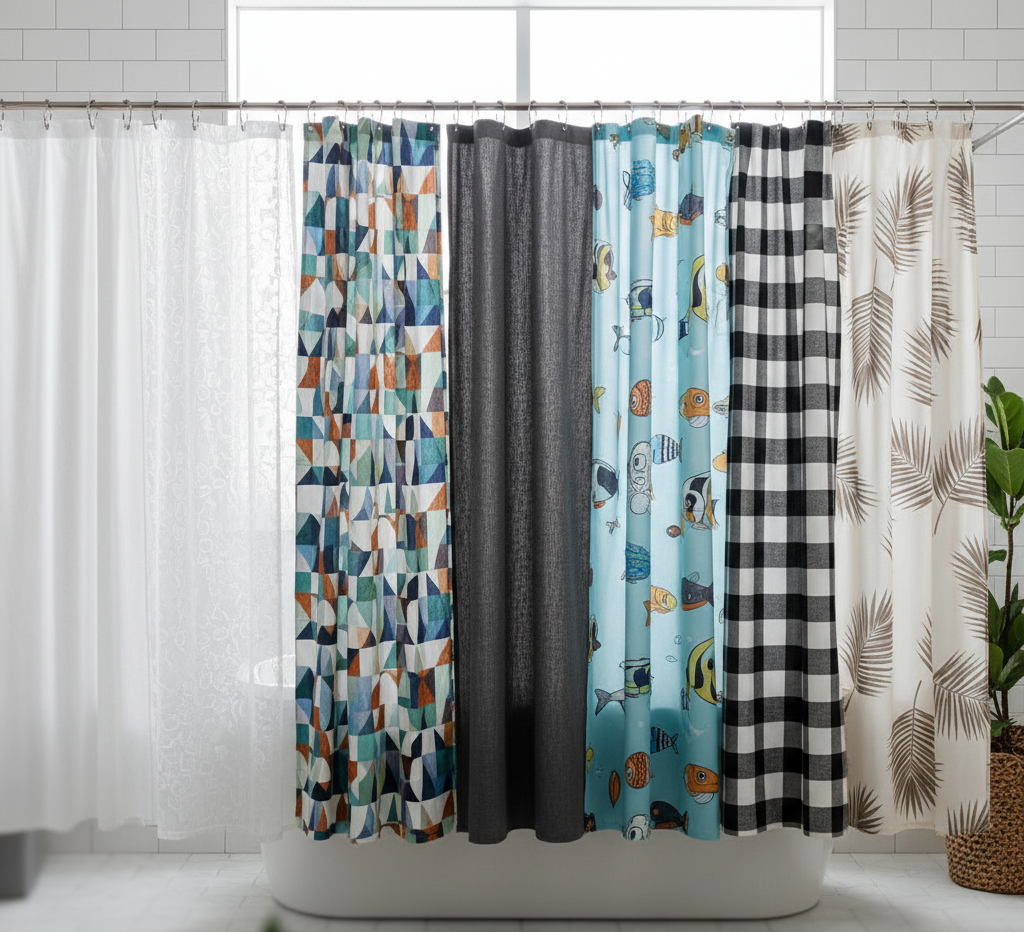
Cleaning Guide

salt on recipient

6 Tips On The Benefits Of Salt For Cleaning – You Need To Know

This common kitchen staple, salt, extends its utility far beyond seasoning food. Its inherent properties make it a surprisingly effective and economical cleaning agent for various household tasks. From scrubbing surfaces to neutralizing odors, and tackling stubborn stains, this inexpensive compound offers a natural alternative to many commercial cleaners, often with fewer harsh chemicals. The granular nature of salt, combined with its chemical characteristics, provides a multifaceted approach to maintaining a cleaner home environment. 1.The Power Of Salt  One of the most straightforward benefits of this common mineral in cleaning lies in its abrasive nature. The crystalline structure of the granules provides a gentle yet effective scouring action, suitable for tackling grime on various surfaces without being overly harsh like some chemical scouring powders or steel wool, which can damage more delicate materials. For instance, caked-on food remnants on pots and pans, especially those made of stainless steel, enamel, or even some non-stick surfaces (when used carefully as a paste), can often be loosened. Creating a paste with the crystalline substance and a little water allows for targeted scrubbing. Alternatively, directly sprinkling the granules onto the affected area and scrubbing with a damp sponge, brush, or even a halved potato can dislodge stubborn residues. This method is particularly useful for materials that might be scratched by more aggressive abrasives. Coarse varieties of this kitchen staple, like kosher or sea variants, offer more pronounced scrubbing power for tougher jobs, while finer table versions can be used for more delicate applications. Kitchen sinks, especially those made of stainless steel or porcelain, can be brightened and cleaned by scrubbing with these white crystals. A mixture of the salt with lemon juice or white vinegar can enhance this cleaning power. The acidity of the liquid helps to dissolve grease, hard water stains and mineral deposits, while the abrasive particles do the physical cleaning, removing loose dirt. This combination not only cleans but also leaves a fresh scent. Even stubborn coffee or tea stains inside mugs and pitchers can be easily scrubbed with a damp cloth soaked in the cleaner. Beyond the kitchen, this abrasive quality also helps to remove dirt from tile grout. A paste applied to the grout lines and scrubbed with an old toothbrush can significantly improve their appearance. For oven spills, once they cool, a generous application of the granules can absorb some of the dirt, and then the abrasive action helps to scrub away the burnt-on residue, often minimizing the need for harsh oven cleaners. Care must be taken with highly polished or delicate surfaces, and it’s always advisable to test on an inconspicuous area first, but for many common cleaning challenges that require a little effort, readily available salt offers a reliable option. 2.Absorbs Spills  The hygroscopic nature of salt, meaning its ability to attract and hold water molecules from its surroundings, makes it an excellent first response for various spills, particularly liquids. When accidents happen, such as knocking over a glass of red wine on a carpet or upholstery, quick action with the kitchen staple can significantly mitigate the stain. By generously covering the fresh spill with a thick layer of the white crystals, they will begin to draw the liquid out of the fibers through osmosis. The absorbent material should be left to sit for a period, sometimes several hours or until it appears to have absorbed the maximum amount of moisture, often changing color as it does so. Once the substance has done its work, it can be vacuumed up. This method is effective because it physically removes much of the staining agent before it has a chance to fully set and bond with the fibers. The quicker the application, the more effective it tends to be. The same principle applies to greasy spills. If oil, butter, or a fatty sauce splatters on the floor, a countertop, or even some fabrics, covering it with the granular cleaner can help absorb the grease. The particles wick the oil into themselves, making the remaining residue easier to wipe or scrape away. For fabric, after this initial treatment, any remaining discoloration might require further spot cleaning, but the initial damage will likely be far less severe. This absorbent property is also why this compound is sometimes used in homemade desiccant packs to reduce humidity in small, enclosed spaces like closets or drawers, helping to prevent mustiness, though its capacity is limited compared to commercial desiccants like silica gel. For liquid spills on hard surfaces that might spread, creating a border with the granules can help contain the spill before covering it entirely. 3.Deodorizers  In addition to its visual cleaning ability, table salt can also be a powerful ally in neutralizing unwanted odors around the home. Its ability to absorb moisture, which often harbors and encourages the growth of odor-causing bacteria and mold, contributes significantly to this effect. For example, a smelly refrigerator can benefit from an open container or small bowl of the mineral; the salt crystals will gradually absorb the strange odors from food and excess moisture that can contribute to a smelly environment. This principle is similar to using baking soda, but offers an alternative if baking soda is not available or if you prefer to use this more readily available item. Drains, which can often be sources of unpleasant odors due to the accumulation of organic matter, grease, and soap scum, can be deodorized. Pouring a strong solution of the granules dissolved in hot water down the drain, or a mixture of the dry crystals followed by hot water, can help break down some of the grease and deodorize the pipes. Adding baking soda and vinegar to the mixture can create an effervescent action that further helps remove buildup. Cutting boards, especially wooden ones that can absorb juices and strong odors from foods like onions, garlic, and fish, can be effectively deodorized. Scrubbing them with coarse crystals, possibly moistened with a little lemon juice for added antibacterial effect and a fresh scent, can lift food particles from

6 Tips On The Benefits Of Salt For Cleaning – You Need To Know Read More »

summer cleaning woman

Preparing for Summer Cleaning – 6 Easy Steps

Before you begin your summer cleaning, certain preparations can make the entire process smoother, more efficient, and considerably less intimidating. Systematically tackling these preliminary steps turns a potentially overwhelming task into a series of manageable actions, setting you up for success and a refreshingly clean home. 1.Four Box Method The first and most impactful step is to thoroughly declutter. Unnecessary items not only take up valuable floor space, but they also collect dust, harbor allergens, and make cleaning around them more time-consuming and time-consuming. Embark on a systematic journey through your home, tackling it room by room, or perhaps by specific categories, such as clothes, books, papers, kitchen utensils, old electronics, or miscellaneous items. For each item, make a conscious decision: will you keep it, donate it, sell it, or discard it? Consider adopting a method like the “Four Box Method”—labeling boxes Keep, Donate/Sell, Trash, and Relocate (for items that belong in another room). Reducing the bulk of your possessions means less stuff to clean, move, and organize. This fundamental act immediately simplifies all subsequent cleaning steps, creating a more open, airy, and accessible space that’s conducive to thorough cleaning. Think of organization as the essential foundation that lightens the load for all future cleaning efforts—not just for summer cleaning, but for ongoing maintenance as well. The mental clarity and sense of calm that an organized space provides are also significant benefits, making your home feel more peaceful. 2.Start Your Summer Cleaning Once your spaces are significantly cleaner, it’s a good idea to develop a detailed, well-thought-out plan. This isn’t just a vague idea of ​​what needs to be cleaned; it’s a concrete roadmap for your summer cleaning. Identify all the specific areas and tasks you plan to tackle during your summer cleaning. This could include deep cleaning kitchen appliances like the oven and refrigerator, washing windows and drapes, scrubbing floors and baseboards, cleaning light fixtures and ceiling fans, or tackling outdoor spaces like patios, decks, or porches. List these tasks meticulously. You can organize them by room (e.g., all kitchen tasks, then all bathroom tasks) or by type of activity (e.g., dusting, vacuuming, and mopping). Having a clear, written checklist provides essential direction, helps you visually monitor progress (which is very motivating), and ensures that no important areas or tasks are inadvertently forgotten. A structured approach avoids the common feeling of being overwhelmed and allows for a more focused, efficient effort in your summer cleaning. This planning phase is crucial for visualizing the full scope of work for your summer cleanup, allowing you to allocate resources, including time and energy, more effectively. You can even prioritize tasks, deciding which ones will have the greatest impact or which ones are most urgent for your cleanup. 3.Accessories And Supplies With your comprehensive cleaning plan in place, the next logical step is to gather all the cleaning supplies and tools you’ll need for your summer cleanup. Take a complete inventory of your current supply of cleaning products, disinfectants, cloths, sponges, brushes, and any specialized equipment, such as vacuum cleaners with all their attachments, mops, buckets, or steam cleaners. Make a detailed list of everything that’s missing, low on supplies, or items that need replacing (such as old, ineffective sponges or worn-out mop heads). Purchase these items before you begin cleaning. Having everything readily available will prevent frustrating interruptions and help you keep the momentum going once the cleaning process begins. Most importantly, make sure your tools are in good working order: empty vacuum cleaner bags or containers, clean or replace filters, make sure mop heads are clean and fresh, and spray bottles are working properly. This preparatory step ensures that when you set aside time for your summer cleaning, you can proceed smoothly and efficiently without unnecessary delays or trips to the store. Consider whether you prefer commercial cleaning products or if you want to use more natural or homemade solutions like vinegar and baking soda for your cleaning, and make sure you have these ingredients on hand. 4.Make Your Own Pace Consider carefully how you will allocate time for your summer cleaning project. Breaking the overall summer cleaning endeavor into smaller, more manageable chunks can be highly effective and less daunting. You can dedicate specific days or weekends to certain rooms or specific types of tasks for your summer cleaning. For example, one Saturday morning could be dedicated to deep cleaning the kitchen, while another afternoon could be dedicated to washing all the windows in the house. Alternatively, you could take a “little and often” approach, dedicating 30 to 60 minutes each day to tackling one or two items on your summer cleaning checklist. Scheduling these time blocks into your existing calendar, just like any other commitment, helps you integrate summer cleaning into your routine without it becoming an all-consuming endeavor that disrupts your entire life. This approach also helps you maintain your energy levels and thoroughness for each individual task, preventing burnout. Be realistic about how long certain cleaning tasks will take; it’s usually better to overestimate a little. Fitting your summer cleaning into your current schedule, rather than trying to overhaul your entire routine to do so, leads to greater consistency and a higher likelihood of completion. 5.Protection Before you apply any cleaning products or start scrubbing or washing heavily, prepare the actual spaces you’ll be working in for your summer cleaning. Ensure good ventilation by opening windows and, if necessary, using fans to circulate the air, especially if you’ll be using strong-smelling cleaning solutions or chemicals while cleaning. This is especially important during the warmer summer months, when indoor air can become stagnant and fumes can build up. Protect furniture, floors, or delicate items that aren’t being cleaned by covering them with old sheets, drop cloths (canvas is durable, plastic protects against spills), or plastic sheeting. If possible and practical, move smaller pieces of furniture out of the area temporarily. Clearing walkways and ensuring that you have safe, unobstructed access to all areas you plan to clean

Preparing for Summer Cleaning – 6 Easy Steps Read More »

4 Easy Home Deep Cleaning Tips You Need to Try

Home deep cleaning represents a far more comprehensive and intensive approach to household cleanliness than routine or daily tidying. While regular cleaning maintains a surface level of order, deep cleaning delves into the accumulated dirt, stubborn grime, pervasive bacteria, and hidden allergens that build up over time in every part of a home. It is a methodical process designed to sanitize and refresh spaces from top to bottom, reaching beyond the immediately visible to address areas often overlooked. This type of cleaning aims not just for visual appeal but to restore a home to its optimal hygienic condition. It involves meticulous attention to detail, often requiring significantly more time, focused effort, and the use of specialized cleaning agents and equipment compared to standard upkeep. The goal is to systematically eliminate layers of dust, grease, soap scum, limescale, and other residues that can compromise both the appearance and the healthfulness of a living environment. 1.Home Deep Cleaning – Kitchen   A home environment stands to gain substantially from periodic, thorough home deep cleaning. Over months and seasons, dust particles, pet dander, pollen, mold spores, and various pathogens can settle and multiply in hard-to-reach places like behind furniture, within carpet fibers, on high ledges, and in air vents. These hidden accumulations can degrade indoor air quality, potentially triggering or exacerbating allergies, asthma, and other respiratory conditions. Home deep cleaning directly targets and removes these reservoirs of contaminants, contributing to a healthier atmosphere for all occupants. Beyond health implications, this intensive cleaning also plays a crucial role in home maintenance. By removing corrosive substances like grease build-up in kitchens or hard water stains in bathrooms, home deep cleaning helps preserve the integrity and extend the lifespan of fixtures, surfaces, and appliances. A deeply cleaned home offers an enhanced sense of comfort and well-being, transforming the living space into a more pleasant, sanitary, and genuinely revitalized sanctuary. This can also be a factor in preventing pest infestations by removing food sources and disturbing potential hiding spots.   Numerous situations and life events make a professional home deep cleaning service particularly beneficial. Seasonal transitions, notably spring and autumn, are common triggers as individuals look to refresh their homes after a long winter or prepare for increased indoor living as temperatures drop. Before hosting significant events, such as holiday gatherings, family celebrations, or important social functions, a deep clean ensures the home is impeccably presentable and welcoming. Conversely, after such events, a deep clean helps restore order and cleanliness. Moving is another prime occasion; cleaning an old residence thoroughly before vacating or ensuring a new home is sanitized and fresh before moving in is standard practice. Properties being prepared for sale or rental greatly benefit from home deep cleaning to enhance their appeal to potential buyers or tenants. Post-renovation or construction work, a specialized deep clean is essential to remove fine dust, debris, and construction residues that settle everywhere. Furthermore, many homeowners integrate home deep cleaning into their annual or semi-annual maintenance schedule as a proactive measure to maintain a consistently high standard of cleanliness and hygiene, even without a specific event prompting it. Observable signs like persistent musty odors, visible dust build-up in corners or on less-disturbed surfaces, or a general feeling that the home isn’t truly clean despite regular efforts also indicate it’s time for a deep clean. Home deep cleaning services are characterized by their meticulousness and comprehensive scope, designed to address areas that routine cleaning simply cannot cover effectively. While the exact checklist can vary between providers and can often be customized, a typical comprehensive service will dedicate focused attention to all rooms. In the kitchen, deep cleaning is particularly intensive due to grease, food particles, and potential bacteria. This usually involves cleaning the interior and exterior of major appliances. Ovens are degreased inside and out, including racks and doors. Microwaves are cleaned internally and externally. Refrigerators are cleaned on the outside, and often the inside if requested and emptied, including shelves and drawers. Dishwasher exteriors are wiped, and sometimes an internal cleaning cycle is run. Range hoods and their filters are thoroughly degreased. Cabinet exteriors are wiped down to remove fingerprints, food splatters, and grease accumulation; interior cabinet cleaning may also be included if they are empty. Sinks, faucets, and fixtures are descaled, cleaned, and polished to remove water spots and build-up. Countertops and backsplashes are cleaned and sanitized, with specific attention paid to grout lines to remove discoloration and grime. Floors, including edges, corners, and under movable appliances, are scrubbed or mopped meticulously. Even small appliances’ exteriors and accessible areas around them receive attention. 2. Mold, Hard Water And Dust? No! Bathrooms, being high-moisture areas prone to mold, mildew, and soap scum, undergo rigorous sanitization. Showers and bathtubs, including walls, doors, and tracks, are scrubbed intensively to eliminate soap scum, hard water deposits, and any signs of mildew. Toilets are disinfected thoroughly, both inside the bowl and all exterior surfaces, including the base and the floor area surrounding it. Sinks, vanities, and countertops are cleaned, sanitized, and polished. Mirrors are cleaned to achieve a streak-free finish. Tiles and grout on both floors and walls are scrubbed to remove build-up and restore brightness. Light fixtures, exhaust fans, and vents are dusted or wiped down to remove accumulated dust and improve air circulation. Faucets, showerheads, and other chrome fixtures are often descaled and polished. Living areas, dining rooms, and bedrooms are also given detailed treatment. All surfaces are thoroughly dusted, encompassing high areas such as ceiling fans (blades and fixtures), light fixtures, picture rails, and curtain rods, as well as often-neglected low areas like baseboards, skirting boards, and electrical outlet covers. Furniture is typically vacuumed, including under cushions, and if feasible, moved to allow cleaning underneath and behind. Upholstery may receive more detailed vacuuming, targeting crevices. Window sills, ledges, tracks, and frames are wiped clean of dust and grime. Cobwebs are carefully removed from ceilings, corners, and light fixtures. Interior windows (glass and frames) and mirrors throughout these rooms are cleaned.

4 Easy Home Deep Cleaning Tips You Need to Try Read More »

Very dirty gutter

Gutter Cleaning In 3 Steps – You Should To Know

Effective gutter cleaning starts with selecting the right tools. For a thorough cleaning, make sure you have a sturdy ladder. The ladder should be tall enough to safely reach the gutters without straining. Always prioritize safety. You’ll also need heavy-duty, waterproof gloves to protect your hands from the sharp debris and bacteria that are often encountered during cleaning. A gutter shovel or small, sturdy garden spade is essential for removing leaves, twigs, mud, and even snow. These tools make the physical act of cleaning much easier. Have a bucket ready to collect debris, or lay a tarp on the ground beneath your work area to catch any debris that falls. A garden hose fitted with a spray nozzle is crucial for removing fine particles and testing the flow after the main cleaning. Safety glasses are essential to protect your eyes from falling debris or splashing water during the process. For stubborn clogs, a plumber’s snake or flexible auger can be a very useful addition to your arsenal. Having all of these items ready before you begin will speed up the job. 1.Safety First Proper ladder safety is essential before performing any gutter cleaning. Position your ladder on firm, level ground. If the ground is uneven, use a ladder leveler or sturdy boards to create a stable base. Never place a ladder on wet or slippery surfaces. When extending the ladder for cleaning, make sure it reaches at least three rungs above the roof line or gutter lip for safe access. Always maintain three points of contact with the ladder when climbing or working—two feet and one hand, or two hands and one foot. Avoid reaching too far to the side while cleaning; it is much safer to climb down and replace the ladder frequently. This may seem time-consuming, but it significantly reduces the risk of falls, which are a serious hazard when cleaning gutters. Let someone know that you will be cleaning, especially if you are working alone. A properly positioned and safely used ladder is the foundation of any successful, injury-free gutter cleaning task. Start your gutter cleaning by removing the largest debris. It’s usually most effective to start near the outlet of a gutter. This allows you to clear a path for water if you decide to flush during the process, though removing large amounts usually comes first. Using your gutter shovel or trowel, begin removing leaves, twigs, pine needles, gravel, and any other accumulated solids. Work in manageable sections along the gutter. Deposit the removed debris directly into the bucket or onto the tarp spread below. This initial step of the cleaning can be messy, which is why gloves are so important. Pay close attention to areas where debris tends to accumulate, such as valleys or corners of your gutter system. Removing this bulk material consistently is the crux of the gutter cleaning process and will make subsequent steps easier. This part of the cleaning prevents larger items from being pushed into and clogging your gutters. 2.Cleaning Gutters With Water? Once the bulk of the debris has been removed, grab your garden hose, fitted with a spray nozzle, and start at the end of the gutter furthest from a downpipe. Direct a stream of water into the gutter, working toward the downpipe. This flushing action will remove any remaining smaller particles, mud, and grit that your shovel may have missed during the initial phase. Watch the flow of water carefully. If the water pools or backs up, this indicates a blockage further along the gutter or in the downpipe itself. This flushing step of gutter cleaning not only clears the channels, but also serves as an excellent diagnostic tool for identifying problem areas that require more focused attention. A strong, consistent flow toward and into the downpipe signifies a successful cleaning for that section. Checking and clearing your downpipes is an essential part of a thorough gutter cleaning. If, during the flushing step, you notice that water is not draining properly through a downpipe, it is almost certainly clogged. Start by trying to clear the downpipe from top to bottom with a concentrated spray of water from the hose. Sometimes the force of the water is enough to clear the clog. If this does not work, try inserting the hose into the bottom opening of the downpipe and spraying upward. This can sometimes clear the pipe from below. For more stubborn blockages found during gutter cleaning, a plumber’s snake or auger can be carefully inserted from top to bottom or bottom to top into the downpipe to break up or remove compacted debris. In severe cases, it may be necessary to disassemble sections of the downpipe, especially at elbow joints, where clogs often form. Ensuring that your downpipes are clear is vital, as a clogged downpipe renders all your efforts ineffective. 3.Benefits After the primary gutter cleaning and flushing are complete, conduct a thorough inspection of your gutters and downspouts. Look closely for any signs of damage. Check for cracks, holes, or areas of rust, particularly in older metal gutters. Ensure that all gutter sections are securely fastened to the fascia board and that there is no sagging, as sagging can cause water to pool and not drain correctly, defeating the purpose of gutter cleaning. Examine the seams between gutter sections and at the end caps for any leaks. Inspect the downspouts to ensure they are firmly attached to both the gutter outlet and the house, and that they extend far enough away from your home’s foundation to direct water appropriately. This post-gutter cleaning inspection can help you identify minor issues before they become major, costly repairs, extending the life of your gutter system and the benefits of your gutter cleaning. Finally, establish a schedule for regular gutter cleaning. The frequency of gutter cleaning depends largely on your home’s surroundings. As a general rule, gutter cleaning should be performed at least twice a year: once in the late spring after trees have shed their seeds and

Gutter Cleaning In 3 Steps – You Should To Know Read More »

dry leather

5 Tips for Caring for Dry Leather That You Need to Know to Make It Last Longer

Dry Leather requires specific care to maintain its appearance and longevity. As a natural material derived from animal hides, its unique structure is sensitive to conventional cleaning methods. Different types of leather, such as full-grain, top-grain, suede, or nubuck, possess distinct characteristics that influence how they react to cleaning agents and processes. The porous nature of leather means it can readily absorb liquids, oils, and dirt, which can become embedded within its fibers. If not cleaned correctly, leather can suffer irreversible damage, becoming dry leather that is prone to cracking, discoloration, stiffness, or loss of its natural texture. Understanding these inherent properties is fundamental to appreciating why specialized cleaning approaches are necessary for its upkeep and to avoid the problems associated with dry leather. 1.Why does dry leather require care? The primary reason leather often necessitates dry cleaning is its adverse reaction to water and common detergents. Water can strip leather of its essential natural oils. These oils are crucial for keeping the material supple, flexible, and resilient. When these oils are depleted, the material becomes dry leather, brittle, and prone to cracking. Furthermore, water can cause unsightly stains, spotting, and even color bleeding, particularly on leathers that are unfinished or have minimal protective coatings, often leading to a dry leather appearance. Many detergents used in standard laundry practices are too alkaline or contain harsh chemicals that can damage the leather’s finish, strip its dyes, and further deplete its natural emollients, accelerating the transformation into dry leather. The physical agitation from a washing machine can also be detrimental, potentially distorting the shape of leather garments, causing stretching, or damaging seams and structural components. Dry cleaning, in contrast, utilizes solvents that clean effectively without the damaging effects of excessive moisture, offering a gentler yet thorough cleaning solution tailored to leather’s sensitivities and preventing the onset of dry leather. The professional leather dry cleaning process is a multi-stage operation that requires expertise and specialized equipment. It begins with a thorough inspection. A trained cleaner examines the leather item meticulously, identifying the type of leather, its construction, any pre-existing damage including signs of dry leather, the nature of visible stains, and the presence of any embellishments like buttons, zippers, or decorative elements that might require special attention or removal. A crucial part of this initial assessment is a colorfastness test, typically performed on an inconspicuous area of the item to ensure the cleaning process will not cause adverse color changes. Specific stains, such as those from ink, oil, food, or beverages, are noted and may undergo pre-treatment. This involves the careful application of specialized spotting agents formulated for use on leather. The choice of agent and application technique is critical to lift the stain without harming the leather’s surface or color, or worsening any existing conditions like dry leather. 2.Hydrocarbon solvents Following inspection and any necessary pre-spotting, the item moves to the cleaning phase. Leather dry cleaning utilizes specific solvents designed to dissolve and remove grease, oils, and general soiling. While traditional dry cleaning solvents like perchloroethylene (perc) have been used, the industry is increasingly shifting towards newer, more leather-friendly alternatives. Hydrocarbon solvents, for example, are generally considered gentler and pose less risk of causing color loss, shrinkage, or damage to the leather’s delicate finish, which is especially important for items already showing signs of becoming dry leather. These solvents clean effectively without relying on water, thus bypassing the issues associated with aqueous cleaning methods. The actual cleaning takes place in specialized dry cleaning machines. These machines are distinct from domestic washing machines and are designed to handle delicate materials. The cleaning cycles are carefully controlled in terms of solvent temperature, mechanical action (tumbling), and duration. Settings are often optimized specifically for leather to minimize stress on the material. To prevent issues like dye transfer or abrasion from other garments, leather items are typically cleaned separately or with other similar leather pieces. The machine gently agitates the garments in the solvent, which lifts the dirt and oils. After the cleaning cycle, the solvent is drained, and the items go through an extraction phase to remove most of the residual solvent, followed by a carefully controlled drying process designed to avoid making the material dry leather. 3.Steam clean Post-cleaning care is perhaps the most critical stage in professional leather dry cleaning and significantly differentiates it from standard fabric dry cleaning. The cleaning process, even with gentle solvents, can remove some of the leather’s natural oils. To counteract this, and to prevent the material from becoming dry leather, a re-oiling or “fatliquoring” step is essential. Specialized oils, conditioners, and fatliquors are applied to the leather. These products penetrate the fibers, replenishing lost moisture and emollients, thereby restoring the leather’s suppleness, flexibility, and characteristic feel. Without this step, the material becomes dry leather, which is stiff and more susceptible to cracking over time. After re-oiling, further finishing processes may be undertaken. This can include measures to restore or even out color if any minor fading has occurred, though significant color restoration is a more specialized service. Protective finishes might be reapplied to enhance resistance to future soiling and moisture, further safeguarding against conditions that lead to dry leather. The item is then professionally pressed or steamed to restore its original shape, remove wrinkles, and improve its overall appearance. The techniques used for pressing leather are different from those for fabrics, often involving lower temperatures and specialized equipment to avoid damaging the surface, especially if it’s delicate or prone to becoming dry leather. For certain types of smooth leather, a glazing process might be employed to restore a high-gloss finish. The entire process ensures the leather is not only clean but also properly conditioned and finished to look its best and to prevent it from turning into dry leather. 4.Professional leather dry A wide variety of leather items are suitable for professional dry cleaning. Common examples include leather jackets, coats, and vests, which are frequently exposed to the elements and daily wear that can lead to dry leather if not maintained. Leather trousers, skirts, and dresses also benefit from this

5 Tips for Caring for Dry Leather That You Need to Know to Make It Last Longer Read More »

5 Best Tips To Keep Your Pet’s Area Clean And Odor-Free

Cleaning your pet’s area brings joy, companionship and a unique atmosphere to your life.. Of course, your pet also brings its own set of cleaning concerns—from loose fur and paw prints to the specific needs of their dining and bathroom areas. The goal isn’t just to deal with the mess, but to create a healthy, comfortable, and enjoyable environment for all family members, whether they have two or four legs. 1. Fundamental routines The foundation of a consistently clean, pet-friendly home lies in establishing clear routines and carefully designated zones for your pet’s main activities. Pets, like humans, often thrive on predictability, and a regular cleaning routine not only tackles messes as they occur, but also prevents them from escalating into larger, more daunting tasks. This routine naturally encompasses daily actions such as a quick sweep or vacuum of high-traffic pet areas, wiping down the perimeters of food bowls, and, for cat owners, the crucial daily cleaning of the litter box. In addition to these immediate daily needs, a weekly routine should include more thorough cleanings such as washing your pet’s bedding, vacuuming more deeply under furniture where hair tends to accumulate, and thoroughly cleaning food and water bowls. Periodically, perhaps monthly, even more intensive tasks such as deep cleaning carpets or washing pet toys should be incorporated. Concurrent with establishing these routines is the importance of thoughtfully designating specific areas within your home for your pet’s core activities. This means creating an intentional space for feeding, a comfortable and secure spot for sleeping, and a consistent location for elimination. For cats, this typically involves strategically placing their litter box in a quiet, accessible, yet somewhat private location. For dogs, especially puppies or those who use indoor potty pads, having a clearly defined potty spot is essential. The advantage of such designated zones is multifaceted. It helps to contain the inevitable messes associated with these activities – stray kibble, water splashes, litter scatter, or an occasional accident – to more manageable and predictable areas. This targeted approach makes cleaning more efficient and less overwhelming. Furthermore, the selection of materials within these zones can significantly impact ease of cleaning. Opting for pet bedding with removable, machine-washable covers, choosing food and water bowls made from non-porous, easily sanitized materials like stainless steel or ceramic, and selecting litter boxes that are simple to scrub and disinfect all contribute to a more hygienic environment with less intensive cleaning effort. This initial stage of thoughtful planning and routine-building lays a crucial foundation upon which all other cleaning efforts will more effectively rest.     2. Hair, Dandruff and Paw Marks One of the most ubiquitous challenges faced by pet owners is the relentless presence of pet hair and dander, along with the inevitable paw prints that chart their adventures through our homes. Effectively managing these elements is a continuous process, but with the right approach, it becomes a manageable part of maintaining a clean environment. Regular and thorough vacuuming stands as the primary defense. A vacuum cleaner with strong suction power, ideally one designed with pet owners in mind, can make a significant difference. Features such as effective beater brushes for carpets, specialized upholstery attachments, and a good quality filtration system, like a HEPA filter, can help capture not only visible hair but also finer dander particles that can contribute to allergies. Your vacuuming efforts should encompass all surfaces where hair accumulates – carpets and rugs will require slow, overlapping passes, while hard floors benefit from an attachment that prevents hair from scattering. Don’t overlook upholstery, as sofas and armchairs are often favorite lounging spots for pets. Beyond vacuuming, other methods can be employed to tackle pet hair on fabrics and surfaces. Simple tools like lint rollers are invaluable for quick touch-ups on clothing and furniture. A slightly dampened rubber glove, when wiped across upholstery, can create friction that miraculously gathers embedded fur into clumps for easy removal. For hard surfaces where dust and hair settle, microfiber cloths are excellent at trapping particles rather than just pushing them around. The battle against dander also extends to the air itself. Using an air purifier, particularly one equipped with a HEPA filter, in rooms where your pet spends a lot of time can help to significantly reduce airborne allergens and fine hairs, contributing to a fresher feeling home. And while our focus is on cleaning the environment, it’s worth acknowledging that regular grooming of your pet – consistent brushing to remove loose fur before it sheds onto your floors and furniture – is a powerful preventative measure that complements your cleaning efforts. Similarly, keeping a mat and a towel near entry points to wipe paws after outdoor excursions can drastically reduce the amount of dirt and mud tracked into the house, simplifying your floor cleaning tasks. 3. Food and Water The area where your pet eats and drinks is a critical zone for maintaining hygiene, not only for the cleanliness of your home but, more importantly, for the health and well-being of your pet. Food and water bowls can quickly become breeding grounds for bacteria if not cleaned regularly and properly. It is a good practice to wash food and water bowls daily. Warm, soapy water is generally sufficient for this task, ensuring all food residue and biofilm are scrubbed away. Stainless steel, ceramic, or glass bowls are often recommended as they are non-porous and easier to sanitize thoroughly compared to some plastic alternatives, which can develop scratches that harbor bacteria. After washing, rinse them well to remove any soap residue. Protecting the floor around the feeding station is also a wise measure. Pets can be enthusiastic, and sometimes messy, eaters and drinkers. Placing an easy-to-clean placemat or a shallow tray beneath their bowls can catch stray kibble and water splashes, preventing them from soiling your floor or carpet. These mats should also be wiped down or washed regularly. Any spills that occur around the feeding area should be addressed promptly. Dried-on food can be difficult

5 Best Tips To Keep Your Pet’s Area Clean And Odor-Free Read More »

5 Expert Tips for Cleaning With Hot Water At Home

The Power of Hot Water I’m highlighting one of the most fundamental yet profoundly effective allies in our quest for cleanliness: plain, unadulterated hot water. In our modern world, filled with a variety of specialized cleaning solutions and devices, it’s easy to overlook the sheer effectiveness of this readily available resource. Yet for generations, hot water has been the foundation of effective cleaning, and its power remains undiminished. Today, we’re going to delve into the remarkable benefits of incorporating hot water into our cleaning routines, exploring how its thermal energy works to break down dirt, improve hygiene, and ultimately make the task of maintaining a sparkling home significantly easier and more satisfying. The cleaning magic of hot water isn’t just an old wives’ tale; it’s rooted in basic principles of physics and chemistry. When water is heated, its molecules gain energy and move much more quickly. This increased molecular activity translates directly into increased cleaning power. These energized water molecules are better able to break the bonds that hold dirt, grease, and other residues to surfaces. They can penetrate dirt more effectively, loosening its grip and making it much easier to wipe or rinse away. Additionally, hot water often works to reduce the surface tension of the water itself, allowing it to spread more evenly and wet surfaces more thoroughly, which in turn helps cleaning agents, if used, work more effectively. Understanding this fundamental action helps us understand why hot water is not just a preference, but often a necessity for achieving a deep, satisfying clean. Let’s consider its application in the heart of the home, the kitchen, where some of the most challenging cleaning tasks reside. Think of a sink full of greasy dishes after a hearty meal. Attempting to tackle this with cold water can be a frustrating, smeary affair. Introduce hot water, however, and the scenario changes dramatically. The elevated temperature begins to liquefy fats and oils almost immediately, allowing them to be more easily emulsified by dish soap and rinsed away cleanly. The same principle applies to greasy stovetops, oven doors splattered with cooking residues, or countertops where oily spills have occurred. Hot water, often combined with a suitable degreasing agent, dramatically reduces the amount of physical effort – the scrubbing and scraping – required to lift these stubborn substances, leaving behind surfaces that are not only visibly clean but also feel less tacky to the touch. Even the kitchen sink itself, prone to a build-up of food particles and greasy films, benefits immensely from a regular wash and rinse with hot water, helping to keep drains clearer and the basin more hygienic. 2. Moving to the bathroom, another area where hygiene is paramount, hot water continues to prove its worth. Soap scum, that resilient film left behind by soap and hard water minerals, can be particularly stubborn on shower doors, tiles, and bathtubs. Hot water helps to soften and dissolve these deposits, making them more susceptible to removal by bathroom cleaners or even a simple scrubbing with a non-abrasive pad. When cleaning toilets, while specialized cleaners are often used in the bowl, wiping down the exterior surfaces with hot water and a disinfectant can contribute to a more thorough sanitization. For bathroom floors, mopping with hot water not only helps to lift dirt and footprints but also contributes to a faster drying time, reducing the chance of slips and leaving the room feeling fresher overall. The steam generated by hot water during a shower can even play a small role in loosening grime on surrounding surfaces, making them a bit easier to wipe down afterwards.   3. The benefits of hot water extend significantly to our laundry routines. Most laundry detergents are formulated to perform optimally in warm or hot water. The heat helps the detergent to dissolve completely and to activate its cleaning enzymes and surfactants more effectively, allowing them to penetrate fabric fibers more deeply and release trapped dirt, oils, and stains. For heavily soiled items, or for ensuring the effective sanitization of items like bedding or towels, particularly during times of illness, a hot water wash can be invaluable. It aids in killing germs and dust mites, contributing to a healthier home environment. While cold water washing has its place for delicate fabrics or energy saving, the sheer cleaning power for general laundry and stubborn stains is often best unlocked with the assistance of appropriately heated water. 4. Beyond these specific areas, the general application of hot water for cleaning various surfaces around the home brings tangible advantages. When mopping hard floors, whether tile, vinyl, or sealed wood, hot water helps to cut through accumulated grime more effectively than cold. It can make the task quicker and leave floors looking brighter and feeling cleaner underfoot. For wiping down painted walls, baseboards, or other washable surfaces, dampening a cloth with hot water can often be sufficient to remove light marks and dust, sometimes reducing the need for chemical cleaners altogether. The warmth can help to soften adhered dirt, making it easier to lift without excessive scrubbing that could potentially damage the surface. 5. One of the overarching benefits of utilizing hot water in our cleaning endeavors is the reduction in physical effort often required. Because hot water is inherently more effective at loosening and dissolving dirt and grease, we often find ourselves scrubbing less vigorously and for shorter periods. This not only makes the cleaning process less physically demanding but can also help to preserve the surfaces we are cleaning by minimizing wear and tear from excessive abrasion. Furthermore, by enhancing the action of soaps and detergents, hot water can sometimes allow us to use less product to achieve the same level of cleanliness, which can be both economically and environmentally beneficial. The faster evaporation rate of hot water also means surfaces tend to dry more quickly, reducing streaks and water spots, and getting the cleaned area back into use sooner. In essence, the consistent and thoughtful use of hot water elevates

5 Expert Tips for Cleaning With Hot Water At Home Read More »

drains

7 Tricks To Keep Your Drains Clean And Odor-Free

When your drains are working properly, you barely notice them. However, when problems arise, from slow drains to unpleasant odors or even complete blockages, the disruption can be significant. This guide will walk you through seven essential steps to understanding and maintaining your drains, helping you prevent common problems and ensuring that your home’s plumbing system runs smoothly, keeping your home clean and efficient 1. Your Home’s Drains Before we dive into maintenance, it’s important to understand the vital role that drains play. Every sink, tub, shower, toilet, and washing machine in your home is connected to a drainage system designed to safely and efficiently channel wastewater to the main sewer or septic system. Kitchen drains primarily carry dishwashing water, often mixed with small food particles and grease. Bathroom drains contain residue from soap, hair, toothpaste, and other personal care products. Laundry drains carry water laden with detergent and lint. Each of these pathways is crucial, and a problem in one can sometimes indicate a larger problem. Recognizing that these systems are constantly in operation helps underscore the importance of consistent care, preventing minor annoyances from turning into larger, inconvenient, and potentially costly plumbing emergencies. A well-functioning drainage system is the foundation of a healthy and pleasant home environment.   2. Protecting What Goes Down The most effective approach to drain maintenance is proactive prevention, starting with being aware of what we allow into the system. Many common drain clogs are entirely preventable if we exercise caution. In the kitchen, cooking fats, oils, and grease are the leading culprits. While liquid when hot, these substances solidify as they cool inside the pipes, creating sticky, persistent clogs that trap other debris. Coffee grounds, tea leaves, and fibrous food scraps like vegetable peels are also significant contributors to clogs. In the bathroom, hair is a major culprit, tangling together to form dense webs that trap soap scum and other particles. So-called “toilet-flush” wet wipes, despite their name, are notorious for causing clogs because they don’t break down the way toilet paper does. Dental floss, cotton swabs, and feminine hygiene products should also never be flushed down the toilet. By consciously keeping these problematic items out of your drains, you’re taking the most significant step toward keeping your pipes clean and trouble-free. 3. Daily Habits Incorporating a few simple habits into your daily and weekly routines can make a substantial difference in the long-term health of your drain. One of the easiest, yet most effective, measures is to consistently use drain strainers or screens in all sink and shower drains. These inexpensive devices catch hair, food particles, and other debris before they enter the pipes. The key is to empty these strainers regularly, ideally after each shower and several times a day in a busy kitchen sink. Another beneficial habit, especially for the kitchen sink, is to run hot water for a minute or two after washing dishes, especially if greasy items are involved. This helps remove any remaining grease particles while they are still slightly liquefied. For all drains, a weekly flush with very hot water (not boiling water, which can damage some PVC pipes) can help dissolve early buildup of soap scum or grease, keeping your drains cleaner. These small, consistent actions work like preventative medicine for your plumbing. 4. Impending Drain Problems Being aware of the subtle signs your drains may be sending can help you address potential problems before they turn into serious clogs. One of the earliest and most common indicators is a drain that begins to empty more slowly than usual. Water may remain in the sink or shower for a long time after use. Another telltale sign is the gurgling sounds that emanate from the drains as the water passes through. These noises often suggest that air is being trapped and displaced by a partial obstruction within the pipe. Unpleasant odors rising from a drain can also indicate the buildup of decaying food particles, grease, or other organic matter trapped in the pipes or trap. In more advanced cases, you may notice water backing up into other fixtures—for example, water appearing in the bathtub when you flush the toilet could signal a more significant clog in the future. Paying attention to these early signs allows for timely intervention. 5. Gentle DIY Approaches to Fixing Minor Drain Problems When faced with a slightly slow drain, there are a few gentle, homemade methods that can often provide relief without resorting to harsh chemicals. One common and often effective technique involves using a combination of baking soda and vinegar. First, pour about half a cup of baking soda into the affected drain, followed by an equal amount of white vinegar. The mixture will fizz, which can help unclog minor buildup. After about 30 minutes to an hour, flush the drain thoroughly with plenty of hot water. For physical blockages closer to the drain opening, a plunger can be effective. Make sure there is enough water in the sink or tub to cover the top of the plunger, create a good seal over the drain, and use firm, steady pushes and pulls. For P-traps in your sink that are easily accessible, and if you feel comfortable doing so, placing a bucket underneath and carefully unscrewing the trap may allow you to manually remove any accumulated debris. It is generally advisable to avoid commercial drain-unclogging chemicals, as they can be corrosive to pipes, harmful to the environment, and pose safety risks if not handled properly or if they fail to clear the blockage. 6. Regular Flushing  In addition to your daily habits and troubleshooting of minor issues, incorporating a regular, more dedicated maintenance flush into your routine can go a long way toward keeping your drains in good working order. This isn’t about fixing an existing clog, but rather about proactively cleaning your pipes to prevent buildup from taking hold. Once a month, or at least once a quarter, consider performing a more thorough flush. This could involve filling each

7 Tricks To Keep Your Drains Clean And Odor-Free Read More »

oil diffusers and flowers

6 Expert Tips For Getting Rid Of Odors In Your Home

How to prevent odors and have a home that smells good, either conjuring comfort and cleanliness or, if neglected, a sense of discomfort. Creating a space that always welcomes you with a breath of fresh air is less about masking odors and more about a deliberate, multifaceted approach. Today, we’ll walk you through five essential steps to transform your home into a fragrant sanctuary, where freshness is a constant and comforting presence. 1. Eliminating Sources of Odors Our first and most crucial step on the path to a sweet-smelling home lies in the uncompromising elimination of existing and potential odor sources through thorough, regular cleaning. Before any thought is given to introducing pleasant fragrances, the priority must be to neutralize the very things that cause unwelcome smells. This involves a commitment to consistent cleanliness across all areas. Kitchen waste bins, especially those holding food scraps, require daily emptying and periodic washing to prevent lingering odors. Similarly, bathroom bins and other refuse containers must be managed with diligence. Spills in the kitchen, whether on countertops, the stovetop, or the floor, need immediate attention, as decomposing food particles are a primary odor culprit. Sink drains in both the kitchen and bathroom should be regularly flushed and cleaned to prevent build-up. In the bathroom, combating moisture through ventilation and ensuring towels dry completely is key to preventing musty smells. Essentially, this initial stage is about removing the “bad” before we even consider adding the “good,” creating a truly clean slate. 2. Consistent Ventilation With a foundation of cleanliness established, our second vital step involves actively inviting fresh air into our homes. Consistent and effective ventilation is a remarkably simple yet profoundly effective tool in maintaining a pleasant indoor atmosphere. The daily practice of opening windows, even for a short duration when weather conditions permit, allows for the crucial exchange of stale, odor-laden indoor air with clean, fresh outdoor air. This natural circulation works wonders to dissipate lingering cooking smells, general household stuffiness, and a myriad of airborne particles that can otherwise contribute to a less-than-fresh environment. To maximize this effect, aim for cross-ventilation whenever possible by opening windows on opposite sides of a room or the home, creating a gentle but powerful current that sweeps away impurities and revitalizes the air within your living spaces. This regular “breathing” of your home is fundamental to its olfactory well-being. 3. Fabric Odors Our third significant step focuses on managing items within our homes that are particularly prone to trapping and holding onto odors: fabrics. Carpets, upholstered furniture, curtains, bedding, and clothing can all act like sponges, absorbing smells from cooking, pets, smoke, or general daily life. Regular vacuuming of carpets and upholstery is essential, not just for removing visible dirt but also for lifting odor-carrying particles. Bed linens should be laundered frequently, and dirty laundry, especially damp items or sportswear, should not be allowed to accumulate, as it can quickly become a source of unpleasant smells. Ensure all laundered items are completely dry before being stored to prevent mildew. For deeper-seated odors in carpets or large upholstered pieces, periodic professional steam cleaning or the use of appropriate fabric refreshers (preferably natural or unscented initially) can make a substantial difference, effectively neutralizing trapped smells and restoring freshness to these often-overlooked odor reservoirs. 4. Pet Areas The fourth step requires targeted attention to specific zones within the home that are inherently more susceptible to developing persistent odors. For households with pets, this means diligent management of pet-related smells. Regular grooming of animals, frequent cleaning of their bedding, and meticulous daily scooping and regular changing of litter boxes are non-negotiable. Any pet accidents must be addressed immediately with enzymatic cleaners designed to break down odor-causing proteins. High-moisture areas, primarily bathrooms but also potentially poorly ventilated laundry rooms or basements, need consistent strategies to combat mustiness. This includes ensuring good airflow, promptly repairing any leaks, and using dehumidifiers if necessary. The refrigerator also falls into this category; regular clearing out of old food and wiping down interior surfaces prevents it from becoming an odor source. By proactively managing these specific “hotspots,” we prevent localized odors from permeating the entire home. 5. Natural Fragrances Having diligently addressed cleanliness, ventilation, fabric care, and specific odor zones, our fifth and final step involves the artful and thoughtful introduction of subtle, natural fragrances to enhance the home’s ambiance. The aim here is not to overpower the senses with artificial chemicals but to add a delicate layer of pleasing scent that complements the underlying freshness. Consider placing fresh flowers or a bowl of citrus fruits in living areas for a light, natural aroma. Simmering a pot of water on the stove with ingredients like cinnamon sticks, cloves, and citrus peels can gently perfume the air, especially during cooler months. Essential oil diffusers, used responsibly with high-quality oils like lavender, citrus, or eucalyptus, can customize the scent profile of a room. Good quality candles made from natural waxes and scented with essential oils can also contribute, provided they are used safely and with adequate ventilation. The key is subtlety and a preference for natural sources, ensuring these added scents enhance, rather than compete with, the genuine cleanliness you’ve worked to achieve. 6. Maintenance Habits The sixth pillar emphasizes the critical importance of establishing and sticking to regular cleaning routines and habits. While the initial deep cleaning (Pillar One) is essential for a reset, it’s consistent and ongoing maintenance that truly keeps your home smelling great. This involves integrating small cleaning tasks into your daily and weekly routines. Daily habits might include wiping down kitchen counters after every meal, quickly sweeping or vacuuming high-traffic kitchen floors, making sure the sink is free of dirty dishes before bed, and quickly cleaning the bathroom sink. Weekly habits might include vacuuming and dusting all rooms more thoroughly, changing bed linens, cleaning bathroom fixtures more thoroughly, and mopping floors. By breaking down larger cleaning tasks into regular, manageable activities, you can prevent the buildup of dirt, grime, and odor-causing

6 Expert Tips For Getting Rid Of Odors In Your Home Read More »

micro fiber cloth colorful

Best 5 Tips You Need To Know About Microfiber Cloths

Far from being just another option in the cleaning arsenal, microfiber cloth offers a unique combination of effectiveness, versatility, and durability that elevates it to the status of indispensable for those seeking superior results with less effort and, often, fewer chemicals. We’ll explore its remarkable capabilities in five key steps of understanding and application. 1. The Science Behind the Sparkle To truly appreciate why microfiber cloths are such game-changers in the world of cleaning, we must first delve into the unique structure that gives them their power. The term “microfiber” itself refers to the incredibly fine synthetic fibers – typically a blend of polyester and polyamide (nylon) – that are woven together to create the fabric. These individual fibers are astonishingly thin, often many times finer than a single strand of human hair. What makes them even more effective is that during the manufacturing process, these fibers are frequently split or “fragmented.” This splitting process vastly increases the surface area of each fiber and creates millions of microscopic nooks, crannies, and tiny “claws” along each strand. It is this intricate, engineered architecture at a microscopic level that bestows microfiber cloths with their remarkable ability to attract, lift, and trap dirt, dust, and grime. Unlike traditional cotton cloths which might simply push particles around or require significant liquid to suspend dirt, the microfibers actively grab onto debris. Furthermore, the polyester component often carries a natural positive electrical charge, which acts like a magnet for negatively charged dust particles, pulling them from surfaces and holding them securely within the cloth’s weave until it is laundered. This fundamental understanding of their construction is key to recognizing why they perform so exceptionally well in various cleaning applications. 2. Mastering Dry Dusting One of the most immediate and visibly impressive applications of microfiber cloths is their proficiency in dry dusting. When used without any moisture, these cloths transform into highly efficient dust magnets. Imagine gliding a dry microfiber cloth across a dusty bookshelf, an antique wooden table, intricate window blinds, or the delicate surfaces of your electronic devices. You will observe how the dust seems to cling effortlessly to the fabric, leaving behind a surface that is not only visibly cleaner but also smoother to the touch, free from the fine particulate layer that can dull its appearance. The crucial difference compared to traditional feather dusters or less advanced cloths is that microfiber doesn’t merely displace dust, scattering it into the air only for it to settle elsewhere moments later. Instead, the fine, charged fibers actively capture and tenaciously hold onto these dust particles. This superior trapping ability not only enhances the aesthetic appeal of your home by keeping surfaces looking pristine for longer but also contributes significantly to a healthier indoor environment by reducing airborne allergens and irritants, a particularly valuable benefit for households with allergy sufferers or individuals sensitive to dust.     3.Unleashing Wet Cleaning Wonders When a microfiber cloth is dampened with plain water, its cleaning capabilities expand dramatically, turning it into a versatile workhorse for a multitude of cleaning tasks. The absorbent nature of microfiber is quite remarkable; these cloths can typically hold several times their own weight in liquid. This makes them exceptionally effective for quickly and efficiently soaking up spills, whether it’s a splash of juice on the kitchen counter or water around the bathroom sink. Beyond simple spill absorption, a damp microfiber cloth becomes a powerful tool for general surface cleaning. The combination of the microfibers’ scrubbing action and their ability to lift and trap grime means that they can tackle everyday messes like food splatters, sticky fingerprints, soap scum, and light layers of grease with surprising ease, often requiring nothing more than water. For more resistant or greasy build-up, a minimal amount of a mild, pH-neutral cleaning solution can be added to the water, but one of the most significant advantages of microfiber is its capacity to clean effectively and hygienically with little to no reliance on harsh chemical cleaners. This gentle yet powerful action makes damp microfiber cloths ideal for use on kitchen countertops, bathroom tiles and fixtures, appliance exteriors, and dining tables, consistently leaving behind a thoroughly clean and satisfyingly streak-free finish.   4. The Microfiber Advantage on Glass and Polished Surfaces The task of cleaning glass, mirrors, and other highly polished surfaces is an area where microfiber cloths truly demonstrate their superiority, delivering results that are often described as brilliantly clear. Anyone who has previously battled with the frustrating streaks, smudges, and lint residue left behind by conventional cleaning cloths or paper towels when attempting to clean windows, mirrors, or shiny chrome fixtures will find the performance of microfiber to be a revelation. When a microfiber cloth is lightly dampened – either with just a touch of water, or for exceptionally stubborn marks or a professional gleam, with a specialized glass cleaning spray or a diluted solution of water and white vinegar – it glides almost effortlessly across these smooth surfaces. It efficiently lifts away dirt, grime, fingerprints, and water spots. Crucially, due to the fineness of the fibers and the tight weave of the cloth, it dries very quickly and leaves behind virtually no lint or streaks, resulting in an impeccable, crystal-clear finish. This ability to clean without leaving any trace of itself behind is what makes microfiber the go-to choice for ensuring that reflective surfaces throughout the home are not just clean, but flawlessly transparent and sparkling.   5. The Long-Term Value of Microfiber Beyond their immediate cleaning prowess, the durability and inherent reusability of microfiber cloths are fundamental aspects that contribute significantly to their overall value and their standing as an environmentally conscious cleaning choice. Unlike disposable paper towels that contribute to waste after a single use, or traditional cotton cloths that can quickly fray, lose their shape, and diminish in cleaning effectiveness, high-quality microfiber cloths are engineered to withstand hundreds of washing cycles without degrading their unique cleaning properties. To ensure their longevity and maintain peak performance, a

Best 5 Tips You Need To Know About Microfiber Cloths Read More »