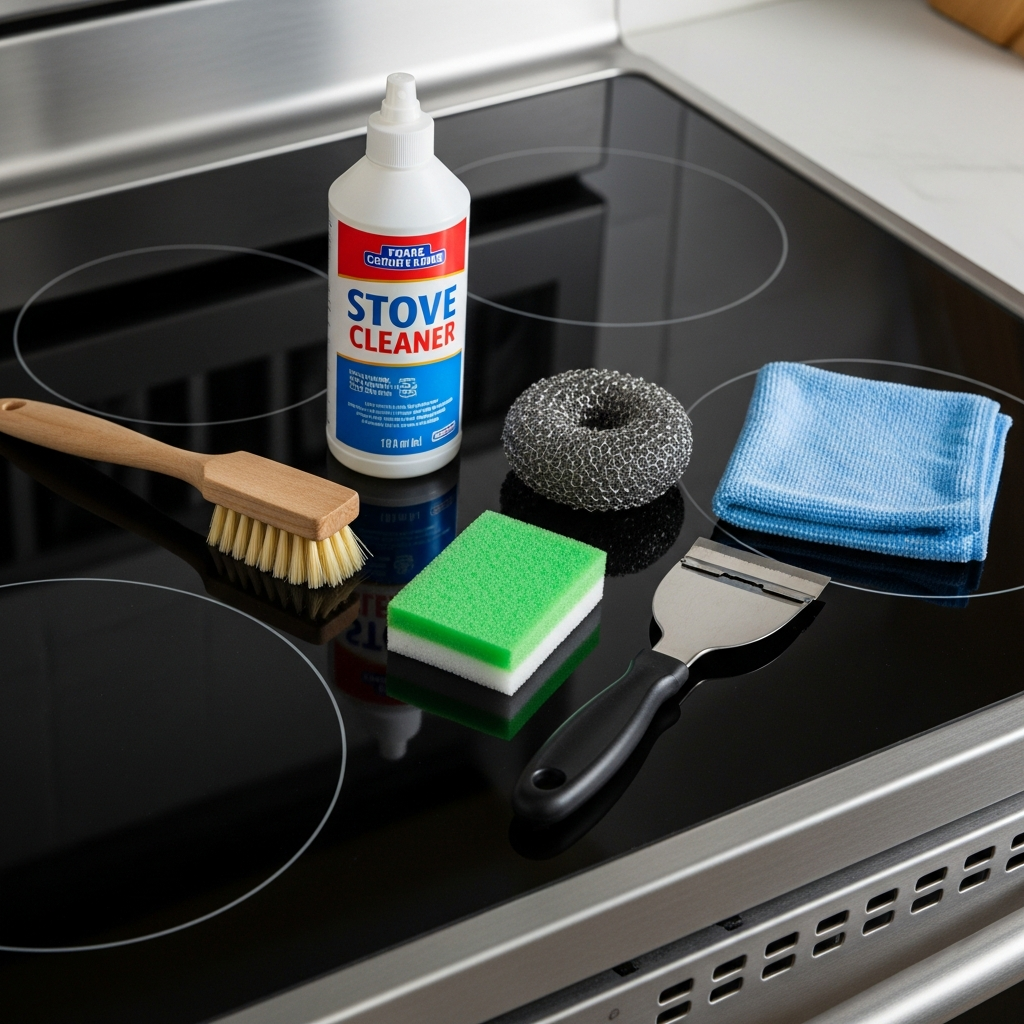
Tips and Tricks

Isopropyl Alcohol

Isopropyl Alcohol – 101 Simple and Safe Ways to Clean Your Home

Isopropyl alcohol, often referred to as rubbing alcohol, is a staple in first-aid kits, but its utility extends far beyond disinfecting minor scrapes. In the realm of cleaning, it is a formidable, versatile, and cost-effective agent. Its chemical properties—specifically its ability to act as a solvent and its rapid evaporation rate—make it an indispensable tool for tackling a wide array of messes throughout the home. The primary strength of isopropyl alcohol lies in its solvent capabilities. It effectively dissolves a range of non-polar compounds, which includes many of the common culprits behind household grime: oils, greases, adhesives, and certain inks. Unlike water, which can struggle with these substances, alcohol breaks them down chemically, lifting them from surfaces with minimal effort. This is immediately apparent when cleaning stainless steel appliances. Fingerprints, smudges, and cooking grease residue can make stainless steel look dull and streaky. A simple wipe with a microfiber cloth lightly dampened with isopropyl alcohol will cut through the oily film instantly. Because the alcohol evaporates almost immediately, it leaves behind a pristine, streak-free finish that water-based cleaners often fail to achieve. The alcohol lifts the grease, and its fast evaporation prevents new water spots or streaks from forming as it dries. This same principle applies to glass and mirrors. Commercial glass cleaners often contain ammonia or other chemicals to achieve a streak-free shine. Isopropyl alcohol accomplishes the same goal more simply. A solution of one part alcohol to one part water in a spray bottle creates a highly effective glass cleaner. It cuts through haze, hairspray residue on bathroom mirrors, and smudges on windows, evaporating quickly for a perfectly clear result. For chrome fixtures in the bathroom and kitchen, rubbing alcohol removes water spots and soap scum, restoring their reflective shine without leaving behind any film. Beyond its solvent action, isopropyl alcohol is a potent disinfectant. The most common concentration available, 70%, is considered an optimal grade for this purpose. The presence of 30% water is crucial; the water acts as a catalyst, helping the alcohol to penetrate the cell wall of bacteria, viruses, and fungi more effectively. Once inside, the alcohol denatures the essential proteins and enzymes of the microorganism, causing it to die. This makes it an excellent choice for sanitizing high-touch surfaces. Light switches, doorknobs, remote controls, keyboards, and mobile phones are breeding grounds for germs. Regularly wiping these items with a cloth dampened with 70% isopropyl alcohol can significantly reduce the transmission of pathogens in a household. When cleaning electronics, it is crucial to apply the alcohol to the cloth first, never directly onto the device, to prevent liquid from seeping into sensitive components. The higher concentrations, such as 91% or 99% isopropyl alcohol, have their own specific advantages, particularly where water content is a concern. For cleaning sensitive electronic components, like computer motherboards or CPU contacts, 99% alcohol is the professional standard. Its extremely low water content means it evaporates almost instantly and carries virtually no risk of causing short circuits or corrosion. It effectively removes dust, grime, and old thermal paste without leaving any conductive residue. One of the most celebrated uses for isopropyl alcohol is stain removal, particularly on resilient materials. It is famously effective at removing permanent marker from hard, non-porous surfaces. If a marker finds its way onto a countertop, a plastic toy, or a laminate floor, a small amount of alcohol on a cotton ball will typically dissolve the ink, allowing it to be wiped away. It can also be a lifesaver for fabric, though a spot test in an inconspicuous area is always mandatory. For ink stains on sturdy upholstery or clothing, gently blotting the stain with a cloth soaked in alcohol can lift the ink out of the fibers. The key is to blot, not rub, to prevent the stain from spreading. This solvent power is especially valuable for microfiber upholstery. Microfiber is sensitive to water, which can leave behind rings and change the texture of the fabric. Because isopropyl alcohol evaporates so quickly, it can be used to clean microfiber couches and chairs without this risk. By spraying a light mist of alcohol onto a stained area and gently scrubbing with a soft-bristled brush, you can lift dirt and grime. Once dry, the stiffened area can be brushed again to restore its soft texture. This method effectively cleans the material without the water damage associated with traditional upholstery cleaners. Adhesive residue is another common frustration that isopropyl alcohol handles with ease. Price tags on new glassware, labels on plastic containers, or the sticky residue left behind by tape can be stubborn. Soaking the residue with alcohol for a few minutes will break down the adhesive, allowing it to be scraped or wiped off cleanly without damaging the surface underneath. This is far gentler and often more effective than abrasive scrubbing, which can scratch glass, plastic, or metal. In the bathroom, the fight against mold and mildew can be persistent. While not a substitute for a dedicated fungicide in cases of heavy infestation, isopropyl alcohol can be used as a preventative measure. Its disinfecting properties kill mold spores on contact, and its drying action helps to create an environment less hospitable to their growth. A regular wipe-down of grout lines, shower corners, and other damp areas with alcohol can help keep mildew at bay. It also works wonders on soap scum buildup on glass shower doors, dissolving the greasy film and leaving the glass sparkling. The applications continue into more niche areas. Isopropyl alcohol can be used to clean and sanitize makeup brushes, dissolving oily makeup residue and killing bacteria that can cause skin breakouts. It can be used to clean jewelry, removing lotions and oils to restore sparkle to gemstones and metals (though care should be taken with delicate or porous stones like opals or pearls). It can even be used to de-ice car windows and frozen locks in the winter; the alcohol lowers the freezing point of water, causing the ice to melt quickly.

Isopropyl Alcohol – 101 Simple and Safe Ways to Clean Your Home Read More »

Barbecue Grills

6 Tips on How to Keep Your Barbecue Grills Looking Like New

The residue of past meals clings to your barbecue grates. It’s a combination of carbonized sugars from marinades, polymerized fats from meats, and the general ash and debris of open-flame cooking. This build-up is not a badge of honor or a layer of “seasoning.” It is a detriment to your cooking. It imparts a bitter, burnt flavor to fresh food, causes flare-ups that scorch your meal, and can harbor bacteria. A clean barbecue is not just an aesthetic choice; it is a functional necessity for better-tasting, safer food and for prolonging the life of your equipment. The grates are the most critical component, as they make direct contact with your food. 1.Grill Brush Before you begin any deep cleaning, you need the right tools. Your success is dictated by your preparation. You will need a high-quality grill brush. The debate between traditional wire bristle brushes and bristle-free alternatives is significant. Wire bristles are effective but carry a small risk of detaching and ending up in food. If you use one, inspect it before each use for loose bristles and replace it regularly. Bristle-free brushes, often made of coiled stainless steel or featuring nylon bristles for cool-grate cleaning, are a safer alternative. A long handle is non-negotiable for safety. You will also need a metal or plastic scraper for stubborn, flat deposits, gloves (heavy-duty rubber or nitrile) to protect your hands from grease and cleaning agents, and a bucket for hot, soapy water. For cleaning solutions, simple dish soap with degreasing properties is a workhorse. For more natural methods, distilled white vinegar and baking soda are essential. For extreme cases, a specialized barbecue degreaser or oven cleaner can be used, but with significant caution. Finally, have a collection of microfiber cloths, paper towels, and perhaps a non-abrasive scour pad on hand. 2.Warm Up The process always begins with heat. This is the single most effective step you can take after every cook and as the precursor to a deep clean. Turn your barbecue on to its highest setting, close the lid, and let it run for 15 to 20 minutes. The intense heat will incinerate most of the fresh food residue, turning it into a dry, white or gray ash. This process, known as pyrolysis, makes the subsequent scraping significantly easier. The goal is to carbonize the gunk, not to cook it further. After the burn-off period, turn off the gas or extinguish the charcoal. While the grates are still very hot, use your grill brush to scrape them clean. Work in the direction of the grate bars. Apply firm, steady pressure. The ash and carbon should flake off relatively easily. The scraper on your brush is useful here for any particularly thick, flat areas of carbon. This immediate post-cook or pre-deep-clean scrape is a fundamental habit that reduces the need for intensive deep cleans. For a true deep clean, the hot scrape is only the beginning. You must remove the grates from the grill. Ensure they have cooled enough to be handled safely with gloves. Your approach from here depends on the level of grime and the type of grates you have. Cast iron, stainless steel, and porcelain-coated grates have slightly different tolerances. 3.Submerge The most common and straightforward deep-cleaning method is the soap and water soak. Place the grates in a large utility sink, a bucket, or a plastic tub large enough to submerge them. If you don’t have a container large enough, a heavy-duty trash bag laid inside a tub or even on your driveway can work. Fill the container with the hottest water you can safely handle and a generous amount of degreasing dish soap. Let the grates soak for at least 30 minutes, but several hours or even overnight for severely neglected grates is better. The hot, soapy water will work to soften and dissolve the polymerized grease that the burn-off couldn’t completely eliminate. After soaking, use a stiff, non-abrasive brush or scour pad to scrub every surface of the grates. Pay attention to the corners and undersides. The gunk should come off with moderate effort. Once you are satisfied, rinse the grates thoroughly with clean water to remove all soap residue. Any leftover soap can impart an unpleasant taste to your food. Dry the grates immediately and completely with a cloth or paper towels, especially if they are cast iron, to prevent flash rust. 4.Mixtures For a more natural approach, or for those who prefer to avoid detergents, the vinegar and baking soda method is highly effective. Place the cool grates in a large, heavy-duty trash bag. Pour in a solution of two parts distilled white vinegar to one part water, enough to coat the grates. Seal the bag and let it sit for a few hours or overnight. The acetic acid in the vinegar is excellent at breaking down grease and rust. After the initial soak, open the bag and generously sprinkle baking soda over the grates. The chemical reaction between the acidic vinegar and the alkaline baking soda will create a fizzing foam. This gentle abrasive action helps to lift the loosened grime from the metal. Close the bag again and let it sit for another 20-30 minutes. Then, open the bag and use a scour pad or brush to scrub the grates. The combination of the two agents makes the caked-on residue surprisingly easy to remove. Rinse them thoroughly with water and dry them completely. This method is particularly good for grates with surface rust. 5.Protection In extreme situations, where layers of black carbon have fused to the grates over years of neglect, you may consider a commercial oven cleaner or a dedicated barbecue degreaser. This is the most aggressive option and requires caution. This method should be performed outdoors in a well-ventilated area, away from children and pets. Always wear gloves and eye protection. Place the grates on several layers of newspaper or cardboard to protect the surface underneath. Spray the cleaner evenly over all surfaces of the grates, following

6 Tips on How to Keep Your Barbecue Grills Looking Like New Read More »

different types of cleaning sponges

10 Tips on How to Use Sponges That You Should Know

Learn the difference between different types of sponges and how to use them. 1.Cellulose Sponge A cellulose sponge is the most common type found in kitchens. It is made from wood pulp and other natural plant fibers, making it highly porous and capable of absorbing and holding a significant amount of liquid often up to twenty times its own weight. This absorbency makes it the ideal tool for soaking up spills from countertops, tables, and floors. When wet, it becomes soft and pliable, suitable for washing dishes, wiping down kitchen surfaces like laminate and sealed granite, and cleaning appliances. Its soft texture ensures it will not scratch most common household surfaces. However, its organic nature and porous structure create a perfect environment for bacteria to grow if it is not properly maintained. To sanitize a cellulose sponge, it can be run through a dishwasher cycle on the top rack or dampened and microwaved for one to two minutes. Be cautious, as the sponge will be extremely hot afterward. Cellulose sponges tend to break down over time, especially when used with harsh chemicals like bleach, which can disintegrate the fibers. They should be replaced every two to three weeks, or sooner if they develop an odor or begin to fall apart. 2.Dual-Sided Scrub Sponge The dual-sided scrub sponge is a versatile workhorse. It combines a standard cellulose sponge on one side with a scouring pad on the other. The cellulose side performs all the functions of a regular sponge absorbing liquids, creating suds with soap, and gently wiping surfaces. The other side, typically green or another dark color, is made of a more aggressive, abrasive nylon or similar synthetic material. This side is designed for tough cleaning jobs that require significant friction. It excels at removing burnt-on food from pots and pans (excluding non-stick varieties), scrubbing oven interiors and racks, cleaning barbecue grills, and tackling stubborn grime on hard, durable surfaces like concrete or unsealed tile. The key is to understand the abrasive nature of the scouring side. It should never be used on delicate surfaces like non-stick cookware, glass cooktops, polished countertops, acrylic tubs, or painted surfaces, as it will leave permanent scratches. Always test the scouring pad on a small, inconspicuous area first if you are unsure about the surface’s durability. Like its cellulose-only counterpart, the scrub sponge needs regular sanitizing and should be replaced frequently to prevent bacterial growth and cross-contamination. 3.Anti-Scratch Scrubbing Sponge For tasks requiring scrubbing power without the risk of scratches, the non-scratch scrub sponge is the appropriate tool. It looks similar to a standard dual-sided scrub sponge, but its abrasive side is made from a different, gentler material. This side is often a different color, such as blue or white, to distinguish it from its more aggressive green counterpart. The scrubbing material is typically a finer nylon weave or a plastic mesh that is designed to dislodge grime and food particles without gouging or dulling the surface beneath. This makes it the perfect choice for cleaning non-stick pots and pans, as it can remove residue without stripping the delicate coating. It is also safe for use on glass cooktops, ceramic dishes, stainless steel sinks, chrome fixtures, and plastic containers. While it provides more friction than a simple cellulose sponge, it lacks the heavy-duty power of a standard scourer. It will struggle with heavily baked-on or carbonized messes. For daily dishwashing and cleaning of sensitive but durable kitchen and bathroom surfaces, the non-scratch scrub sponge offers the best balance of cleaning effectiveness and safety. Maintenance is the same as for other synthetic sponges: regular sanitizing and prompt replacement are essential for hygiene. 4.Natural Sea Sponges Natural sea sponges are harvested from the ocean floor. They are the skeletons of simple marine organisms. When dry, they are hard and stiff, but once saturated with water, they become incredibly soft and luxurious to the touch. Their structure consists of a complex network of channels, which makes them far more absorbent and durable than their synthetic cellulose counterparts. A key advantage of natural sea sponges is that they contain natural enzymes that inhibit the growth of mold, mildew, and bacteria, making them a more hygienic option that lasts much longer if cared for properly. Because they are so soft, they are the ultimate tool for delicate cleaning tasks. They are ideal for washing fine china, crystal glassware, and silver. Their gentle nature also makes them a favorite for washing cars, boats, and windows, as they lift dirt without leaving swirls or scratches. They are also widely used for personal bathing. To maintain a sea sponge, it should be thoroughly rinsed with clean water after each use and allowed to air dry completely. It should never be twisted or wrung out aggressively, as this can tear its delicate structure. Harsh chemicals and boiling water will damage it. A well-maintained sea sponge can last for several months or even years. 5.Melamine Foam Sponges Melamine foam sponges, commonly known by the brand name Magic Eraser, operate on a completely different principle from other sponges. They are not absorbent in the traditional sense and do not require soap. The material, melamine foam, acts as a super-fine abrasive. When wet, its microscopic structures become incredibly hard and work like extremely fine sandpaper to scrub away surface stains. This sponge is highly effective at removing marks that other cleaners cannot touch. It can erase crayon, marker, and scuff marks from painted walls (use with care on glossy finishes), lift grime from baseboards and door frames, clean soap scum from shower doors and tile, and remove stains from vinyl flooring and some plastics. It is also useful for cleaning the rubber soles of sneakers. The abrasive nature of melamine foam means it must be used with caution. It can dull glossy surfaces, damage clear coats on wood furniture, and scratch delicate plastics or polished stainless steel. It works by physically wearing away the stain, and with it, a minuscule layer of the surface itself.

10 Tips on How to Use Sponges That You Should Know Read More »

How to Clean Your Microwave – 6 Amazing Tips

A microwave is an appliance of convenience, yet it often becomes a container for neglect. Splatters from reheating spaghetti, explosions from soup, and the lingering scent of burnt popcorn can turn this kitchen workhorse into a source of grime and odor. Cleaning it is not a complex task, but it requires the correct approach to dissolve cooked-on food without resorting to harsh chemicals or abrasive scrubbing that can damage the interior. 1-Steam The foundational method for cleaning most microwave messes relies on steam. Steam gently loosens hardened food particles, making them easy to wipe away. This method is effective, safe for the appliance, and uses common household items. For this primary steam-cleaning method, you will need a microwave-safe bowl or a large glass measuring cup, water, and an acid component like white vinegar or a lemon. You will also need several microfiber cloths and potentially a non-scratch sponge for any remaining stubborn spots. Begin by filling the microwave-safe bowl with one cup of water. To this, add either two tablespoons of distilled white vinegar or the juice of half a lemon. You can drop the squeezed lemon halves directly into the water as well; the oils in the rind will release during the heating process, adding a fresh, clean scent. The purpose of the acid is twofold: it helps to break down greasy residue and acts as a natural deodorizer, combating any unpleasant smells that have taken hold. Place the bowl of water and vinegar or lemon inside the microwave. Close the door and set the microwave to run on high power for three to five minutes. The goal is to bring the water to a rolling boil so that a significant amount of steam is produced. You should see condensation forming on the interior window of the microwave door. This is a clear sign the process is working. Once the microwave cycle is complete, the most critical step is to do nothing. Leave the microwave door closed for at least five to ten minutes. This waiting period traps the hot, acidic steam inside the appliance, giving it ample time to work its magic. The steam will soften and dissolve the baked-on food splatters on the ceiling, walls, and floor of the microwave. Attempting to wipe the interior immediately after the cycle ends will be far less effective and presents a burn risk from the hot steam and water. 2.Microfiber Cloth After waiting, carefully open the microwave door. Use an oven mitt to remove the bowl of hot water, as it will still be very hot. Next, take a clean microfiber cloth and begin wiping down the interior. It is most efficient to start with the ceiling, then move to the side walls, the back wall, and finally the floor of the microwave. You will find that most of the grime, even splatters that have been there for weeks, will wipe away with minimal effort. The condensation has done the heavy lifting for you. For any slightly more resistant spots, you can dip your microfiber cloth directly into the warm lemon or vinegar water you just removed from the microwave. The added moisture and warmth will help lift the remaining residue. If a spot is particularly stubborn, use the non-scratch side of a kitchen sponge. Never use steel wool, a scouring pad, or any other abrasive metal scrubber, as these will permanently scratch and damage the interior coating of the microwave. 3.Toothbrush While the interior is now clean, the job is not complete. Remove the glass turntable plate and the plastic roller ring that sits beneath it. These components are often the collection point for drips and crumbs. The glass plate can typically be washed by hand in the sink with warm, soapy water, just like any other dish. Most are also top-rack dishwasher safe, but it is always wise to consult your appliance’s manual to be certain. The roller ring can be washed in the same manner. Pay close attention to the small wheels on the ring, as food particles and grease can get trapped in them, impeding the smooth rotation of the turntable. An old toothbrush can be useful for scrubbing these small, hard-to-reach areas. Before returning the clean turntable and roller ring, give the floor of the microwave a final wipe to ensure it is completely clean and dry. Once dry, place the roller ring back in its track and set the glass plate on top. 4.Baking Soda For microwaves with more significant, caked-on, or burnt food messes, the steam method alone might not be sufficient. In these cases, a baking soda paste is an excellent second step. Baking soda is a mild alkali and a gentle abrasive, making it perfect for scrubbing away tough grime without scratching surfaces. To create a baking soda paste, mix approximately two parts baking soda with one part water in a small bowl. Stir until it forms a thick paste, similar in consistency to toothpaste. If it’s too watery, add more baking soda; if it’s too thick, add a few more drops of water. Apply this paste directly to the stubborn, burnt-on spots inside the microwave. Do not smear it all over; target only the problem areas. Let the paste sit on the spots for at least fifteen minutes. During this time, the baking soda will work to break down the carbonized food. After waiting, take a damp microfiber cloth or a non-scratch sponge and gently scrub the areas in a circular motion. The paste will provide the necessary friction to lift the grime. Wipe away the paste and the loosened food particles. You may need to rinse your cloth several times to remove all the residue. Finish by wiping the area with a clean, damp cloth to ensure no baking soda remains. 5.Careful The microwave door also requires specific attention. The inside of the door can be wiped down with the same vinegar or lemon water solution used for the interior. Pay special attention to the mesh screen and

How to Clean Your Microwave – 6 Amazing Tips Read More »

7 Best Homemade Cleaning Solutions to Make Your Home Look Like New

Creating your own homemade cleaning solutions is a direct approach to maintaining your home using simple, accessible ingredients. The effectiveness of these homemade cleaning solutions lies in understanding the properties of each component and how they interact with different surfaces and types of grime. There is no single magic formula; rather, a collection of recipes tailored for specific tasks. Many people turn to homemade cleaning solutions for their simplicity and cost-effectiveness. 1.White Vinegar The foundation of most homemade cleaning solutions rests on a few key ingredients. White vinegar, with its acetic acid content, is a powerful degreaser and disinfectant, capable of breaking down mineral deposits from hard water, soap scum, and everyday grime. Baking soda acts as a gentle, non-scratching abrasive, perfect for scrubbing surfaces without causing damage. It also serves as a natural deodorizer, absorbing and neutralizing unpleasant odors in refrigerators, drains, and carpets. The combination of these two ingredients creates a fizzing reaction that can help dislodge stubborn buildup, making them a dynamic duo in the world of DIY cleaning. The key to successful homemade cleaning solutions is understanding the ingredients. 2.Lemon For an all-purpose cleaner suitable for a majority of household surfaces, a simple mixture is highly effective. Combine one part white vinegar with one part water in a spray bottle. For a more pleasant scent and added antibacterial properties, add 10-15 drops of an essential oil like lemon, tea tree, or lavender. This specific homemade cleaning solution is excellent for wiping down laminate countertops, sealed granite, appliance exteriors, and painted walls. It cuts through fingerprints and light grease with ease. However, this vinegar-based homemade cleaning solution should not be used on natural stone surfaces like marble or unsealed granite, as the acid can etch and dull the finish. The versatility of this simple recipe demonstrates why so many rely on homemade cleaning solutions for daily upkeep. When it comes to glass and mirrors, achieving a streak-free shine is the primary goal. A superior homemade cleaning solution for this task involves mixing one part rubbing alcohol, one part white vinegar, and two parts water in a spray bottle. The rubbing alcohol is the key ingredient here; it evaporates quickly, preventing the water and vinegar from leaving behind streaks as they dry. Spray the solution directly onto a microfiber cloth rather than the glass surface to prevent drips. Wipe the surface clean, then use a second, dry microfiber cloth to buff it to a perfect shine. This is one of the most reliable homemade cleaning solutions for achieving crystal-clear windows and mirrors. 3.Baking Soda The kitchen presents a variety of cleaning challenges, from greasy stovetops to stained sinks. A powerful degreasing homemade cleaning solution can be made by creating a paste of baking soda and a small amount of warm water. Apply this paste directly to greasy splatters on the stovetop, backsplash, or inside the oven. Let it sit for 15-20 minutes to break down the grease, then scrub gently with a non-abrasive sponge and wipe clean with a damp cloth. For tougher, baked-on food, you can spray the baking soda paste with white vinegar to create that fizzing action, which helps lift the grime. This method showcases the targeted power of specific homemade cleaning solutions. To clean and deodorize a kitchen sink, sprinkle a generous amount of baking soda over the entire basin. Cut a lemon in half and use it to scrub the baking soda into the sink surface. The mild abrasiveness of the soda, combined with the citric acid and fresh scent of the lemon, will clean, polish, and deodorize the sink and garbage disposal simultaneously. Rinse thoroughly with hot water. This technique is a classic example of how natural, food-safe homemade cleaning solutions can be incredibly effective. 4.Natural Deodorant In the bathroom, soap scum and mildew are the primary adversaries. For tubs, showers, and tile, a highly effective homemade cleaning solution involves mixing one cup of baking soda with about a quarter-cup of liquid castile soap to form a thick, scrubby paste. Apply this paste to the surfaces and scrub with a brush or sponge. The baking soda provides the scrubbing power, while the castile soap helps lift and wash away the grime and soap scum. For tough mildew stains, a spray made of equal parts white vinegar and water can be used. Spray it on the affected areas, let it sit for at least 30 minutes, and then scrub away. It’s important to have good ventilation when working with these homemade cleaning solutions, particularly vinegar. Toilet bowls can be cleaned and sanitized without harsh chemicals. Pour about one cup of white vinegar into the toilet bowl and let it sit for at least an hour, or even overnight. The acid will work to dissolve mineral rings and stains. Afterward, sprinkle baking soda into the bowl, scrub with a toilet brush, and flush. The fizzing action provides an extra cleaning boost. This is a straightforward yet potent homemade cleaning solution for a task many people dislike. The power of homemade cleaning solutions extends to every corner of the house.   5.Dilute Floors require different approaches based on their material. For tile, vinyl, or linoleum floors, a simple and effective homemade cleaning solution consists of a gallon of warm water mixed with a half-cup of white vinegar and a few drops of castile soap. The vinegar disinfects and cuts through dirt, while the soap helps to lift it. Be careful not to use too much soap, as it can leave a sticky residue. For hardwood floors, the approach must be much more delicate. A heavily diluted homemade cleaning solution is necessary to prevent damage to the wood’s finish. Mix a gallon of warm water with just a quarter-cup of white vinegar. Wring the mop out until it is barely damp before applying it to the floor. Never let water pool on a hardwood surface. The development of specialized homemade cleaning solutions for different floor types is crucial for proper care. 6.Sprinkle Even carpets can

7 Best Homemade Cleaning Solutions to Make Your Home Look Like New Read More »

Dishwasher

5 Common Dishwasher Cleaning Mistakes You Need to Stop Making

The critical Dishwasher Cleaning Mistakes that are ruining your dishes, dishwasher is an instrument of precision, not a brute-force cleaning bin. Its ability to produce sparkling, sanitized dishes is entirely dependent on the user’s understanding of its mechanical and chemical processes. When dishes emerge still dirty, streaked, or wet, the fault lies not with the machine, but with a series of preventable and often repeated Dishwasher Cleaning Mistakes. Rectifying these errors transforms the appliance from a source of frustration into the reliable workhorse it was designed to be. 1.Loading The most fundamental failures originate with loading. The core principle of a dishwasher is the systematic spraying of every dish surface with high-pressure, hot, detergent-laden water. Anything that obstructs this spray guarantees a failed cleaning. Overcrowding is the most common violation of this principle. The temptation to fit one more plate or bowl is strong, but doing so creates “water shadows.” A large bowl placed incorrectly can block the spray from reaching half a dozen smaller items behind it. This leads not only to the shielded items remaining dirty but to a more insidious problem: food particles trapped on those dishes can become loosened by the heat and steam, only to be blasted across the machine during the rinse cycle. This is the source of the dreaded gritty film that can coat supposedly clean glasses and plates. These types of Dishwasher Cleaning Mistakes actively make other dishes dirtier. Each item requires clearance on all sides for the water to circulate.   2.Right Position Equally important is the orientation of the dishes. The primary spray arms are located at the bottom of the tub and often underneath the top rack, meaning the water’s primary trajectory is upward. As a consequence, all soiled surfaces must face down and be angled toward the center of the machine where the spray is most concentrated. Placing a bowl upright is a classic example of Dishwasher Cleaning Mistakes; its interior will remain a dry, dirty island. Cups, glasses, and bowls belong on the top rack, angled downward between the tines to maximize exposure. Plates on the bottom rack should be arranged in the tines so they face the central spray, not all aligned in one direction against the side. The tines themselves are angled to achieve this optimal positioning. Large, flat items like cutting boards and baking sheets must be placed on the periphery along the sides or back of the bottom rack. Placing one at the front can physically block the detergent door from opening or impede the rotation of the lower spray arm, effectively neutralizing the entire wash cycle and creating one of the most frustrating Dishwasher Cleaning Mistakes to diagnose. The division of the racks is deliberate. The bottom rack is a zone of high intensity, situated directly above the main heating element and in the path of the most powerful water jets. This area is reserved for durable items: ceramic plates, stainless steel pots, and sturdy pans. The top rack provides a gentler wash, making it the safe haven for more delicate items. All plastics, even those labeled “dishwasher safe,” must be placed on the top rack. The intense, direct heat from the lower heating element will inevitably warp or melt plastic placed on the bottom rack, a permanent form of damage that ranks high among costly Dishwasher Cleaning Mistakes. The heat can also cause certain plastics to degrade and potentially leach chemicals. Delicate glassware, too, belongs on the top rack, secured between tines to prevent it from rattling against other items and chipping. Utensil loading is a science in itself. Simply dumping cutlery into the basket leads to “nesting,” where identical shapes, especially spoons, fit together and form a waterproof seal. To prevent this, utensils must be mixed. Alternate placing some handles up and some handles down. Distribute forks, spoons, and knives across different compartments. This simple act of separation is vital to avoid these common Dishwasher Cleaning Mistakes. For safety, sharp knives should always be placed blade-down, though it must be stressed that fine cutlery should never be subjected to a dishwasher’s harsh environment. 3.Be Careful This leads to arguably the most destructive category of Dishwasher Cleaning Mistakes: washing items that are not dishwasher-safe. The damage is often irreversible. Wood, including cutting boards, utensils, and knife handles, will absorb the hot water and swell, then crack and split as the heat-dry cycle rapidly removes the moisture. Cast iron cookware will be stripped of its vital seasoning—the polymerized oil layer that provides its non-stick quality. The harsh detergents are designed to dissolve grease and oil, so they directly attack this layer, exposing the raw iron which will immediately begin to rust. High-carbon steel chef’s knives suffer a dual assault: the chemicals in the detergent micro-corrode the fine blade edge, while the physical jostling against racks dulls it. Most non-stick pans will have their delicate coatings slowly abraded by the detergents. Fine china with metallic trim or hand-painted patterns will be chemically stripped by the heat and powerful cleaning agents. Insulated travel mugs can lose their vacuum seal due to the extreme temperature fluctuations, rendering them useless. These are not minor mishaps; they are severe Dishwasher Cleaning Mistakes that ruin valuable kitchen tools. 4.Very Clean Paradoxically, being too clean before loading is also an error. Many modern dishwashers are equipped with soil sensors, often a turbidity sensor that shines a light through the wash water to measure how dirty it is. When you pre-rinse dishes to a squeaky-clean state, the sensor detects very little soil in the water. The machine’s logic then concludes it’s a light load and runs a shorter, more energy-efficient cycle. This may be insufficient for any genuinely dirty pots or pans elsewhere in the load. Furthermore, modern detergents are packed with enzymes like amylase and protease, which are designed to break down starches and proteins. These enzymes need a substrate food to work on. By pre-rinsing, you are essentially washing away the target of the detergent, making it less effective. Scraping off large chunks of food is all

5 Common Dishwasher Cleaning Mistakes You Need to Stop Making Read More »

Hot Water vs Cold Water – Which is More Efficient at Cleaning?

The temperature of hot or cold water used for cleaning is not a matter of preference; it is a fundamental variable that determines the effectiveness, safety and efficiency of the task at hand. The choice between hot and cold water can mean the difference between a stain being removed permanently and being set forever, or between a surface being sanitized and simply being wiped. Understanding the distinct properties and applications of each is essential for proper cleaning. 1.Greasy Hot water’s primary advantage lies in its thermal energy. Molecules in hot water move faster and with more kinetic energy than those in cold water. This increased energy translates directly into enhanced cleaning power in several ways. First, it lowers the surface tension of water, allowing it to spread more easily and penetrate soils and fabrics more effectively. Second, and most critically, heat excels at dealing with fats, oils, and grease. When heated, these substances become less viscous they soften, liquefy, and break down. This makes them significantly easier for detergents and mechanical action (scrubbing) to lift and wash away. Think of washing a greasy frying pan. Using cold water, the grease remains a stubborn, solid film. With hot water, the grease melts into a liquid that can be readily emulsified by soap and rinsed away. This principle applies to kitchen backsplashes coated in cooking oil, range hoods accumulating greasy vapor, and dining tables with oily residues from food. Beyond its effect on grease, heat acts as a powerful sanitizer. While boiling water (100°C or 212°F) is required for true sterilization, the hot water from a typical tap (usually between 49°C and 60°C or 120°F and 140°F) is sufficient to kill a significant number of common household bacteria, germs, and viruses. This makes hot water the superior choice for cleaning areas where hygiene is paramount. Kitchen countertops where raw meat has been prepared, cutting boards, sinks, and garbage disposals all benefit from the sanitizing action of hot water. In the bathroom, hot water is effective for cleaning toilets, sinks, and shower surfaces, helping to reduce the microbial load and control the spread of germs. It also works exceptionally well on soap scum, which is composed of mineral deposits and body oils. The heat helps to soften this tough buildup, making it much easier to scrub away. 2.Fabrics In laundry, hot water is a powerful tool for specific applications. It is most effective for washing heavily soiled items, such as work clothes, sports uniforms, and reusable cleaning cloths. It is the best choice for white cottons, bedding, and towels, as it not only removes dirt and body oils more effectively but also helps to sanitize the items, killing dust mites and allergens. The heat helps to brighten whites and can handle robust fabrics that are not at risk of shrinking or color loss. Furthermore, many powdered detergents are formulated with ingredients that activate and dissolve more completely in hot water, unleashing their full cleaning potential. Without sufficient heat, these detergents can clump and leave a residue on clothes. However, the power of hot water is also its primary source of risk and limitation. The same heat that melts grease can also damage a wide range of materials. It can cause synthetic fabrics like polyester and rayon to warp or melt, and natural fibers like wool and silk to shrink and lose their shape. Hot water is notorious for causing colors to bleed and fade, which is why it is generally unsuitable for washing dark or brightly colored garments. It can also damage certain surfaces around the home. Prolonged exposure to hot water can warp unsealed wood, damage the finish on some types of flooring, and cause certain plastics to become brittle or misshapen. A critical mistake in stain removal is applying hot water to protein-based stains. Stains from blood, egg, dairy, or mud contain proteins that coagulate when heated essentially, they cook. Applying hot water will permanently set these stains into the fabric fibers, making them nearly impossible to remove. 3.Cold Water Cold water, on the other hand, operates on a different set of principles and offers its own distinct advantages. Its primary benefit is its gentle nature. Lacking the intense thermal energy of hot water, it is significantly safer for a vast majority of materials and fabrics. This makes it the default and recommended choice for washing delicate items, such as lace, silk, and woolens, as it prevents shrinkage, stretching, and damage to the fibers. It is also the best option for washing dark and vibrant colors, as it minimizes the risk of dye bleeding and fading, preserving the life and look of the garments. The most crucial application for cold water is in stain removal for protein-based soils. Unlike hot water, which sets these stains, cold water helps to break them down and flush them out of the fabric without cooking the proteins. Any time you are dealing with a bloodstain on a shirt, a spilled glass of milk on the carpet, or an egg yolk on a tablecloth, the first and most important step is to use cold water. Soaking or rinsing the affected area in cold water before applying any cleaning agent is the correct protocol. Modern advancements in detergent technology have greatly expanded the utility of cold water for general cleaning and laundry. While older detergents required heat to be effective, most liquid detergents and specialized cold-water powders today are formulated with enzymes. These enzymes are biological catalysts designed to target and break down specific types of stains proteases for proteins, amylases for starches, and lipases for fats and they function optimally in cool or cold temperatures. Using a high-quality, enzyme-based detergent allows cold water to achieve cleaning results that are comparable to hot water for many types of lightly to moderately soiled loads, effectively removing everyday dirt and grime without the risks associated with heat. Beyond its material safety and stain-specific effectiveness, the use of cold water has significant economic and environmental benefits. Heating water is

Hot Water vs Cold Water – Which is More Efficient at Cleaning? Read More »

Vinegar, Lemon Juice and baking soda

3 Amazing Homemade Mixes: Effective and Economical

Homemade mixes, often based on simple ingredients like vinegar and baking soda, can be surprisingly powerful against kitchen grime. The true measure of a clean home isn’t found in the sheer number of specialized bottles under the sink, but in the intelligent application of a few fundamental, powerful ingredients. Long before the advent of hyper-specific commercial cleaners, households were maintained using substances readily available in the pantry. This return to basics is not about sentimentality; it is about embracing the potent, economical, and often superior efficacy of homemade mixes. Understanding the chemical properties of these simple ingredients—their acidity, alkalinity, abrasiveness, and disinfecting capabilities—is the key to unlocking a versatile and formidable cleaning arsenal. The beauty of these homemade mixes is their customizability and the transparent control they offer over the substances introduced into your living environment. 1.Vinegar and Lemon Juice At the center of this approach are the acidic powerhouses: white vinegar and lemon juice. White vinegar’s cleaning prowess comes from its acetic acid content, which gives it a low pH ideal for dissolving mineral deposits. This makes it the champion against limescale on faucets, showerheads, and inside kettles. One of the most foundational homemade mixes is a simple all-purpose surface cleaner: a 50/50 solution of white vinegar and water in a reusable spray bottle. This is the go-to for wiping down kitchen countertops (with the crucial exception of natural stone), cleaning the exterior of refrigerators and dishwashers, and making sinks sparkle. When faced with stubborn kitchen grease, this basic formula can be enhanced. By adding a teaspoon of a simple, non-moisturizing dish soap, you transform the solution. The soap acts as a surfactant, breaking the surface tension of the grease, allowing the acidic vinegar to penetrate and dissolve it more effectively. For deeper cleaning tasks, the concentration of these acidic homemade mixes can be adjusted. To descale a coffee maker, run a full cycle with a reservoir of half vinegar and half water, followed by two or three cycles of plain water to completely flush the system. To restore a clogged showerhead, submerge it completely in a bowl of undiluted white vinegar overnight. The acetic acid will patiently eat away at the calcium and magnesium buildup. A quick scrub with an old toothbrush in the morning will dislodge any remaining particles, restoring full water pressure. As a natural rinse aid in your dishwasher, a small, upright bowl of white vinegar placed on the top rack can help prevent water spots on glassware, proving the diverse utility of these homemade mixes. Lemon juice, with its citric acid, works similarly but offers the added benefits of a natural degreaser and a fresh, clean scent. A fantastic trick for cleaning a grimy microwave involves one of the simplest homemade mixes imaginable: slice a lemon into a bowl of water, microwave on high for three to five minutes until boiling, and let the steam-filled chamber sit for ten minutes before wiping. The steam, infused with citric acid, softens baked-on food to the point where it can be wiped away with almost no effort. It is absolutely critical, however, to understand the limitations of acidic homemade mixes. Their power to dissolve minerals means they will permanently damage certain surfaces. Never use vinegar or lemon juice on natural stone like marble, granite, travertine, or soapstone. The acid will etch the surface, creating dull spots and compromising the sealant. Likewise, avoid using it on waxed wood furniture or floors, as it will strip the protective finish. Cast iron cookware, which relies on a polymerized oil seasoning, will also be stripped by acid. 2.Sodium Bicarbonate On the opposite end of the pH spectrum lies baking soda, or sodium bicarbonate. This mild alkali is a master of dissolving organic compounds like dirt and grease. Its fine, crystalline structure also makes it a superb gentle abrasive that won’t scratch most surfaces. For a powerful scouring paste, one of the most effective homemade mixes for bathrooms and kitchens, simply combine baking soda with a small amount of water to form a thick, spreadable consistency. This paste is perfect for cleaning sinks, tubs, and tile. Apply it, let it sit for twenty minutes to allow the alkali to work, and then scrub. For notoriously difficult tile grout, this is where you can see the synergistic power of combining different homemade mixes. After scrubbing with the baking soda paste, a light spray of hydrogen peroxide will create a fizzing reaction that helps lift deep-set stains. This same baking soda paste is the secret to a fume-free, non-toxic oven cleaning. Coat the cool, interior surfaces of the oven (avoiding heating elements) and let the paste sit overnight. The sodium bicarbonate will break down the carbonized grease, which can then be scraped and wiped away the next day. A final spray of vinegar will react with any leftover paste residue, making the final wipe-down easier. Beyond scrubbing, baking soda is a world-class deodorizer. It neutralizes odor molecules rather than masking them. Sprinkling a generous layer over carpets and rugs, letting it sit for an hour, and then vacuuming it up will pull out stale smells. An open box in the fridge, a sprinkle in the bottom of the trash can, or a pour down a smelly drain followed by hot vinegar are all testaments to the deodorizing strength of this simple powder. These applications showcase how homemade mixes can be as simple as a single, well-applied ingredient. For disinfection and achieving a polished finish, rubbing alcohol and hydrogen peroxide are essential. Isopropyl alcohol is an excellent solvent that evaporates quickly without a trace. This makes it a key ingredient in some of the most effective homemade mixes for shiny surfaces. For a perfect, streak-free stainless steel cleaner, mix equal parts water and 70% isopropyl alcohol with a few drops of a neutral oil like mineral or olive oil in a spray bottle. The alcohol cleans, and the oil provides a micro-layer that buffs to a shine and resists fingerprints. This same principle makes alcohol a valuable addition to window cleaning solutions, as its rapid evaporation is the secret to preventing streaks.

3 Amazing Homemade Mixes: Effective and Economical Read More »

dishwasher

6 Easy Tips On How To Clean Your Dishwasher With Vinegar

A dishwasher, in its daily work, cleans plates, glasses, and cutlery. It processes food residues, grease, and detergents. Over time, these elements do not simply vanish. They accumulate. Food particles, soap scum, and the minerals from hard water deposit themselves on the internal surfaces, within the filter, and on the spray arms. This buildup leads to several common issues: dishes emerging with cloudy spots or a film, an unpleasant odor emanating from the appliance, and a general decline in the machine’s efficiency. The very appliance designed to clean becomes a source of uncleanliness. Its performance diminishes, and its lifespan can be inadvertently shortened by neglect. Maintaining the cleanliness of the dishwasher itself is as crucial as loading it correctly. 1001 Uses For Vinegar For this internal cleaning, white distilled vinegar stands as an effective and straightforward solution. It is a natural product, widely available, and remarkably versatile for household cleaning. Its primary active component, acetic acid, is a mild acid that possesses properties invaluable for dishwasher maintenance. Acetic acid works by dissolving mineral deposits, such as limescale and hard water stains, which often manifest as a white, chalky film. It effectively cuts through grease and helps to break down stubborn soap scum, which adheres to surfaces over time. Beyond its dissolving capabilities, vinegar is also a natural deodorizer. It neutralizes rather than masks unpleasant odors, leaving the dishwasher interior smelling fresh and clean without harsh chemical fragrances. Furthermore, it offers a gentle antimicrobial action, inhibiting the growth of mold and mildew that can thrive in damp environments. Unlike many commercial chemical cleaners, white distilled vinegar is non-toxic, safe for use around food preparation areas, and poses no risk to household members or pets. It is also environmentally friendly, biodegrading without leaving harmful residues. Its non-corrosive nature ensures it is safe for the various components of a dishwasher, including stainless steel interiors, plastic parts, and rubber seals, provided it is used as directed. The combination of its cleaning power, deodorizing ability, safety, and cost-effectiveness makes white distilled vinegar an ideal choice for the regular deep cleaning of a dishwasher. 1.Remove All Items Before initiating the vinegar cleaning cycle, proper preparation is essential to maximize effectiveness. The first step is to ensure the dishwasher is completely empty. Remove all dishes, glasses, cutlery, pots, and pans. Nothing should remain inside the racks or in the utensil baskets. This allows the vinegar solution to circulate freely and access all internal surfaces without obstruction. Once emptied, the next critical step involves inspecting and manually cleaning the dishwasher’s filter and drain area. This component, typically located at the bottom of the dishwasher, traps larger food particles and debris to prevent them from recirculating or clogging the drain pump. Depending on the dishwasher model, the filter may be a single removable cylinder or a multi-part assembly. Consult your appliance’s user manual for specific instructions on how to access and remove it, as designs vary. Once removed, rinse the filter thoroughly under hot running water. You will often find accumulated food scraps, labels from containers, small bone fragments, or even broken glass shards. Use an old toothbrush or a small scrub brush to dislodge any stubbornly adhering food particles, grease, or slimy buildup. Pay close attention to the mesh screens and any crevices where debris can hide. For more tenacious grime, a small amount of dish soap can be used during this manual scrubbing. After cleaning, ensure the filter is completely clear and free of obstructions before carefully reinserting it back into its housing, ensuring it is properly seated and locked according to your dishwasher’s design. This manual pre-cleaning of the filter is vital because a clogged filter significantly impedes water circulation and can prevent the vinegar solution from effectively reaching all areas. Additionally, take a moment to manually wipe down accessible areas like the edges of the door, the rubber gaskets or seals around the door frame, and the lower spray arm if easily reachable. Food debris and greasy buildup often accumulate in these spots. A damp cloth, possibly moistened with a little diluted white vinegar, can be used for this preliminary wipe-down, addressing visible grime before the main cycle begins. This foundational cleaning ensures the vinegar cycle focuses its power on the more inaccessible internal workings. With the dishwasher prepped, it is time for the main vinegar cleaning cycle. First, select the appropriate container for the vinegar. An open, dishwasher-safe bowl or a measuring cup made of glass or ceramic is ideal. Avoid using plastic containers that might absorb odors or stain. The key is that the container should be open at the top, allowing the vinegar’s vapors to disperse throughout the dishwasher cavity as well as allowing the liquid to mix with the wash water. Pour approximately two cups of white distilled vinegar into this open container. This specific type of vinegar, clear and typically containing 5% acetic acid, is crucial. Other types, such as apple cider vinegar, should be avoided because their color can potentially stain the dishwasher’s interior, and their sugar content might leave a sticky residue. Once the vinegar is in the container, place it upright on the top rack of the empty dishwasher. The top rack placement ensures that the vinegar is introduced to the wash cycle from a higher point, allowing it to distribute effectively throughout the entire system. Next, close the dishwasher door. 2.Be Careful With the Mixtures Before starting the cycle, it is imperative to ensure that no dishwasher detergent, rinse aid, or any other cleaning product is present in their respective dispensers. The vinegar cycle must be run independently. Mixing vinegar with certain cleaning agents, particularly chlorine bleach, can produce dangerous, toxic fumes and should always be avoided. Select the hottest and longest wash cycle available on your dishwasher. Common cycle names include “Heavy Duty,” “Sanitize,” or “Pots and Pans.” The elevated water temperature significantly enhances the effectiveness of the vinegar’s acetic acid, allowing it to better dissolve mineral deposits, cut through grease, and sanitize the

6 Easy Tips On How To Clean Your Dishwasher With Vinegar Read More »

dirty Air Conditioner

The Best Way To Clean Your Air Conditioner And You Need To Know

Ensure your air conditioner is completely disconnected from its power source before you begin any cleaning. For window units, this means unplugging it from the wall outlet. For split and central air conditioning systems, you must switch off the corresponding circuit breaker in your home’s main electrical panel. Outdoor condenser units often have an additional disconnect switch located near the unit itself; turn this off as well. Gather your supplies: a vacuum cleaner with a soft brush attachment, screwdrivers if needed for panel removal, a fin comb, specialized air conditioner coil cleaner (check if it’s for evaporator or condenser coils, and if it’s a no-rinse formula), a spray bottle, mild detergent, several clean cloths, gloves, and protective eyewear. Window Air Conditioner Once unplugged, you can begin cleaning your window air conditioner. If possible, removing the unit from the window and placing it on a stable, practical surface outdoors will allow for a more thorough cleaning, especially of the outer frame and rear condenser coils. If removal is not practical, proceed to clean the accessible parts while the unit is installed. Start by removing the front panel or grille. This usually comes off or may be held in place by a few screws. Consult your unit’s manual if you are unsure. Behind this panel, you will find the air filter. Slide the filter out. Most window air conditioner filters are washable. Use a vacuum cleaner with the brush attachment to remove loose dust and debris. For more stubborn dirt, wash the filter gently with warm water and a mild soap solution. Rinse it thoroughly under running water and allow it to air dry completely before reinstalling. A damp filter can encourage mold and mildew growth in your air conditioner. With the filter removed, you will see the evaporator coils. These are thin metal fins that cool the air. They can collect a significant amount of dust. Use the soft brush attachment on your vacuum cleaner to gently clean these coils. Always vacuum in the direction of the fins (usually up and down) to avoid bending them. If you notice any bent fins, a fin comb can be used to gently straighten them. Bent fins restrict airflow and reduce the efficiency of the unit. For a deeper clean, apply a non-acidic, foaming coil cleaner specifically designed for evaporator coils. Spray the cleaner evenly over the coils and let it sit for the time recommended by the manufacturer. The foam will usually break down and carry the dirt away, often dripping into the drain pan. Some cleansers do not require rinsing, while others may suggest a light rinse if possible. If you have removed the unit from the window, you can now access the condenser coils located at the back of the unit. These coils release heat to the outside and are prone to collecting leaves, grass, and other outdoor debris. Use a stiffer brush to remove larger debris, then vacuum carefully. You can also gently spray these coils with a garden hose, directing the water from the inside of the unit outwards, if possible, to push dirt out rather than further in. Avoid using high pressure, which could damage the fins. Apply a condenser coil cleaner if needed, following product instructions, and rinse if required. Locate the drain pan at the bottom of the unit. It collects condensation. Clean any accumulated slime or mold from the pan using a cloth and a mild detergent solution or a diluted bleach solution. Ensure the drain port or tube is clear of any blockages. A pipe cleaner or a small, flexible wire can be used to dislodge obstructions. Carefully wipe down any accessible fan blades, as these can also collect dust. Clean the interior surfaces of the AC casing with a damp cloth. Once all parts are clean and thoroughly dry, reassemble the air conditioner. Reinstall the dry filter, attach the front panel, and if you removed the unit, carefully place it back in the window, ensuring it is securely installed and properly sealed around the edges to prevent air leaks. Split Air Conditioner (Ductless Mini-Split) Split air conditioners consist of an indoor unit (evaporator) and an outdoor unit (condenser), both of which require regular cleaning. Indoor Unit: Make sure the entire system is turned off at the circuit breaker. Open the front panel of the indoor unit; this panel usually opens upward. You can clean the outer plastic housing of the air conditioner with a soft, damp cloth. The air filters are located directly below the front panel. Most units have two or more filter screens. Unclip or slide them out carefully. These filters are usually reusable. Vacuum them thoroughly on both sides. If they are greasy or very dirty, wash them in warm water with a mild detergent. Rinse them thoroughly and allow them to air dry completely. Never operate the unit without the filters installed, as this allows dust to directly clog the evaporator coils and fan rotor. Behind the filters are the evaporator coils. These delicate fins can be gently vacuumed with a soft brush attachment. Move the brush toward the edges. For a more thorough cleaning, use a no-rinse evaporator coil cleaner spray designed for indoor use. Apply it evenly over the entire surface of the coil. The cleaner will usually foam, dissolve dirt and grime, and then condense and drain with normal condensation the next time the unit is used. Straighten any bent edges of your air conditioner with a fine-toothed comb. The blower wheel, or drum fan, is located deep inside the indoor unit, behind the evaporator coils. This component is crucial for air circulation, but it is prone to accumulating a thick layer of dust, mold, and grime, which can significantly reduce airflow and air quality, as well as cause imbalances and noise. Cleaning the blower wheel can be challenging without disassembling it. For light surface cleaning, you can reach parts of the blower wheel with a long, thin brush or a specialized flexible cleaning brush,

The Best Way To Clean Your Air Conditioner And You Need To Know Read More »