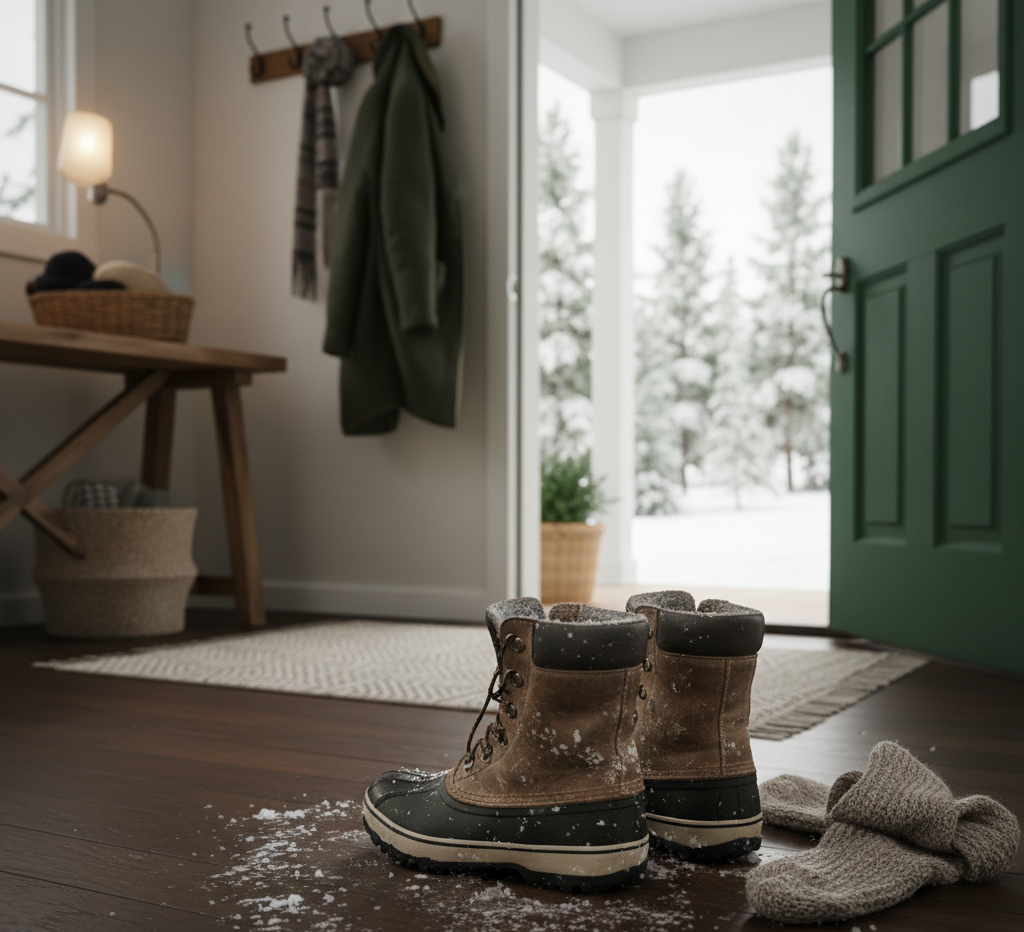
Winter Cleaning

Perfect Cleaning Schedule

Cleaning Schedule: A Room-by-Room Guide to Your Perfect Cleaning Schedule

For many, cleaning a house is a cycle of chaos and control, and having a daily cleaning schedule becomes essential. It exists in the extremes: either a frantic, multi-hour marathon of scrubbing and scouring in a desperate attempt to reclaim a space that has descended into disarray, or a state of blissful ignorance where the dust bunnies multiply in the corners and the sticky film on the kitchen counter becomes an accepted part of the landscape. We clean in a panic before guests arrive, we clean in a fit of frustration when we can no longer stand the mess, and we clean on the first sunny day of spring with a burst of ambitious energy that quickly fades. This reactive approach to cleaning is exhausting, inefficient, and ultimately, a losing battle. The secret to a consistently clean, calm, and functional home does not lie in more powerful chemicals or more aggressive scrubbing. It lies in a simple, transformative tool: a cleaning schedule. Proactive Maintenance The very idea of a cleaning schedule can feel restrictive, conjuring images of a rigid, joyless routine. But in reality, a schedule is the opposite of a restriction; it is a form of freedom. It is the freedom from the overwhelming feeling of not knowing where to start. It is the freedom from the guilt of a messy home and the freedom from having to sacrifice an entire weekend to a cleaning binge. A schedule transforms the monumental task of “cleaning the house” into a series of small, manageable, and predictable habits. It is the difference between facing a mountain and climbing a single step each day. It is about proactive maintenance, not reactive disaster control. Creating a schedule that works is about understanding the different rhythms of your home and the tasks required to maintain it. These tasks can be broken down into different frequencies: daily, weekly, monthly, and seasonal. By assigning tasks to these categories, you create a system that ensures everything gets done in its own time, preventing the kind of deep-seated grime that requires a marathon session to remove. The daily tasks are the bedrock of the system, the small habits that take no more than fifteen to twenty minutes but have the greatest impact on the daily sense of order in your home. These are the actions that prevent chaos from ever taking root. This includes making the bed each morning, an act that takes less than two minutes but instantly makes an entire room feel more put-together. It means wiping down the kitchen counters and sink after every meal. This simple wipe prevents the buildup of sticky spills and crumbs that become harder to clean the longer they sit. A quick sweep of the kitchen floor at the end of the day catches the daily debris and stops it from being tracked throughout the rest of the house. Another cornerstone of the daily routine is the “one-load” rule for laundry. By doing a single load of laundry from start to finish each day—washing, drying, folding, and putting away—you prevent the dreaded mountain of clothes from ever forming. Cleaning Day From these high-impact daily habits, we move to the weekly core clean. This is the more traditional “cleaning day,” but when broken down and performed consistently, it becomes a much less daunting task. You can choose to tackle all of these tasks on a single day, or you can assign one or two rooms to different days of the week, a method often called “zone cleaning.” The weekly routine is about a more thorough reset of the main living areas. The bathrooms are a primary focus of the weekly clean. This is a matter of hygiene as much as appearance. This means a thorough scrubbing of the toilet, inside and out. It involves cleaning the shower or bathtub, scrubbing away the beginnings of soap scum before it can become a thick, stubborn film. The bathroom sink and countertops should be scrubbed and disinfected, and the mirror should be wiped to a streak-free shine. Finally, the bathroom floor should be swept and mopped. The kitchen, the heart of the home, also requires a weekly deep dive. This goes beyond the daily counter wipe. It means wiping down the exterior of all your appliances—the refrigerator, the dishwasher, the microwave, and the stovetop—to remove fingerprints and splatters. It involves cleaning the inside of the microwave, a task made simple by heating a bowl of water and vinegar to loosen the grime. The kitchen floor, which sees the most traffic and spills, needs to be thoroughly mopped. The rest of the home requires a focus on the universal enemy: dust. The weekly routine should include a thorough dusting of all surfaces in the living areas and bedrooms. This includes furniture, shelves, and any decorative items. Following the dusting, a comprehensive vacuuming of all floors is essential. This includes carpets, rugs, and hard surfaces. Regular vacuuming not only keeps floors looking clean but also improves indoor air quality by removing dust, dander, and other allergens. Deep Cleaning Beyond the weekly routine lies the monthly deep dive, the set of tasks that addresses the slow, creeping grime that is often overlooked. These are the details that separate a tidy house from a truly clean one. This is the time to wipe down all the baseboards in your home, which are magnets for dust and scuffs. Clean your light fixtures and ceiling fans, carefully wiping away the dust that accumulates on bulbs and blades. This is also the time to deep clean some of your hardworking appliances. Run a cleaning cycle on your washing machine to prevent the buildup of soap scum and mildew. Clean the filter in your dishwasher to improve its performance. This is also a good opportunity to clean your window sills and the tracks of your sliding doors, which are notorious for trapping dirt and insects. At the end, we have the seasonal, or quarterly, tasks. These are the major projects, the whole-home

Cleaning Schedule: A Room-by-Room Guide to Your Perfect Cleaning Schedule Read More »

humidifier being effective

Humidifier Cleaning: The Hidden Danger in Your Humidifier (And How to Prevent It)

A humidifier is essential because it’s the invisible antagonist of the Canadian winter, an adversary that arrives not with a blizzard, but with the first click of the heater. It’s dry air, and its effects are as predictable as the fall of leaves in October. It manifests as a persistent tickle in the throat, a morning voice that sounds raspy and strained. It is the reason our skin feels tight and itchy, our lips chap, and our knuckles crack. It is the culprit behind the surprising, sharp zap of a static shock from a doorknob and the reason our wooden furniture can creak and even crack over time. In our quest to create warm, sealed sanctuaries against the cold, we inadvertently strip our indoor environment of its most essential atmospheric component: moisture. The Solution The solution to this pervasive dryness is a simple, yet profoundly effective, appliance: the humidifier. It is a machine dedicated to the straightforward task of reintroducing water vapor into the air, and in doing so, it can transform a harsh, uncomfortable indoor climate into a healthy, comfortable, and pleasant one. But a humidifier is not a passive appliance. It is an active participant in the quality of the air you breathe, and its ownership comes with a critical responsibility. A clean, well-maintained humidifier is a powerful tool for health and wellness. A neglected one can become the exact opposite, a device that disperses not soothing moisture, but a plume of microscopic contaminants. To appreciate the importance of a humidifier, one must first understand the concept of relative humidity. This is a measure of the amount of water vapor in the air, expressed as a percentage of the maximum amount the air could hold at a given temperature. Health experts generally agree that the ideal indoor relative humidity for human comfort and health is between 30 and 50 percent. During a cold winter, the air outside holds very little moisture. When we bring that air into our homes and heat it, its relative humidity plummets, often falling into the single digits, creating an environment that is drier than a desert. This parched air acts like a sponge, drawing moisture from every available source. It pulls it from our skin, leading to dryness and exacerbating conditions like eczema. It pulls it from the delicate mucous membranes lining our respiratory tract, from our nose and throat down to our lungs. This can dry them out, impairing their ability to trap viruses and bacteria, which is one reason colds and sinus infections can feel so much worse in the winter. Proper humidity keeps these membranes moist and healthy. It can also help soothe a cough and relieve congestion, making a humidifier an indispensable tool during cold and flu season. The Right Choice The most fundamental choice you will make is the type of humidifier that best suits your needs, and each operates on a different principle. The most common and traditional type is the evaporative humidifier. This device works on a simple principle, using a fan to blow air through a wet, absorbent filter, often called a wick. The water evaporates from the wick and is released into the room as a fine, invisible cool mist. These models are often self-regulating; as the humidity in the room increases, the rate of evaporation from the wick naturally slows down. Their main drawback is that the wick is a consumable item. It must be replaced regularly, as it can become clogged with mineral deposits and can potentially harbor mold if not maintained. A more modern and increasingly popular option is the ultrasonic humidifier. These machines are known for being exceptionally quiet. They use a small, vibrating diaphragm, a nebulizer, that moves at an ultrasonic frequency. These high-frequency vibrations break the water in the reservoir into microscopic droplets, which are then released into the air as a visible, cool mist. A major advantage of ultrasonic models is that they do not use a filter, reducing ongoing replacement costs. However, they have one significant potential downside that is directly tied to your water source, which we will address later. Vaporizer For those who prefer a warm mist, there is the vaporizer, or steam humidifier. This type of machine is the simplest of all. It contains a heating element that boils the water, creating steam that is then released into the room. The primary advantage of a vaporizer is that the boiling process kills any bacteria, mold, or other microorganisms that might be present in the water, ensuring the mist it produces is sterile. This warm mist can be particularly soothing for coughs and congestion. The trade-offs are that these models consume more electricity to heat the water, and they present a potential burn risk, making them a less ideal choice for homes with small children. At the end, there is the whole-house, or central, humidifier. This is not a portable appliance, but a system that is integrated directly into your home’s forced-air heating and cooling system. It automatically adds moisture to the air as it is being heated and distributed throughout your home, maintaining a consistent, pre-set level of humidity in every room. While this is the most convenient and hands-off solution, it is also the most expensive and typically requires professional installation and maintenance. Regardless of which type of humidifier you choose, one non-negotiable truth unites them all: they must be kept scrupulously clean. A humidifier’s reservoir of still, room-temperature water is the perfect environment for the growth of mold, mildew, and bacteria. If the machine is not cleaned regularly, it will aerosolize these contaminants along with the water vapor, broadcasting a plume of potentially harmful microorganisms directly into the air you breathe. This can trigger allergies, and in some cases, lead to a respiratory illness sometimes called “humidifier fever.” Cleaning The cleaning routine is a simple but critical two-part process of descaling and disinfecting. The first step, which should be done weekly, is descaling. This addresses the mineral buildup, or limescale,

Humidifier Cleaning: The Hidden Danger in Your Humidifier (And How to Prevent It) Read More »

Hot Tub Cleaning: Get Perfectly Balanced Hot Tub Water Every Time

The hot tub is a unique and cherished feature of a home, a vessel of relaxation and hydrotherapy that promises to melt away the stresses of the day. It is a place of quiet solitude under the stars or a centerpiece for social gatherings with friends and family. But this luxury comes with a non-negotiable responsibility. A hot tub is not a “set it and forget it” appliance like a refrigerator or a dishwasher. It is a small, self-contained, and highly active body of water, a delicate ecosystem that requires consistent, diligent maintenance to remain a source of pleasure and not become a source of murky, unsanitary, and potentially hazardous problems. The Chemistry of Water To own a hot tub is to become a part-time water chemist. The warm, bubbling environment that is so inviting to us is also the perfect breeding ground for bacteria, algae, and other microorganisms. The key to a clean, safe, and enjoyable hot tub experience is not about performing a massive, hours-long cleaning session once a year. It is about a regular, simple, and consistent routine of testing, balancing, and sanitizing. Understanding the fundamentals of this routine is the most important aspect of hot tub ownership. The foundation of hot tub care is water chemistry, and the three most important pillars of that chemistry are alkalinity, pH, and the sanitizer level. These three elements are interconnected, and a problem with one will inevitably affect the others. The first step for any hot tub owner is to get comfortable with testing the water, which should be done at least two or three times a week, or more often with heavy use. The most common method is with test strips, which are simple, color-coded strips of paper that you dip into the water for a few seconds. The first level you should check and adjust is the total alkalinity. Alkalinity is the water’s ability to resist changes in pH. It acts as a buffer, a stabilizing force that prevents the pH level from swinging wildly. The ideal range for total alkalinity in a hot tub is typically between 80 and 120 parts per million (ppm). If your alkalinity is too low, the pH will be unstable and can drop suddenly, making the water corrosive. If it is too high, it can cause the pH to drift upward, leading to cloudy water and scale formation. You can raise the alkalinity with a product often called “Alkalinity Increaser” (sodium bicarbonate) and lower it with a pH decreaser (sodium bisulfate). Always adjust the alkalinity first, before you address the pH. Alkalinity Once your alkalinity is in the correct range, you can adjust the pH. The pH is the measure of how acidic or basic your water is, on a scale of 0 to 14. A pH of 7 is neutral. The ideal range for a hot tub is between 7.4 and 7.6. This is not an arbitrary number; it is slightly alkaline to match the natural pH of the human eye, which is why it is the most comfortable for bathers. If the pH is too low (acidic), the water can be corrosive to the hot tub’s components, like the heater and the pump seals, and it can be irritating to the skin. If the pH is too high (basic), it will cause the sanitizer to become sluggish and ineffective, lead to cloudy water, and promote the formation of scale on the shell and in the plumbing. You can raise the pH with a “pH Increaser” (sodium carbonate) and lower it with a “pH Decreaser” (sodium bisulfate). Only after both the alkalinity and pH are properly balanced can you effectively manage the sanitizer. The sanitizer is the chemical that actively kills bacteria and other harmful microorganisms in the water. The two most common types of sanitizer are chlorine and bromine. Chlorine is fast-acting and a powerful oxidizer, but it can have a stronger chemical smell and is less stable in the hot, high-pH environment of a spa. Bromine is more stable at higher temperatures and has a less noticeable odor, making it a very popular choice for hot tubs. It also has the unique ability to be reactivated by “shocking” the water. The ideal level for chlorine is between 1 and 3 ppm, and for bromine, it is between 3 and 5 ppm. You must maintain these levels at all times to ensure the water is safe for bathing. Hot Tub Filters Even with a perfectly maintained sanitizer level, the water will accumulate other unwanted waste products over time. Soaps, lotions, deodorants, and organic matter from bathers build up in the water, creating a food source for bacteria and making the water cloudy and unpleasant. To combat this, you need to “shock” your hot tub on a regular basis, typically once a week. Shocking is the practice of adding a large dose of an oxidizer to the water. This does several things: it breaks down all the organic waste, it kills any resistant bacteria, and in a bromine spa, it reactivates the used bromine ions, turning them back into effective sanitizer. Always shock the spa with the cover off and the jets running to allow it to circulate properly and to let the gasses vent. Beyond the daily and weekly chemical maintenance, the hot tub has other physical components that require regular attention. The most important of these is the filter. The filter is the kidney of your hot tub, constantly working to remove small particles, hair, and debris from the water. A dirty, clogged filter cannot do its job, which will result in cloudy water and will put a strain on your pump. The filter cartridges should be removed and rinsed with a garden hose at least once a week. The goal is to spray the debris out from between the pleats of the filter. Every few months, the filter needs a deep clean. This involves soaking it overnight in a specialized filter cleaning solution to break down

Hot Tub Cleaning: Get Perfectly Balanced Hot Tub Water Every Time Read More »

Cleaning Patios and Decks: 5 Essential Tips for Cleaning Your Patio Before the Snow

The patio or deck is an extension of the home. It is an outdoor living room, a place for summer barbecues, quiet morning coffees, and evenings with friends. But unlike a living room, it is in a constant battle with the elements. It is exposed to rain, sun, snow, falling leaves, bird droppings, and the slow, creeping advance of mold, mildew, and algae. Over the course of a season, this relentless exposure can transform a beautiful, welcoming space into a grimy, stained, and even hazardous one. Cleaning a patio or deck is not a simple wipe-down. It is a project of reclamation. It is about pushing back against the natural decay and restoring the space to a state of cleanliness, safety, and readiness. Whether you are preparing it for enjoyment in the spring or putting it to bed for the winter, a thorough cleaning is a non-negotiable part of responsible homeownership. The process requires a systematic approach, the right tools, and an understanding that different materials demand different methods. 1.First Step The first step in this project, before a single drop of cleaner is applied, is the great evacuation. You cannot clean a space that is cluttered. Everything must be removed from the deck or patio surface. This means the furniture, the grill, the planters, the umbrellas, and the outdoor rugs. This step is not just about clearing the way; it is a forcing mechanism that reveals the true state of the surfaces underneath. It uncovers the hidden stains, the patches of green algae under a planter, and the full extent of the dirt you are about to tackle. With the space completely clear, the next step is a thorough sweep. Use a stiff-bristled push broom to remove all the loose debris: leaves, twigs, dirt, cobwebs, and anything else that has accumulated. Pay special attention to the corners and the spaces between deck boards where debris loves to hide. This initial sweep is crucial because it removes the abrasive, gritty material that could otherwise scratch the surfaces during the scrubbing phase. Now, with a clear and swept surface, you can properly assess the situation. Look closely at the material. Is it a wooden deck, a composite deck, or a hardscape patio made of concrete, pavers, or natural stone? Identify the specific problems you need to address. Are there dark, blackish spots that indicate mold? Green, slimy patches of algae, which can be a serious slipping hazard? Dark, circular stains under where planters used to be? Grease splatters around the grill area? The answers to these questions will determine your plan of attack and the specific cleaning solutions you will need. 2.Wooden Decks For wooden decks, the approach must balance cleaning power with the need to protect the wood fibers. The wrong cleaner or technique can cause irreparable damage. The gentlest method should always be the first attempt. A simple solution of a mild pH-neutral soap, like dish soap, mixed in a bucket of warm water can be surprisingly effective for light dirt. Apply the solution, scrub gently with a soft-bristle deck brush, and rinse thoroughly. For the more common and stubborn issues of algae, mold, and ingrained dirt, a more powerful solution is needed. The best choice for a wooden deck is a cleaner based on oxygen bleach (sodium percarbonate). Unlike chlorine bleach, which is harsh, can damage wood fibers, and is harmful to surrounding plants, oxygen bleach is a non-toxic alternative that cleans by releasing oxygen ions when mixed with water. This process breaks down dirt, mold, and algae without harming the wood. To use it, mix the powdered oxygen bleach with water according to the manufacturer’s directions. It is critical to wet the entire deck surface with plain water from a hose before you apply the cleaner. A dry deck will absorb the cleaning solution too quickly and unevenly. Apply the oxygen bleach solution with a mop or a garden sprayer and let it sit on the surface for 10-15 minutes, but do not let it dry. This “dwell time” is when the chemical reaction is happening. After it has sat, use a stiff-bristled deck brush, scrubbing in the direction of the wood grain, to agitate the grime. At the end, rinse the deck completely with a hose until all the cleaner and dirt are gone. 3.High Pressure Washer The question of the pressure washer inevitably arises when cleaning decks. A pressure washer is a powerful tool that, in inexperienced hands, can do far more harm than good. A stream of water that is too powerful or held too close can easily gouge the wood, raise the grain, and create a fuzzy, splintered surface. If you choose to use one, you must do so with extreme caution. Use the lowest possible pressure setting (no more than 1200 PSI for most softwoods like pine), and use a wide, 40-degree fan tip. Keep the nozzle at least a foot away from the wood surface at all times, and use long, sweeping motions, never stopping in one spot. A pressure washer should be seen as a tool for rinsing, not for blasting away dirt. The chemical cleaner does the real work of lifting the grime; the pressure washer just washes it away. For composite decks, the cleaning process is generally less intensive. While marketed as “low-maintenance,” they are not “no-maintenance.” They are still susceptible to mold and mildew, which can feed on the organic fillers within the composite material. A gentle scrub with a soft-bristle brush and a mild soap solution is often sufficient for general cleaning. For mold, a solution of one part white vinegar to two parts water can be effective. Avoid using abrasive cleaners or metal brushes, which can scratch and dull the surface. Pressure washing is generally safer on composite than on wood, but the same precautions of low pressure and a wide fan tip should be observed. 4.Concrete, Paving or Stone Patios made of concrete, pavers, or stone present a different set of challenges. These

Cleaning Patios and Decks: 5 Essential Tips for Cleaning Your Patio Before the Snow Read More »

woman giving her friend a cleaning gift card

Cleaning Gift: The Most Thoughtful Thanksgiving Gift You Can Give

Thanksgiving is a holiday centered on the beautiful, simple act of gathering. It’s about the warmth of a crowded table, gifts, the familiar comfort of shared recipes, and the expression of gratitude for the people in our lives. We plan menus, we brine turkeys, and we coordinate who will bring which dessert. But beneath this joyful preparation lies a silent, often stressful, and monumental task that almost always falls on the host: the pre-Thanksgiving deep clean. We have all felt it. The week before the guests arrive is a frantic race against the clock. It is a period of scrubbing, dusting, and mopping, driven by the quiet but intense pressure to present a home that is not just tidy, but impeccably clean. It is a labor of love, but it is labor nonetheless. It is hours spent on hands and knees, wiping baseboards and scrubbing floors, when that time could be spent perfecting a pie crust or simply taking a moment to breathe before the happy chaos begins. This year, consider a different kind of contribution. Instead of offering to bring another side dish that will crowd the refrigerator, think about giving a gift that truly serves the person you are thankful for. Consider giving the gift of a clean home. It may sound unconventional, but a pre-Thanksgiving cleaning, whether performed by you or a professional service, is one of the most thoughtful, practical, and profoundly impactful gifts you can possibly give a friend who is hosting. It is a gesture that transcends a simple present; it is a gift of time, of peace of mind, and of genuine, functional support. The Gift of Time In our busy lives, time is the most precious and non-renewable resource we have. During the holiday season, this becomes acutely apparent. The host of a Thanksgiving dinner is not just cooking a single meal; they are orchestrating a major event. Their to-do list is a marathon of planning, shopping, chopping, and baking. The last thing they have is a surplus of free hours. Let’s be honest about what a true guest-ready clean entails. It is not a quick wipe of the counters. It is a comprehensive, top-to-bottom effort. The Dusting: This means getting not just the coffee table, but the tops of the door frames, the ceiling fan blades, the baseboards, and the window sills. It is a detailed, meticulous job that can easily take an hour or more. The Kitchen Deep Clean: The kitchen is the heart of Thanksgiving, and it needs the most intensive work. This involves scrubbing the stovetop, wiping down the fronts of all appliances, cleaning the microwave, disinfecting the countertops, and making sure the sink is sparkling. This is a solid hour of focused work, at minimum. The Bathroom Scrub: The guest bathroom needs to be pristine. This means scrubbing the toilet, cleaning the sink and faucet, wiping down the mirror until it is streak-free, and washing the floor. The Floors: Every hard-surface floor in the main living areas needs to be thoroughly swept and mopped. Every carpet needs to be vacuumed, including moving furniture to get the dust bunnies hiding underneath. This can easily consume another hour or two, depending on the size of the home. The Final Touches: Cleaning entryway glass, tidying up clutter, and giving everything a final polish. When you add it all up, a proper pre-hosting deep clean can easily take five to eight hours of hard, physical work. By giving the gift of a cleaning, you are handing your friend an entire day of their life back. That is a day they can now use to finalize their menu, to bake a dessert without rushing, to spend time with their children who are excited for the holiday, or, most importantly, to simply sit down with a cup of tea and mentally prepare for the joy of hosting, rather than the stress of it. You are not just saving them a chore; you are giving them the space to enjoy the process. The Gift of Peace of Mind The physical labor of cleaning is only half the battle. For any host, the mental load can be even more exhausting. The pressure to have a “perfect” home is a real and often unspoken source of anxiety. Every dust bunny in the corner, every smudge on the window, and every crumb under the dining table can feel like a personal failing when you are about to welcome people into your home. This “hosting anxiety” creates a mental checklist that runs on a constant loop in a host’s mind. Did I remember to dust the lampshades? Is the guest bathroom clean enough? Does the house smell fresh? This internal monologue is a significant source of stress that detracts from the true spirit of the holiday. When you give the gift of a clean home, you are silencing that nagging voice. You are taking a huge, stressful item off their mental checklist and completely erasing it. Imagine the profound sense of relief your friend will feel, walking into their home a day or two before Thanksgiving to find that it is already done. The floors are gleaming. The kitchen is sanitized and ready for the culinary marathon. The bathroom is sparkling. This gift allows your friend to transition their focus from the presentation of their home to the purpose of the gathering. They can channel all their energy into what truly matters: the food, the conversation, and the connection with their loved ones. They can be a present, relaxed, and joyful host, not a frazzled, exhausted one who is secretly worrying about whether a guest noticed the dust on the baseboards. You are not just cleaning their house; you are clearing their mind. A Foundation for the Entire Holiday Season Thanksgiving in many ways is the official kick-off to the entire winter holiday season. The festivities of November flow directly into the preparations for December. A deep clean for Thanksgiving is therefore not just a gift for a single day; it is a foundational gift that keeps on

Cleaning Gift: The Most Thoughtful Thanksgiving Gift You Can Give Read More »

housekeeper

What Is A Housekeeper – 3 Reasons Why You Should Hire

A housekeeper is far more than just someone who cleans your home. While the primary image that comes to mind might be someone with a vacuum or a dust cloth, the reality of a professional housekeeper’s role is much broader, encompassing a comprehensive approach to home management and the overall well-being of a living space. They are individuals entrusted with maintaining the order, cleanliness, and functionality of a household, often serving as a crucial backbone for busy individuals and families. It’s about creating and sustaining an environment where you can truly thrive, not just exist. Think of a housekeeper not as a visitor who performs a single task, but as a dedicated manager of your domestic environment. Their responsibilities extend well beyond surface-level tidiness. They delve into the intricate details of what makes a house feel like a home  a place of comfort, peace, and efficiency. This often includes a wide array of duties that can be customized to suit specific household needs, but generally covers everything from meticulous cleaning to organizational tasks and even light household management. They are experts in ensuring that every corner of your home is not just clean, but cared for, reflecting an understanding of proper maintenance and the nuances of different materials and surfaces. 1.Light and Heavy Cleaning For instance, their cleaning duties are exhaustive. This isn’t just a quick sweep or a superficial wipe-down. A professional housekeeper engages in deep cleaning protocols for kitchens and bathrooms, sanitizing surfaces, scrubbing grout, polishing fixtures, and ensuring these critical areas are hygienic and sparkling. They handle floor care with precision, knowing the right methods for hardwood, tile, carpet, or laminate, ensuring longevity and shine. Dusting isn’t limited to visible surfaces; it extends to baseboards, light fixtures, ceiling fans, blinds, and intricate decor, preventing the buildup of allergens and maintaining a fresh atmosphere. Vacuuming and mopping are performed thoroughly, reaching under furniture and into corners that are often overlooked in daily tidying. Laundry management is also a common duty, involving washing, drying, folding, ironing, and putting away clothes, linens, and towels, ensuring that your wardrobe and household textiles are always fresh and ready. They make beds with an eye for detail, turning a simple chore into an act of creating a welcoming sanctuary. Beyond the immediate act of cleaning, a housekeeper is also an organizational wizard. They help in reducing clutter, creating systems for storage, and maintaining order in common areas, closets, and pantries. This proactive approach to organization means less time spent searching for items and more time enjoying a harmonious living space. They might assist with tidying up children’s play areas, ensuring toys are stored properly, or organizing bookshelves and filing systems. It’s about creating a flow in the home that makes daily living smoother and less stressful. This often involves an intuitive understanding of how a household operates and anticipating what areas might become disorganized, intervening before chaos takes hold. Furthermore, a housekeeper often takes on light household management responsibilities. This can include managing household supplies, ensuring that cleaning products, toiletries, and even certain pantry staples are always stocked. They might run light errands, such as dropping off dry cleaning or picking up groceries. For homes with pets, they might assist with basic pet care, like feeding or tidying up pet areas. They can also oversee plant care, ensuring your indoor greenery thrives. In some cases, especially in larger homes, a housekeeper might coordinate with other service providers, such as plumbers, electricians, or gardeners, ensuring maintenance schedules are met and issues are addressed promptly. They act as a central point of contact, ensuring the home functions like a well-oiled machine, even when you are not present to manage every detail yourself. The distinction between a “cleaner” and a “housekeeper” is critical. A cleaner typically comes for a few hours, performs specific cleaning tasks, and then leaves. Their focus is solely on the immediate cleanliness of the space. A housekeeper, on the other hand, often has a more encompassing and ongoing relationship with the household. They are involved in the continuous upkeep, proactive organization, and management of the home’s daily rhythm. They build an intimate understanding of the home’s needs, its inhabitants’ preferences, and the specific routines that keep everything running smoothly. This level of dedication and involvement fosters a deeper sense of trust and partnership, where the housekeeper becomes an invaluable asset to the household’s operational efficiency and overall peace. 2.Making Up For Lost Time So, why should you consider hiring a housekeeper? The reasons are multifaceted and profoundly impactful on your daily life. Primarily, it’s about reclaiming your time. In today’s fast-paced world, time is arguably our most precious commodity. Juggling demanding careers, family responsibilities, social obligations, and personal pursuits leaves very little room for the arduous and often relentless demands of household chores. The hours spent on cleaning, organizing, and maintaining a home can quickly accumulate, eating into weekends, evenings, and any potential moments of relaxation. Hiring a housekeeper liberates these hours, allowing you to dedicate them to activities that genuinely enrich your life – spending quality time with loved ones, pursuing hobbies, engaging in personal development, exercising, or simply enjoying uninterrupted rest. Imagine coming home after a long day not to a list of chores, but to a clean, organized, and welcoming sanctuary, ready for you to unwind. This isn’t just about saving time; it’s about investing in your personal well-being and life satisfaction. Beyond time, hiring a housekeeper significantly reduces stress and mental load. The burden of an untidy or disorganized home can weigh heavily on one’s mind, creating a constant hum of anxiety and guilt. The mental energy expended on planning cleaning schedules, remembering what needs to be done, or feeling overwhelmed by accumulated mess is immense. A housekeeper takes this entire burden off your shoulders. The peace of mind that comes from knowing your home is being professionally cared for, consistently and thoroughly, is immeasurable. It eliminates potential arguments or frustrations over chore distribution in shared living spaces and

What Is A Housekeeper – 3 Reasons Why You Should Hire Read More »

4 Easy Home Deep Cleaning Tips You Need to Try

Home deep cleaning represents a far more comprehensive and intensive approach to household cleanliness than routine or daily tidying. While regular cleaning maintains a surface level of order, deep cleaning delves into the accumulated dirt, stubborn grime, pervasive bacteria, and hidden allergens that build up over time in every part of a home. It is a methodical process designed to sanitize and refresh spaces from top to bottom, reaching beyond the immediately visible to address areas often overlooked. This type of cleaning aims not just for visual appeal but to restore a home to its optimal hygienic condition. It involves meticulous attention to detail, often requiring significantly more time, focused effort, and the use of specialized cleaning agents and equipment compared to standard upkeep. The goal is to systematically eliminate layers of dust, grease, soap scum, limescale, and other residues that can compromise both the appearance and the healthfulness of a living environment. 1.Home Deep Cleaning – Kitchen   A home environment stands to gain substantially from periodic, thorough home deep cleaning. Over months and seasons, dust particles, pet dander, pollen, mold spores, and various pathogens can settle and multiply in hard-to-reach places like behind furniture, within carpet fibers, on high ledges, and in air vents. These hidden accumulations can degrade indoor air quality, potentially triggering or exacerbating allergies, asthma, and other respiratory conditions. Home deep cleaning directly targets and removes these reservoirs of contaminants, contributing to a healthier atmosphere for all occupants. Beyond health implications, this intensive cleaning also plays a crucial role in home maintenance. By removing corrosive substances like grease build-up in kitchens or hard water stains in bathrooms, home deep cleaning helps preserve the integrity and extend the lifespan of fixtures, surfaces, and appliances. A deeply cleaned home offers an enhanced sense of comfort and well-being, transforming the living space into a more pleasant, sanitary, and genuinely revitalized sanctuary. This can also be a factor in preventing pest infestations by removing food sources and disturbing potential hiding spots.   Numerous situations and life events make a professional home deep cleaning service particularly beneficial. Seasonal transitions, notably spring and autumn, are common triggers as individuals look to refresh their homes after a long winter or prepare for increased indoor living as temperatures drop. Before hosting significant events, such as holiday gatherings, family celebrations, or important social functions, a deep clean ensures the home is impeccably presentable and welcoming. Conversely, after such events, a deep clean helps restore order and cleanliness. Moving is another prime occasion; cleaning an old residence thoroughly before vacating or ensuring a new home is sanitized and fresh before moving in is standard practice. Properties being prepared for sale or rental greatly benefit from home deep cleaning to enhance their appeal to potential buyers or tenants. Post-renovation or construction work, a specialized deep clean is essential to remove fine dust, debris, and construction residues that settle everywhere. Furthermore, many homeowners integrate home deep cleaning into their annual or semi-annual maintenance schedule as a proactive measure to maintain a consistently high standard of cleanliness and hygiene, even without a specific event prompting it. Observable signs like persistent musty odors, visible dust build-up in corners or on less-disturbed surfaces, or a general feeling that the home isn’t truly clean despite regular efforts also indicate it’s time for a deep clean. Home deep cleaning services are characterized by their meticulousness and comprehensive scope, designed to address areas that routine cleaning simply cannot cover effectively. While the exact checklist can vary between providers and can often be customized, a typical comprehensive service will dedicate focused attention to all rooms. In the kitchen, deep cleaning is particularly intensive due to grease, food particles, and potential bacteria. This usually involves cleaning the interior and exterior of major appliances. Ovens are degreased inside and out, including racks and doors. Microwaves are cleaned internally and externally. Refrigerators are cleaned on the outside, and often the inside if requested and emptied, including shelves and drawers. Dishwasher exteriors are wiped, and sometimes an internal cleaning cycle is run. Range hoods and their filters are thoroughly degreased. Cabinet exteriors are wiped down to remove fingerprints, food splatters, and grease accumulation; interior cabinet cleaning may also be included if they are empty. Sinks, faucets, and fixtures are descaled, cleaned, and polished to remove water spots and build-up. Countertops and backsplashes are cleaned and sanitized, with specific attention paid to grout lines to remove discoloration and grime. Floors, including edges, corners, and under movable appliances, are scrubbed or mopped meticulously. Even small appliances’ exteriors and accessible areas around them receive attention. 2. Mold, Hard Water And Dust? No! Bathrooms, being high-moisture areas prone to mold, mildew, and soap scum, undergo rigorous sanitization. Showers and bathtubs, including walls, doors, and tracks, are scrubbed intensively to eliminate soap scum, hard water deposits, and any signs of mildew. Toilets are disinfected thoroughly, both inside the bowl and all exterior surfaces, including the base and the floor area surrounding it. Sinks, vanities, and countertops are cleaned, sanitized, and polished. Mirrors are cleaned to achieve a streak-free finish. Tiles and grout on both floors and walls are scrubbed to remove build-up and restore brightness. Light fixtures, exhaust fans, and vents are dusted or wiped down to remove accumulated dust and improve air circulation. Faucets, showerheads, and other chrome fixtures are often descaled and polished. Living areas, dining rooms, and bedrooms are also given detailed treatment. All surfaces are thoroughly dusted, encompassing high areas such as ceiling fans (blades and fixtures), light fixtures, picture rails, and curtain rods, as well as often-neglected low areas like baseboards, skirting boards, and electrical outlet covers. Furniture is typically vacuumed, including under cushions, and if feasible, moved to allow cleaning underneath and behind. Upholstery may receive more detailed vacuuming, targeting crevices. Window sills, ledges, tracks, and frames are wiped clean of dust and grime. Cobwebs are carefully removed from ceilings, corners, and light fixtures. Interior windows (glass and frames) and mirrors throughout these rooms are cleaned.

4 Easy Home Deep Cleaning Tips You Need to Try Read More »

Very dirty gutter

Gutter Cleaning In 3 Steps – You Should To Know

Effective gutter cleaning starts with selecting the right tools. For a thorough cleaning, make sure you have a sturdy ladder. The ladder should be tall enough to safely reach the gutters without straining. Always prioritize safety. You’ll also need heavy-duty, waterproof gloves to protect your hands from the sharp debris and bacteria that are often encountered during cleaning. A gutter shovel or small, sturdy garden spade is essential for removing leaves, twigs, mud, and even snow. These tools make the physical act of cleaning much easier. Have a bucket ready to collect debris, or lay a tarp on the ground beneath your work area to catch any debris that falls. A garden hose fitted with a spray nozzle is crucial for removing fine particles and testing the flow after the main cleaning. Safety glasses are essential to protect your eyes from falling debris or splashing water during the process. For stubborn clogs, a plumber’s snake or flexible auger can be a very useful addition to your arsenal. Having all of these items ready before you begin will speed up the job. 1.Safety First Proper ladder safety is essential before performing any gutter cleaning. Position your ladder on firm, level ground. If the ground is uneven, use a ladder leveler or sturdy boards to create a stable base. Never place a ladder on wet or slippery surfaces. When extending the ladder for cleaning, make sure it reaches at least three rungs above the roof line or gutter lip for safe access. Always maintain three points of contact with the ladder when climbing or working—two feet and one hand, or two hands and one foot. Avoid reaching too far to the side while cleaning; it is much safer to climb down and replace the ladder frequently. This may seem time-consuming, but it significantly reduces the risk of falls, which are a serious hazard when cleaning gutters. Let someone know that you will be cleaning, especially if you are working alone. A properly positioned and safely used ladder is the foundation of any successful, injury-free gutter cleaning task. Start your gutter cleaning by removing the largest debris. It’s usually most effective to start near the outlet of a gutter. This allows you to clear a path for water if you decide to flush during the process, though removing large amounts usually comes first. Using your gutter shovel or trowel, begin removing leaves, twigs, pine needles, gravel, and any other accumulated solids. Work in manageable sections along the gutter. Deposit the removed debris directly into the bucket or onto the tarp spread below. This initial step of the cleaning can be messy, which is why gloves are so important. Pay close attention to areas where debris tends to accumulate, such as valleys or corners of your gutter system. Removing this bulk material consistently is the crux of the gutter cleaning process and will make subsequent steps easier. This part of the cleaning prevents larger items from being pushed into and clogging your gutters. 2.Cleaning Gutters With Water? Once the bulk of the debris has been removed, grab your garden hose, fitted with a spray nozzle, and start at the end of the gutter furthest from a downpipe. Direct a stream of water into the gutter, working toward the downpipe. This flushing action will remove any remaining smaller particles, mud, and grit that your shovel may have missed during the initial phase. Watch the flow of water carefully. If the water pools or backs up, this indicates a blockage further along the gutter or in the downpipe itself. This flushing step of gutter cleaning not only clears the channels, but also serves as an excellent diagnostic tool for identifying problem areas that require more focused attention. A strong, consistent flow toward and into the downpipe signifies a successful cleaning for that section. Checking and clearing your downpipes is an essential part of a thorough gutter cleaning. If, during the flushing step, you notice that water is not draining properly through a downpipe, it is almost certainly clogged. Start by trying to clear the downpipe from top to bottom with a concentrated spray of water from the hose. Sometimes the force of the water is enough to clear the clog. If this does not work, try inserting the hose into the bottom opening of the downpipe and spraying upward. This can sometimes clear the pipe from below. For more stubborn blockages found during gutter cleaning, a plumber’s snake or auger can be carefully inserted from top to bottom or bottom to top into the downpipe to break up or remove compacted debris. In severe cases, it may be necessary to disassemble sections of the downpipe, especially at elbow joints, where clogs often form. Ensuring that your downpipes are clear is vital, as a clogged downpipe renders all your efforts ineffective. 3.Benefits After the primary gutter cleaning and flushing are complete, conduct a thorough inspection of your gutters and downspouts. Look closely for any signs of damage. Check for cracks, holes, or areas of rust, particularly in older metal gutters. Ensure that all gutter sections are securely fastened to the fascia board and that there is no sagging, as sagging can cause water to pool and not drain correctly, defeating the purpose of gutter cleaning. Examine the seams between gutter sections and at the end caps for any leaks. Inspect the downspouts to ensure they are firmly attached to both the gutter outlet and the house, and that they extend far enough away from your home’s foundation to direct water appropriately. This post-gutter cleaning inspection can help you identify minor issues before they become major, costly repairs, extending the life of your gutter system and the benefits of your gutter cleaning. Finally, establish a schedule for regular gutter cleaning. The frequency of gutter cleaning depends largely on your home’s surroundings. As a general rule, gutter cleaning should be performed at least twice a year: once in the late spring after trees have shed their seeds and

Gutter Cleaning In 3 Steps – You Should To Know Read More »

Cold Weather Cleaning

Cold Weather Cleaning: Easy Organize Your Space in 7 Days

When the cold weather arrives, it’s the perfect time to declutter and refresh your home. A well-organized space can create a warm and cozy environment during winter. Follow this simple 7-day cold weather cleaning plan to tackle your home and enjoy a cleaner, more comfortable space. Day 1: Declutter Your Entryway Start by organizing your entryway, as it’s the first place people see when they enter your home. Put away shoes, coats, and accessories. Use storage bins and hooks to keep everything tidy. Wipe down surfaces and sweep the floor to remove dirt and debris brought in from the cold. Cold weather cleaning starts at the front door, ensuring a tidy and inviting entrance. Next, evaluate what you really need in your entryway. If there are old or unused shoes, donate or store them elsewhere. Consider adding a small bench or shoe rack to make storage more accessible. Keeping this area organized will help you transition smoothly when coming and going. Finally, check the lighting in your entryway. Winter days can be darker, so ensure you have adequate lighting to create a welcoming atmosphere. A well-lit and clutter-free entryway makes a great first impression and sets the tone for the rest of your home.     Day 2: Tidy Up the Living Room A clean and organized living room makes relaxing in winter much more enjoyable. Fold blankets, fluff cushions, and clear clutter from coffee tables. Dust surfaces, vacuum the floor, and organize books or magazines. Consider adding a cozy rug or extra throw pillows to enhance the warm atmosphere. Cold weather cleaning in the living room ensures a comfortable and inviting space for family and guests. Take a moment to rearrange furniture for better flow and comfort. If you have a fireplace, clean it out and prepare logs for use. Organizing your entertainment center by hiding cables and tidying remote controls can also create a more streamlined look. Add seasonal decorations like warm-toned candles or fairy lights to make your living space feel extra inviting. Creating a cozy ambiance will make winter nights more enjoyable for you and your family. Day 3: Refresh the Kitchen Clear countertops by storing away small appliances and unnecessary items. Wipe down cabinets, deep clean the sink, and organize the pantry. Dispose of expired food items and rearrange shelves for easy access. A tidy kitchen will make cooking in winter more enjoyable. Cold weather cleaning in the kitchen helps maintain a hygienic and functional space. Take the time to deep clean your fridge and freezer. Remove old leftovers, wipe down shelves, and organize food into labeled containers. This will make meal prep easier and reduce unnecessary waste. Lastly, ensure your kitchen is stocked with winter essentials like hot drinks and hearty ingredients. Keeping everything well-organized will make cooking and dining more convenient and pleasant throughout the colder months.     Day 4: Organize Your Bedroom A clutter-free bedroom creates a peaceful space for better sleep. Declutter nightstands, fold clothes, and organize your closet by storing summer outfits away. Change your bedding to warmer sheets and vacuum the floors to eliminate dust and allergens. Cold weather cleaning in the bedroom promotes comfort and relaxation during winter nights. Assess your closet space and remove any items you no longer wear. Store out-of-season clothing in labeled bins to free up room for winter essentials. Organizing your closet will help you find what you need quickly and keep everything neat. Consider adding soft lighting, such as bedside lamps or dimmable bulbs, to create a relaxing atmosphere. A well-maintained bedroom promotes restful sleep, making winter more comfortable and cozy. Day 5: Clean and Disinfect the Bathroom Cold weather can increase germs in your home, so deep Cold Weather Cleaning the bathroom is essential. Scrub the sink, tub, and toilet thoroughly. Replace old towels with fresh, clean ones. Organize toiletries in storage bins to keep countertops clear and create a spa-like feel. Cold weather cleaning in the bathroom ensures a fresh and germ-free space. Don’t forget to clean the grout between tiles and replace any worn-out shower curtains or mats. A fresh, sanitary bathroom helps maintain a healthy living space during flu season. Stock up on winter-friendly self-care items like moisturizing lotions and bath salts. Keeping your bathroom well-maintained will make it a more enjoyable place to unwind after a long, cold day.     Day 6: Tidy Up the Home Office If you work from home, an organized office can improve productivity. Clear off your desk, sort through paperwork, and store away unused office supplies. Wipe down electronics and arrange cables neatly. A clean workspace can boost focus and motivation during colder months. Cold weather cleaning in the home office ensures a clutter-free and efficient work environment. Declutter digital files and organize important documents into labeled folders. Keeping a clutter-free digital and physical workspace will make your daily tasks easier to manage. Consider investing in a cozy chair or additional lighting to create a more comfortable work environment. A well-maintained home office ensures efficiency and helps you stay on top of your responsibilities during the winter. Day 7: Final Touches and Maintenance Now that each area is organized, spend the last day making final adjustments. Light scented candles, add seasonal decor, and do a quick sweep through each room to ensure everything is in place. Keep a routine to maintain cleanliness throughout winter and enjoy a stress-free home. Cold weather cleaning habits will help you maintain a warm and welcoming environment. Walk through your home and make any necessary touch-ups. If any spaces have accumulated clutter again, take a few minutes to tidy them up. Staying consistent with small daily Cold Weather Cleaning tasks will help maintain a warm and welcoming environment. If deep Cold Weather Cleaning feels overwhelming or you want professional help, consider hiring Toronto Shine Cleaning. Their expert team ensures a spotless and organized home, making winter cleaning effortless. With professional assistance, you can enjoy a fresh, cozy, and clutter-free space all season long! Cold

Cold Weather Cleaning: Easy Organize Your Space in 7 Days Read More »

Winter January cleaning the floor

January Cleaning Checklist: Removing Snow, Slush, and Ice Indoors

Winter brings plenty of challenges when it comes to keeping your home clean. Snow, slush, and ice can easily be tracked indoors, leading to wet floors, salt stains, and potential slip hazards. To maintain a clean and safe space, follow this January cleaning checklist to keep your home in top condition. 1. Place Heavy-Duty Mats and Boot Trays at Entrances Preventing snow and slush from spreading inside starts at your entryway. Placing heavy-duty, absorbent mats at all doors will help trap moisture and dirt before they enter your home. A good combination includes a rough-textured mat outside to remove excess snow from shoes and a super-absorbent mat inside to soak up any remaining moisture. Boot trays are another essential tool for January cleaning. These trays collect water and debris from shoes, preventing puddles and dirt from spreading onto your floors. They also help keep footwear organized, making your entryway look neater and more welcoming. Regularly cleaning and drying these mats is key to their effectiveness. Shake out mats daily, vacuum them weekly, and wash them as needed to ensure they continue to do their job. A well-maintained entryway setup will significantly reduce the amount of snow and slush tracked indoors.     2. Regularly Mop and Dry Floors Moisture buildup from snow and slush can create slippery and hazardous conditions. Using a microfiber mop or an absorbent cloth to wipe up water immediately helps prevent slips and falls. The key to effective mopping during January cleaning is frequent maintenance and using the right cleaning tools. Salt and dirt buildup can cause long-term damage to floors. A damp mop with warm water and a mild detergent can help remove grime without harming your flooring. Avoid using too much water, as excess moisture can seep into cracks and cause warping or mildew. To keep floors completely dry, follow up mopping with a dry microfiber mop or towel. This extra step ensures no lingering moisture remains, reducing the risk of slip hazards and maintaining the overall cleanliness of your home. 3. Remove Salt Stains from Floors and Carpets During winter, salt is commonly used to melt ice and prevent slipping outdoors, but it can also create stubborn stains on floors and carpets. These white, powdery marks can dull the appearance of your flooring and cause damage if not addressed promptly. To remove salt stains effectively, mix warm water with a few drops of dish soap and apply the solution to the affected area. Use a microfiber cloth or a soft brush to gently scrub the stains. Avoid using excessive moisture, especially on carpets, to prevent water damage or mold growth. For carpets, blot the stained area with a damp cloth, then use a dry towel to absorb any remaining moisture. Vacuuming regularly also helps prevent salt buildup. Making salt stain removal a key part of your January cleaning routine will keep your floors looking fresh all season.     4. Vacuum and Deep Clean Entryway Mats Entryway mats collect significant amounts of dirt, salt, and moisture during winter. Regular vacuuming helps keep them effective at trapping debris before it spreads throughout your home. Using a HEPA-filtered vacuum ensures dust and allergens are efficiently removed. For deeper cleaning, shake out mats daily and wash them weekly with warm water and mild detergent. Allow them to air dry completely before placing them back at the entrance to avoid mold or mildew growth. Maintaining these mats ensures they continue to function properly in your January cleaning efforts. Another useful tip is to rotate mats if you have extra ones available. Swapping them out allows them to fully dry between uses, keeping your entryway consistently clean and dry.     5. Wipe Down Doors and Walls Near Entrances Snow and slush often splash onto doors and walls, leaving streaks and dirt marks. Keeping these surfaces clean is an important yet often overlooked part of January cleaning. Regular wiping prevents grime buildup and maintains a polished appearance. Use a damp microfiber cloth or a gentle all-purpose cleaner to remove dirt from doors and walls. For stubborn stains, a mixture of warm water and mild detergent works well. Avoid harsh chemicals that could damage paint or finishes. Pay attention to high-touch areas like door handles and frames, which tend to collect dirt quickly. Regular cleaning of these surfaces ensures a welcoming and hygienic home environment, even during the harshest winter months. 6. Maintain Indoor Humidity Levels and Heating Vents Keeping indoor humidity levels balanced is essential during winter. Excess humidity can lead to condensation, which may cause slippery floors and mold growth. On the other hand, overly dry air can make dust and dirt more airborne, contributing to respiratory issues. Using a humidifier can help maintain the right humidity levels, making it easier to manage indoor air quality. If excess moisture is an issue, a dehumidifier can help prevent condensation from forming on floors and windows. Regularly cleaning heating vents is another crucial aspect of January cleaning. Dust and debris can accumulate in vents, reducing efficiency and circulating allergens. Vacuum vents weekly and replace air filters as needed to keep your home’s air clean and fresh. 7. Keep Entryways Dry and Safe A dry and well-maintained entryway is key to preventing accidents and keeping your home clean. Snow, slush, and ice can make floors slippery, increasing the risk of falls. Implementing a strict drying routine will help minimize hazards. After wiping up moisture, using a dry towel or squeegee to remove excess water ensures a safe walking surface. Keeping towels or extra mats near the entrance can also help absorb unexpected wet spots quickly. Regularly inspecting entryways for water buildup and addressing it immediately keeps your home safe and presentable. This final step in your January cleaning checklist ensures a comfortable and hazard-free environment throughout winter.     Let Toronto Shine Cleaning With Your January Cleaning! By following this January cleaning checklist, you can effectively manage snow, slush, and ice indoors while maintaining a safe and clean environment.

January Cleaning Checklist: Removing Snow, Slush, and Ice Indoors Read More »