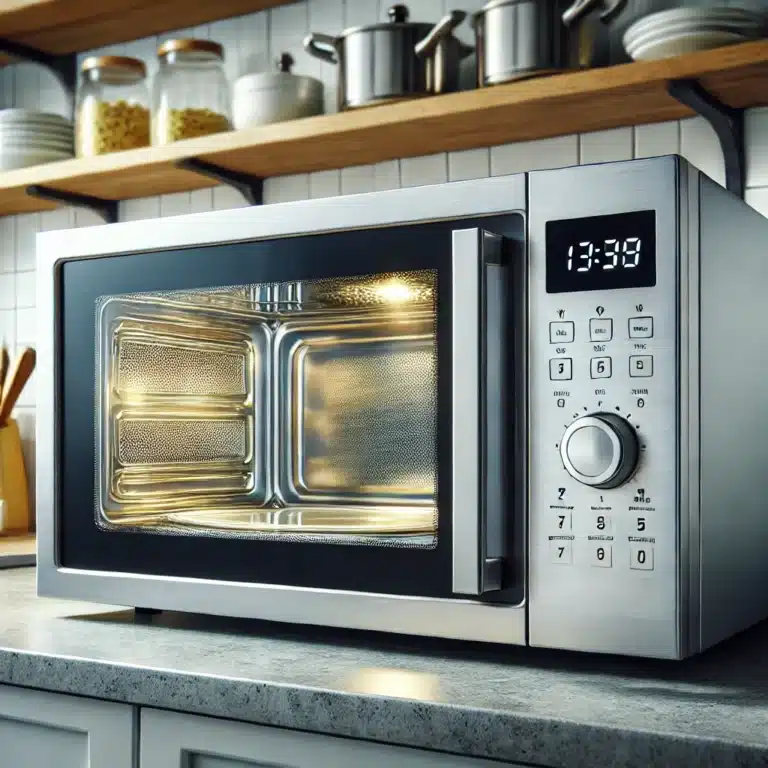
Microwaves are a kitchen lifesaver, but they can get pretty grimy after repeated use. Spills, splatters, and lingering odors can make your microwave less appealing. Thankfully, you can clean your microwave quickly and efficiently. Here’s a simple guide on how to clean a microwave in just 5 minutes!
1. Gather Your Supplies
Before you start cleaning your microwave, it’s essential to gather a few basic supplies:
- A microwave-safe bowl
- Water
- Vinegar or lemon juice
- A clean cloth or sponge
- Baking soda (optional for stubborn stains)
With your supplies ready, you can move on to preparing your cleaning solution. Fill the microwave-safe bowl with one cup of water, then add a few tablespoons of vinegar or the juice of half a lemon. If you’re using lemon, don’t hesitate to toss in the squeezed halves for an extra boost of fresh scent. Place the bowl and set it to run on high for three minutes. This process allows the solution to boil and create steam, which helps loosen food particles and stains. After the timer goes off, let the bowl sit inside for a couple of minutes to maximize the steam’s effectiveness.

2. Prepare the Cleaning Solution
To prepare the cleaning solution for your microwave, start by filling a safe bowl with one cup of water. This water will serve as the base for the cleaning solution. Next, add a few tablespoons of vinegar to the water, which is excellent for cutting through grease and grime. Alternatively, you can squeeze half a lemon into the water. The acidity of the lemon helps break down stubborn stains, and if you toss in the squeezed lemon halves, they will add extra cleaning power and a refreshing citrus scent to your microwave. This combination is not only effective but also leaves a pleasant aroma.
Once your cleaning solution is ready, place the bowl inside the microwave. Set the microwave to run on high for three minutes. The goal here is to bring the solution to a boil, creating steam that will soften any stuck-on food particles and grime. After the three minutes are up, let the bowl sit for a couple more minutes to allow the steam to permeate and work its magic. This steaming process is crucial as it loosens debris and makes it significantly easier to wipe away, leaving your microwave clean and fresh with minimal effort.
3. Microwave the Solution
With your cleaning solution prepared, the next step is to place the bowl in the microwave and set it to run on high for three minutes. This duration is sufficient to bring the solution to a boil, which will create a significant amount of steam inside. The steam plays a critical role in loosening the grime and food particles that have accumulated on the interior surfaces. As the steam spreads throughout, it softens any hardened spills and stains, making them much easier to clean. This method not only saves you from scrubbing but also ensures that the microwave is thoroughly sanitized.
After the three-minute timer goes off, resist the urge to open the microwave immediately. Instead, let the bowl sit inside for an additional couple of minutes. This extra time allows the steam to continue working its magic, further loosening any stubborn grime. The extended steaming period ensures that even the toughest spots are softened and ready to be wiped away with minimal effort. Once you open it, you will find that the interior is significantly easier to clean.

4. Wipe Down the Interior
Once the steaming process is complete, carefully remove the bowl from the microwave, keeping in mind that it will be quite hot. Use oven mitts or a thick towel to avoid burns. With the bowl safely set aside, take a clean cloth or sponge and begin wiping down the interior surfaces of the microwave. Thanks to the steam, the majority of food particles and stains will have loosened, allowing you to easily remove them with minimal effort. This method effectively softens stubborn grime, so you won’t need to scrub vigorously.
As you wipe down the microwave, pay special attention to areas with more residue buildup. The steam should have done most of the work, making it easy to clean even the corners and crevices. The softened grime will lift away, leaving the interior surfaces clean and shiny. If you encounter any particularly stubborn spots, a little extra pressure with the cloth or sponge should be enough to remove them.
5. Address Stubborn Stains
If you come across any stubborn stains that the steam didn’t fully loosen, don’t worry. There’s an easy fix for these persistent spots. Dip your cloth or sponge into some baking soda, which is known for its gentle abrasive properties. Using baking soda will help you scrub away the tougher stains without scratching the microwave’s surface. Gently apply the baking soda to the stained areas and rub in small, circular motions. This action helps lift the grime effectively while being kind to the microwave’s interior.
Continue this process until all the stubborn spots are addressed. The baking soda will not only help in removing the stains but also deodorize the microwave, leaving it smelling fresh. Once you have scrubbed away all the tough spots, take another pass with a clean, damp cloth to wipe away any remaining baking soda residue. This final step ensures that the microwave is clean and free from any abrasive particles, leaving it sparkling and ready for your next use.
6. Clean the Turntable
While cleaning the microwave, it’s important not to overlook the turntable, as it often collects food debris and spills. Begin by removing the turntable from the microwave and setting it aside. Wash the turntable just as you would any other dish, using warm, soapy water. This process helps to remove any stuck-on food particles and grease that might have accumulated over time. Be thorough in your cleaning to ensure that all residue is removed, making the turntable spotless and ready for use again.
After washing the turntable, make sure to dry it thoroughly before placing it back into the microwave. Moisture can attract more grime and can also interfere operation, so it’s crucial that the turntable is completely dry. Use a clean towel to wipe it down or let it air dry if you have time. Once it’s dry, return the turntable to the microwave, ensuring it is correctly seated on its spindle. This step completes the cleaning process, leaving it fully refreshed and ready for your next cooking adventure.
7. Final Wipe
To finish off your microwave cleaning session, it’s essential to give one final wipe. Use a damp cloth to go over all the interior surfaces, ensuring that any remaining traces of the cleaning solution or baking soda are completely removed. This step is crucial because it ensures that is not only clean but also free from any residues that could potentially affect the taste of your food or cause unwanted smells. Make sure to reach all corners and crevices, as these areas can sometimes hold onto cleaning agents.
By thoroughly wiping down the microwave with a damp cloth, you ensure that the interior is spotless and ready for use. This final wipe removes any last bits of grime and leaves the microwave’s surfaces gleaming. Not only does this enhance the appearance of your microwave, but it also maintains a hygienic environment for your food. After this step, it will be clean, odor-free, and ready to handle your cooking needs efficiently and safely.
Conclusion
And there you have it! A clean microwave in just 5 minutes. This quick and easy method uses common household items and minimal effort, making it perfect for busy individuals. Keeping your microwave clean is not just about aesthetics; it also ensures that your appliance operates efficiently. Food particles and grime can absorb energy, making the microwave work harder and potentially shortening its lifespan. Regular maintenance prevents this, saving you time and money in the long run. Plus, a clean microwave helps avoid unpleasant smells and keeps your food tasting as it should.
Incorporating this simple cleaning routine into your regular housekeeping can make a significant difference. A clean microwave is not only more pleasant to use but also more hygienic. The vinegar or lemon juice method provides a natural, chemical-free way to keep spotless and free from bacteria. This approach is particularly beneficial for families with young children or individuals sensitive to harsh cleaning agents. By spending just a few minutes every week, you can maintain a pristine microwave that’s always ready for use, whether it’s heating up leftovers or preparing a quick meal.
If you find that keeping up with all the cleaning tasks around your home is a bit overwhelming, consider enlisting the help of professionals. Toronto Shine Cleaning offers a range of services that can help keep your home in top shape. From regular housekeeping to deep cleaning, their team of experts ensures that every corner of your home is spotless. By entrusting your cleaning needs to Toronto Shine Cleaning, you can enjoy a clean and healthy home without the hassle.