









Best Ways to Clean Window Screens and Restore Your View
Windows only look their best when every component is clean, and that work starts with the screens, not the glass. Begin by gathering your kit: a garden hose for rinsing, two buckets, a squeegee with a supple rubber blade, a strip applicator, microfiber cloths, a soft-bristled brush, and the cleaning solution you prefer. The classic recipe is one gallon of cool water plus a few drops of mild dish soap: slightly soapy, never foamy, because excess suds leave a film that attracts fresh dirt. Keep the second bucket full of clean water for rinsing your tools. Indoors, a spray bottle with the same solution is more practical, and for stubborn mineral deposits, keep distilled white vinegar or #0000 grade steel wool on hand.
Step 1: Remove and Clean the Screens First
Cleaning the glass before the screens is wasted effort, because reinstalling dirty screens instantly coats your fresh panes with a new layer of dust and grime. Start by carefully removing each screen from its frame. Note the fastening mechanism, which may be plunger bolts, tension springs, or clips, and label every screen with a small piece of masking tape noting its location, such as “Dining Room, Right,” since sizes can vary subtly between windows.
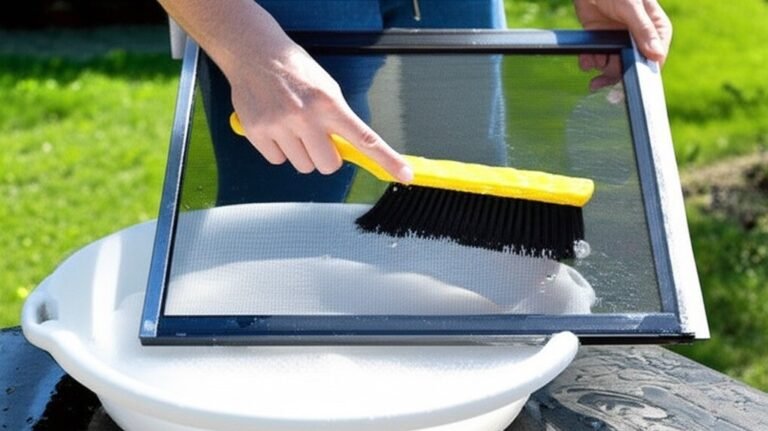
For screens with only light dust, a dry method is fastest. Lay each screen flat on a drop cloth or lean it securely against a wall, then work a soft-bristled brush or the brush attachment of your vacuum over the whole mesh to dislodge loose particles without water. Screens with caked-on dirt, pollen, or greasy buildup need a wet cleaning. Move them to a driveway or lawn and pre-rinse gently on a low-pressure hose setting, since a powerful jet can stretch or tear the mesh and dent frames. Mix warm water with a little mild dish soap, scrub both sides with a soft brush using light, overlapping strokes, and pay extra attention to the frame channels, which trap dirt. Rinse completely: any lingering soap film acts as a magnet for new dust. Check by running a finger across the mesh: it should not feel slippery.
| Screen Condition | Cleaning Method | Key Detail |
|---|---|---|
| Light dust only | Dry brushing or a vacuum brush attachment | Fastest option; no drying time needed |
| Dust and pollen film | Low-pressure rinse, then a mild soap scrub on both sides | Keep rinsing until the mesh no longer feels slippery |
| Caked-on or greasy grime | Warm soapy water with a soft brush | Focus on frame channels, then dry fully before reinstalling |
Step 2: Dry Screens Fully and Clean the Tracks
Let the screens air dry completely against a wall, fence, or outdoor furniture in a spot with good airflow and some sun. Do not rush this step. Reinstalling damp screens traps moisture inside the window frame and track, creating ideal conditions for mold and mildew that can damage your home and health; the CDC explains how mold thrives wherever moisture collects. While they dry, clean the window assembly itself. Open the window fully, vacuum the tracks with a crevice tool to remove loose dirt, cobwebs, and dead insects, and loosen compacted grime in the corners with a stiff dry brush or putty knife before vacuuming again. Follow with a wet pass: scrub the tracks with a small firm brush such as an old toothbrush dipped in your solution, wipe out the loosened grime with a microfiber cloth, and use a cloth wrapped around a flathead screwdriver tip to reach tight corners. Wipe the frame and sill inside and out, then dry everything thoroughly.
Step 3: Squeegee the Glass Like a Professional
If the exterior glass is very dirty, rinse off the loose grit first so you do not drag it across the pane. Soak the strip applicator in the sudsy bucket, squeeze off the surplus liquid, then glide it across the full pane from edge to edge. Then reach for the squeegee. Before the first pull, wipe a narrow one-inch vertical dry strip down one side of the pane so the blade starts dry and does not skip. Set the squeegee at the top of the pane so it overlaps that dry strip, tilt the handle so the blade meets the glass at roughly 30 degrees, press evenly but gently, and draw the tool down in one smooth motion. Wipe the rubber blade after every pull, because a dirty blade drags a line of grime across the next stroke. Overlap each pass by about an inch and a half to avoid leaving lines, and finish by drying the edges and sill with a clean microfiber cloth.
For interior glass, the technique is the same but the setup needs more care. Lay a towel or drop cloth on the sill and floor below to catch drips, mist the pane with a spray bottle instead of dipping into a bucket, and use the same top-to-bottom overlapping strokes, wiping the blade after each pass and detailing the edges with a dry cloth.
Step 4: Reinstall Screens and Keep Them Clean
Once the glass sparkles and the frames and tracks are dry, return each screen to its labeled window and secure it properly. This full-sequence clean, from mesh to tracks to glass, extends the life of your screens and delivers an unobstructed view. Keep them that way with a few simple habits:
- Reinstall every screen only after frames, tracks, and mesh are completely dry.
- Fasten all clips, plunger bolts, and tension springs firmly when you are done.
- Wipe the frames and sills occasionally so dust does not settle straight back onto fresh glass.
The same attention to detail matters in damp climates and humid summer air, and Health Canada offers practical steps for controlling moisture and mold at home. If you would rather leave ladders, buckets, and squeegees to the pros, Toronto Shine Cleaning handles screens, tracks, and glass across the GTA as part of our regular cleaning and deep cleaning service, and we also prepare windows for tenants and owners during move-in and move-out cleaning. Check our pricing or call (647) 424-0355 to schedule your appointment.
Frequently Asked Questions About Cleaning Window Screens
Can I clean window screens without removing them? For a light coating of dust, you can vacuum the mesh in place with a brush attachment, but a full clean requires removal: rinse, scrub, and dry both sides, and cleaning in place risks wetting your freshly cleaned glass.
How long do window screens take to dry? It depends on sun and airflow, but screens should always be fully dry before reinstalling. Damp screens trap moisture in the window frame and tracks, where mold and mildew can grow.
Why does my squeegee leave streaks? Streaks usually come from a dirty blade or skipped strokes. Wipe the rubber blade after every pull, start on a dry edge, and overlap each pass by about an inch and a half.
What should I use for mineral deposits on screens? For stubborn mineral buildup, distilled white vinegar helps dissolve the deposits, and a pad of #0000 grade steel wool can lift what remains without damaging the mesh.