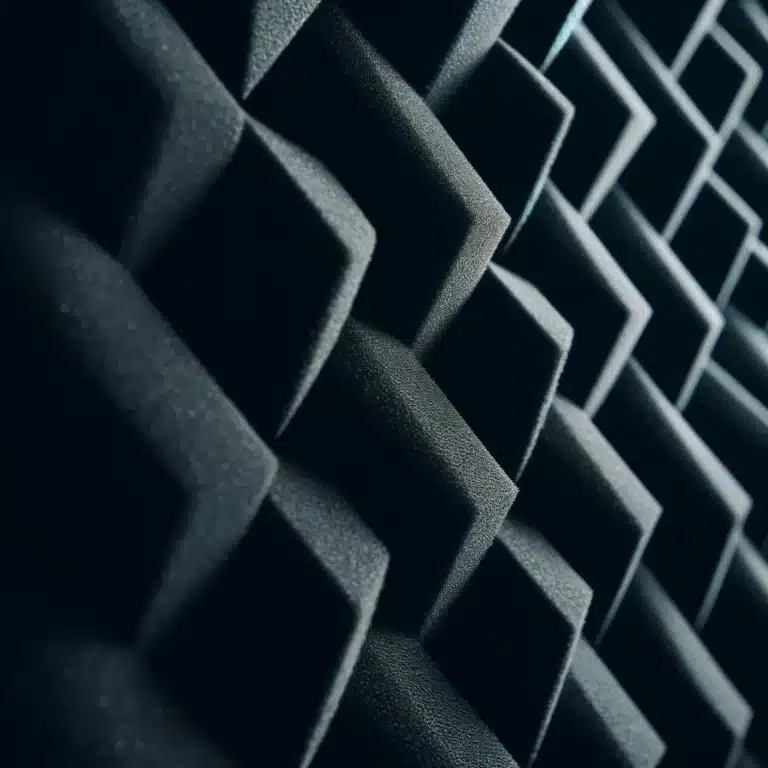
When it comes to maintaining a pristine recording environment or ensuring your home studio remains top-notch, cleaning acoustic foam is a task you can’t overlook. Acoustic foam plays a vital role in managing sound quality by reducing noise and echoes, but it can also gather dust and other particles that may affect its performance. Fear not, for cleaning your acoustic foam isn’t as daunting as it sounds. Here are six easy steps to help you keep your foam looking and functioning like new.
Step 1: Vacuum Gently
The first step in cleaning your acoustic foam is to vacuum it gently. Using a vacuum cleaner with a soft brush attachment is crucial because the soft bristles are gentle on the foam’s delicate structure. Begin by running the vacuum slowly over the surface of the acoustic foam. This action helps to pull out any loose dust, hair, and small particles that have accumulated on the surface.
It’s important to pay attention to the direction in which you vacuum. The foam has a specific texture and pattern, so moving the vacuum along the alignment of these patterns rather than against them helps prevent any potential snagging or pulling that could damage the foam. This method is not just effective but also ensures that the acoustic foam remains in good condition without compromising its ability to absorb sound.
Regular vacuuming, perhaps once a week or bi-weekly depending on the location and usage of the foam, is usually sufficient for light cleaning and routine maintenance. This not only keeps the foam looking fresh but also extends its lifespan by preventing the buildup of dust and other particles that can eventually embed deeper into the foam, making them harder to remove later.
Step 2: Spot Clean Stains
When maintaining your acoustic foam, addressing spots and stains promptly is essential to prevent permanent damage. After identifying areas that are particularly dirty or stained, it’s crucial to treat these spots separately to ensure thorough cleaning without soaking the entire piece of foam. Here’s how you can tackle those stubborn stains effectively:
Begin by mixing a very mild laundry detergent with water to create a cleaning solution that is gentle yet effective. It’s important to use a mild detergent to avoid any harsh chemicals that could potentially degrade the acoustic properties of the foam. Once your solution is ready, immerse a clean, soft cloth into the mixture and wring it out until it is just damp, not wet. This control of moisture is critical because introducing too much water into the foam can lead to issues like mold growth or breakdown of the foam structure over time.
Gently dab the damp cloth on the stained areas of the acoustic foam. The key here is to pat the stains rather than scrub them, as scrubbing can push the dirt deeper into the foam or cause surface damage. Pat the area until the stain begins to lift. This method may need to be repeated a few times with fresh portions of your damp cloth to fully remove the stain.
After treating the stained areas, if you notice any soap residue, it’s a good idea to go over the spots with a clean cloth that has been dampened with plain water. This helps in removing any leftover detergent which, if left behind, could attract more dirt over time.
Step 3: Use a Foam Cleaning Solution
For those times when your acoustic foam needs more than just a light cleaning, opting for a specialized foam cleaning solution is a smart choice. These solutions are specifically designed to handle the unique material of acoustic foam, ensuring that they clean deeply without causing any harm to the structure or acoustic properties of the foam.
To use a foam cleaning solution effectively, start by gently spraying a light coat across the surface of the acoustic foam. It’s important to cover all areas but avoid saturating the foam. These cleaning agents are formulated to act on the dirt and oils that can accumulate in the foam from airborne particles and environmental exposure. By letting the solution sit for a few minutes, you give it time to penetrate and break down this buildup, making it easier to wipe away.
Once the solution has had time to work, take a clean, dry cloth and gently wipe over the surface of the acoustic foam. This step helps to lift away the dirt and debris that the cleaning solution has loosened. Be sure to use soft, gentle strokes to avoid damaging the foam’s surface. This wiping not only removes the cleaning agent but also any particles that have been broken down and brought to the surface.
This deeper cleaning method can be particularly useful in environments where the foam is exposed to more frequent use or in areas with higher levels of dust and air pollution. Regular use of a foam cleaning solution can help maintain the visual appeal and functional integrity of your acoustic foam, ensuring it continues to perform its sound-absorbing duties effectively.

Step 4: Rinse with a Damp Cloth
Once you’ve addressed specific stains or applied a cleaning solution to your acoustic foam, the next critical step is to rinse the foam with a damp cloth. This process is essential to ensure that no cleaning solution remains on the foam, as leftover chemicals can attract more dirt or degrade the foam’s quality over time.
To do this effectively, select a clean cloth and slightly dampen it with clean water. It’s important to ensure the cloth is not overly wet—squeeze out any excess water so that it’s just damp enough to pick up any remaining soap without saturating the foam. Saturating your acoustic foam can lead to a range of problems, such as extended drying times and potential for mold growth if not properly aired out.
Gently wipe the surface of the foam with the damp cloth, going over areas where the cleaning solution was applied. This gentle wiping helps lift and remove any traces of soap or cleaner that might still be clinging to the surface of the foam. By doing this, you’re helping to restore the foam to its cleanest, most natural state without any residues that could interfere with its function or appearance.
Step 5: Air Dry Completely
After cleaning your acoustic foam, the final and crucial step is to ensure it dries completely. Proper drying is vital to maintain the structural integrity and effectiveness of the foam. Introducing heat from hair dryers or other direct heat sources during the drying process can cause the foam to deform or even melt, compromising its sound-absorbing properties.
The best practice is to place the foam in a well-ventilated area where air can circulate freely around it. Avoid locations that receive direct sunlight as UV rays can degrade the foam material over time. The ideal setting might be an indoor space with good airflow, such as near an open window or a fan, to facilitate quicker drying without risking damage from external elements.
Depending on the level of moisture it has absorbed and the humidity in the environment, the drying process can take anywhere from a few hours to a full day. It’s important not to rush this process. Let the foam dry naturally. Patience ensures that the foam doesn’t retain any moisture, which could lead to issues like mildew or mold growth, both of which could significantly reduce the foam’s lifespan and effectiveness.

Step 6: Regular Maintenance
Ensuring the longevity and effectiveness of your sound insulation materials involves committing to a regular maintenance schedule. By incorporating the cleaning steps previously mentioned into a consistent routine, you can significantly extend the life and maintain the performance quality of your materials.
A light, gentle vacuuming of the surface on a monthly basis is recommended to remove any surface dust and particles that have accumulated. This regular attention helps prevent the buildup of debris that can embed deeper into the material over time. Every few months, consider performing a more thorough cleaning using the appropriate solutions and methods to address any deeper grime or stains that may have developed. This not only keeps the material looking fresh but also ensures it functions effectively by preserving its sound-absorbing properties.
In addition to these cleaning routines, it is crucial to manage the environment around your sound insulation. Keep the material away from exposure to smoke, aerosols, and other sprays. These substances can introduce residues that build up on the surface, potentially clogging the open structure of the material and degrading its acoustic capabilities. Over time, such exposure can lead to a deterioration in both appearance and functionality, necessitating more frequent replacements.
Clean Your Acoustic Foam With Us!
Cleaning your acoustic foam is a straightforward process that doesn’t demand special skills or costly products; it simply requires your time and attention. By adhering to a regular maintenance schedule, you can keep your studio or space not only visually appealing but also acoustically effective. The foam’s ability to control sound and eliminate echoes is crucial in settings where audio clarity is paramount, and regular upkeep helps maintain these characteristics. So, don’t hesitate to roll up your sleeves, follow the easy steps outlined, and ensure your acoustic foam remains a valuable component of your sound management system.
For those who want to ensure every part of their home or studio sparkles, not just where the acoustic foam lies, there’s more to explore. Toronto Shine Cleaning offers a wealth of expertise in maintaining clean, inviting spaces. Whether you’re looking to keep your home in top shape or need professional assistance with your studio, our detailed cleaning services are designed to meet a variety of needs. From deep cleaning to regular maintenance, we provide the necessary services to help you maintain a pristine environment.
Visit Toronto Shine Cleaning’s website to dive deeper into what we offer and how we can assist in not only keeping your acoustic foam in excellent condition but your entire space as well. Our comprehensive cleaning solutions and tips are just a click away, ready to help you create and maintain a clean, functional, and professional-looking space.