Toilet Cleaning Brush: 6 Signs It’s Time to Throw Away Your Toilet Cleaning Brush
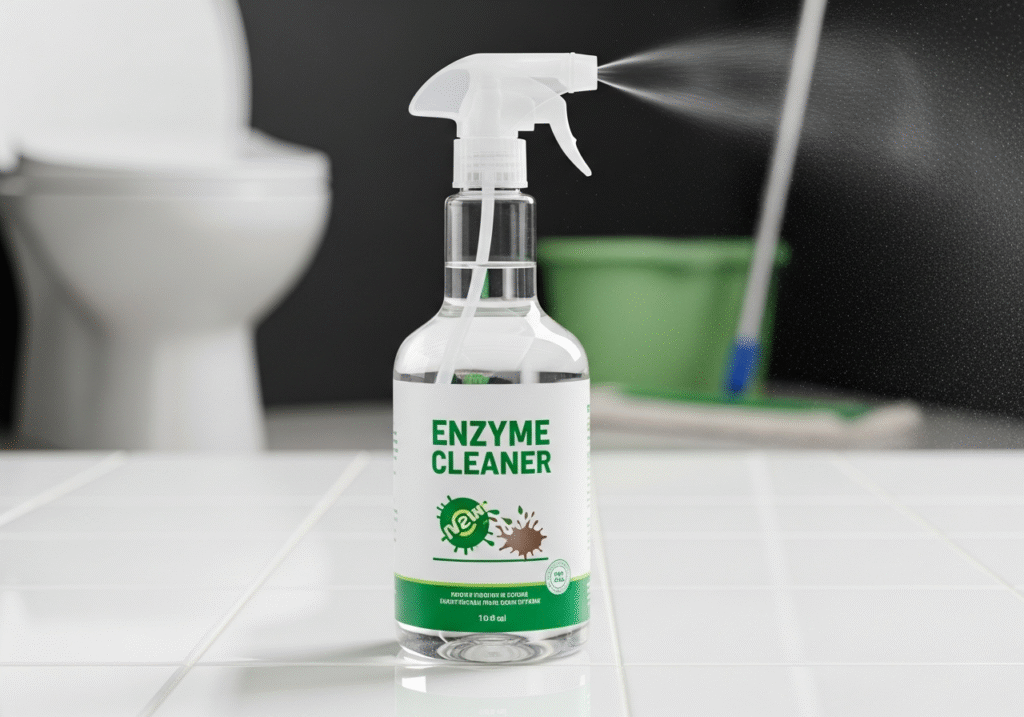
The toilet cleaning brush is the untouchable object of the household. It stands in the corner of the bathroom, often hidden behind the porcelain pedestal or tucked inside a decorative canister, treated as a necessary evil that is essential for hygiene yet repulsive in its very existence. It is the only cleaning tool that is almost universally disgusted by its user. However, this aversion often leads to neglect, and a neglected toilet brush is not a cleaning instrument; it is a biological hazard. To maintain a truly sanitary washroom, one must move past the discomfort and understand the mechanics, the materials, and the maintenance of this critical tool. The toilet brush determines the cleanliness of the most high-risk fixture in the home, and choosing the wrong one—or using the right one incorrectly—can spread more bacteria than it removes. 1.Nylon or Silicone? The efficacy of a toilet brush is determined primarily by its bristle material, and there is a significant divide in the market between traditional nylon and modern silicone. The classic nylon bristle brush has been the standard for decades. Its primary advantage is friction. The stiff, synthetic fibers are excellent at mechanical scrubbing, capable of scouring away the stubborn calcium deposits and organic rings that form at the waterline. However, the design of the nylon brush is fundamentally flawed from a hygiene perspective. The dense clusters of bristles act as a net. They trap toilet paper, hair, and organic waste deep within the core of the brush head where water cannot easily rinse them out. When you return a nylon brush to its holder, you are often returning a brush that is carrying a cargo of fecal bacteria and damp cellulose. Furthermore, nylon bristles are prone to splashing. The stiffness that makes them good scrubbers also makes them act like miniature catapults, flicking droplets of toilet water onto the seat, the floor, and the user’s clothing as the bristles snap back into place during scrubbing. In response to these flaws, the silicone toilet brush has emerged as a superior alternative for the hygiene-conscious homeowner. Made from thermoplastic rubber (TPR), these brushes feature wide, widely spaced rubbery nubbins rather than dense bristles. The material is hydrophobic, meaning it repels water. When you pull a silicone brush from the bowl, the water beads off immediately, preventing the “drip walk” from the toilet to the holder. Because the bristles are widely spaced, debris cannot get trapped. A quick rinse leaves the head virtually sterile compared to its nylon counterpart. However, silicone brushes have a weakness: they lack abrasive power. They are excellent for maintaining a clean toilet, but if a bowl has been neglected and has developed hard mineral scale or heavy staining, the soft rubber often glides over the mess rather than cutting through it. For a household that cleans daily or weekly, silicone is the cleaner choice; for a deep clean of a neglected fixture, nylon still holds the crown for brute force. 2.The Format The geometry of the brush head is just as important as the material. The standard hemispherical dome shape is ubiquitous, but it is inefficient. The most critical area of the toilet to clean is the rim—specifically the underside where the siphon jets release water. This dark, damp cavern is a breeding ground for mold, pink biofilm (Serratia marcescens), and mineral buildup that can clog the jets and weaken the flush. A round brush simply bumps against the rim, failing to reach the crevice. An effective toilet brush must have an under-rim extension—a protruding tuft of bristles angled upward—or a flexible head that can be bent to scrub upwards. Without this feature, the toilet is only being cleaned cosmetically. The visible bowl may sparkle, but the source of odors and bacteria remains untouched just out of sight. The handle of the brush is a feature often overlooked until one is in the midst of cleaning. Length matters. A short handle forces the user to lean dangerously close to the bowl, placing their face in the splash zone and the path of aerosolized germs. A longer handle provides leverage and distance, allowing for vigorous scrubbing without compromising personal hygiene. Furthermore, the material of the handle should be a solid, non-porous plastic or stainless steel. Wooden handles, often chosen for their aesthetic appeal, are a mistake in a bathroom environment. The humidity and the inevitable exposure to toilet water will cause the wood to swell, crack, and harbor bacteria within the grain. A seamless, single-piece plastic handle is the most sanitary option as it has no joints where mold can establish itself. 3.Storage The storage of the toilet brush is where the greatest hygiene crimes are committed. The holder is essentially a petri dish. After use, a brush is wet. If it is placed immediately into a tight-fitting, enclosed canister, the water pools at the bottom. This stagnant mixture of toilet water and chemical residue, kept in a dark, room-temperature environment, creates the perfect incubator for bacterial proliferation. The next time you pull the brush out, you are dipping it into a soup of pathogens. While open-air holders are aesthetically less pleasing because they expose the brush head, they allow for evaporation, which is the enemy of bacteria. If a closed holder is preferred for design reasons, it is imperative that the canister has a suspended design, where the brush hangs above the drip tray rather than sitting in it. This allows the brush to dry while the liquid pools below, separated from the cleaning tool. Maintenance of the brush itself is a concept that baffles many. We wash our dish sponges and our laundry, but we rarely wash the tool used to clean human waste. A toilet brush is not self-cleaning just because it touches soap. To clean a toilet brush effectively, one can utilize the toilet bowl itself. After scrubbing the toilet, flush the toilet to bring in clean water. Add a cup of bleach or a strong disinfectant to the clean bowl water, and
Toilet Cleaning Brush: 6 Signs It’s Time to Throw Away Your Toilet Cleaning Brush Read More »