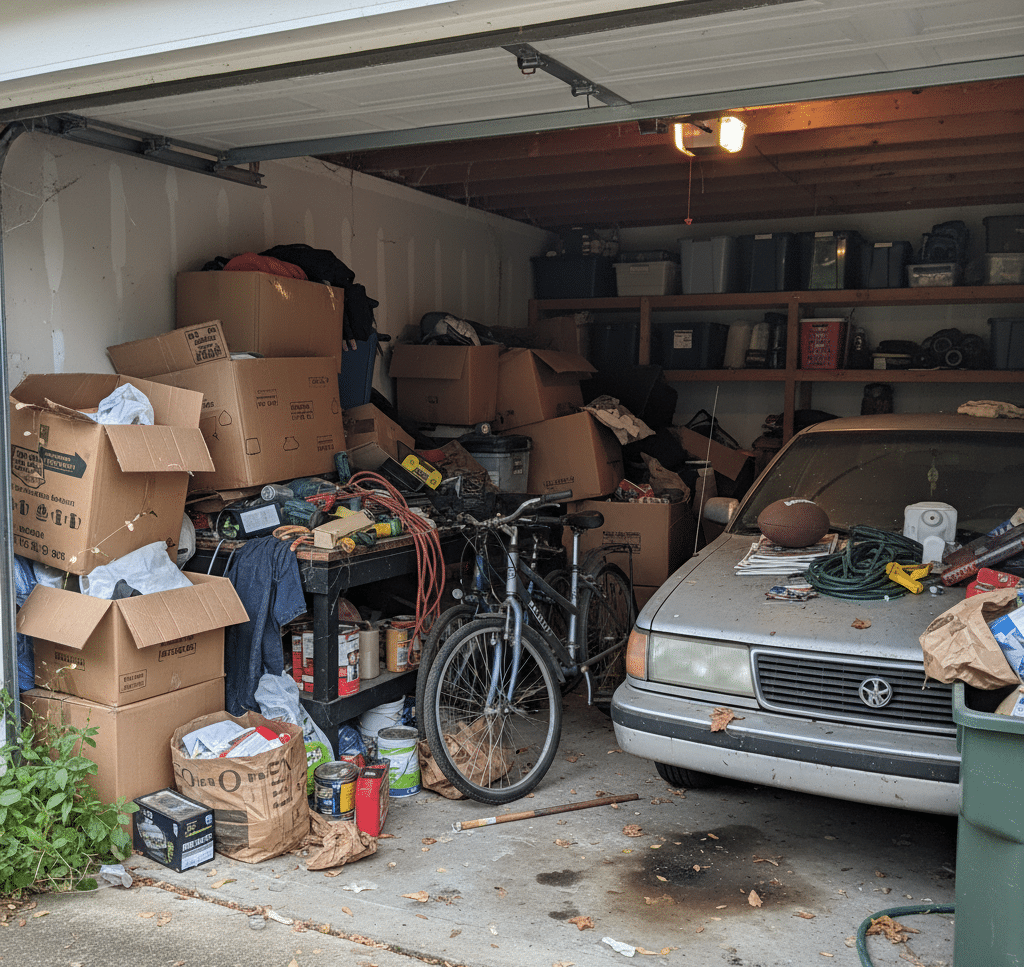
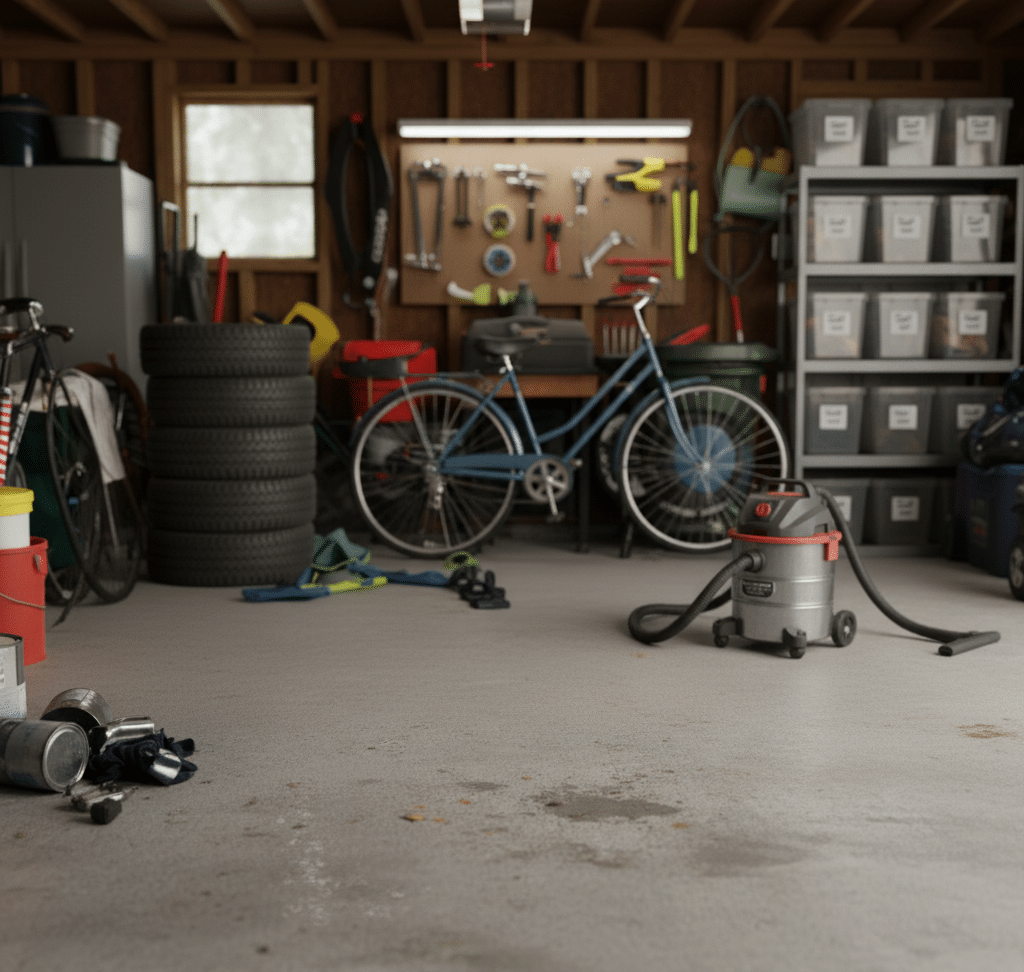
The garage is the forgotten room. It is the one space in the home that is allowed to descend into a state of organized, and then disorganized, chaos. It begins as a home for your car, a place for your tools. But slowly, inevitably, it becomes the household’s dumping ground. It is the final destination for items that have no other place: the broken lawnmower, the half-empty cans of paint, the boxes from a move that happened five years ago, the sporting equipment for a hobby long since abandoned. Before you know it, parking a car inside is a distant memory, and finding a specific screwdriver requires an archaeological dig.
Cleaning the garage is not like cleaning a kitchen. It is not a simple task of wiping surfaces and mopping floors. It is a project. It is an act of reclamation, of taking back a significant portion of your home’s square footage and returning it to a state of function and purpose. It is a process that can feel overwhelming, but when broken down into a systematic, manageable plan, it is entirely achievable. This is not about a quick tidy-up; this is about a full-scale reset.
1.Preparation and Strategy
Before a single box is moved, the project must be planned. The single biggest mistake people make when tackling a garage is underestimating the scope of the job. This is not a two-hour task. For the average cluttered garage, you need to dedicate an entire weekend. Block it out on your calendar. Arrange for kids or pets to be elsewhere. Treat it with the seriousness of a home renovation project, because in many ways, it is.
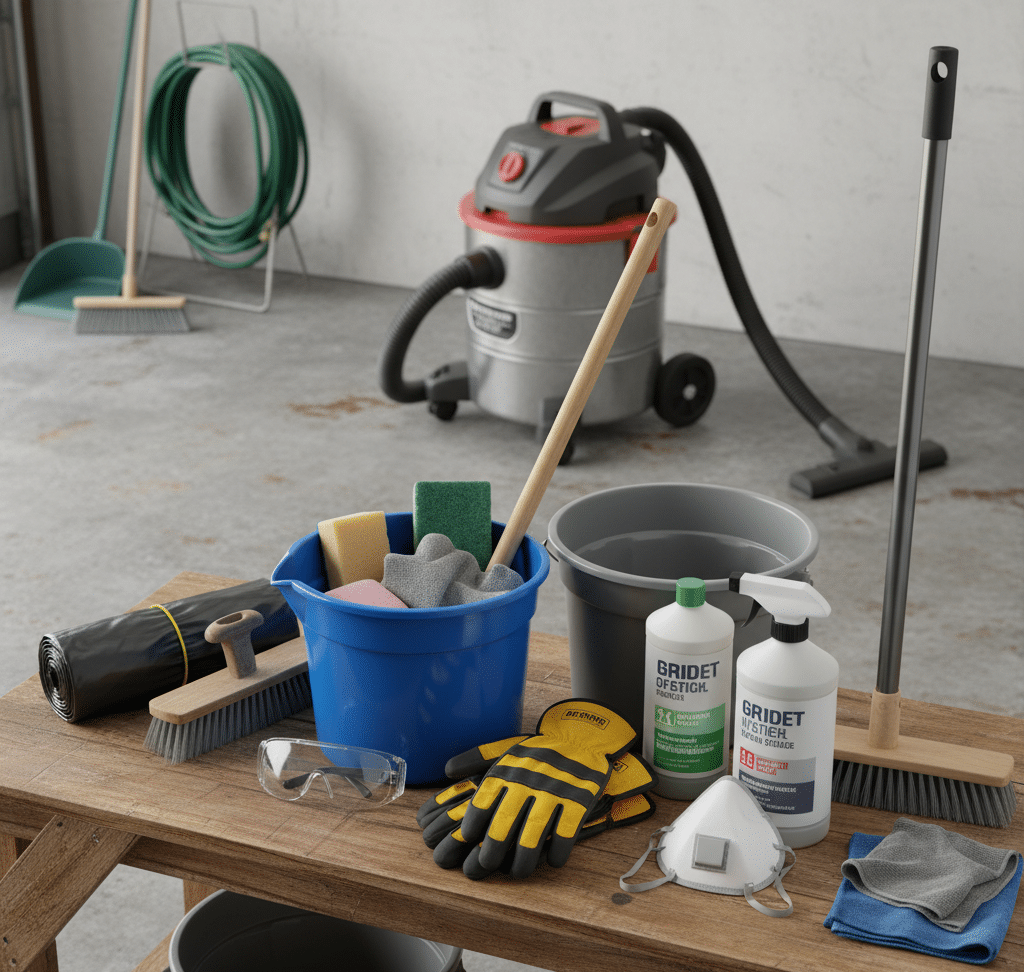
The second part of preparation is gathering your supplies. Going into this battle unarmed is a recipe for frustration and failure. You will need a specific set of tools for sorting, and another for the deep cleaning that will follow.
For Sorting and Decluttering:
Heavy-Duty Trash Bags: You will generate more trash than you think. Get more bags than you think you will need.
Sturdy Boxes or Bins: These will be for items you intend to keep, donate, or sell.
A Labeling System: A thick permanent marker and either labels or masking tape are essential. Every box must be clearly marked with its intended destination.
For Cleaning:
Safety Gear: At a minimum, you need heavy-duty work gloves to protect your hands from dirt, sharp objects, and chemicals. A dust mask is also critical, as you will be kicking up years of dust, dirt, and potentially mold spores. Safety glasses are a good idea, especially when sweeping and dealing with chemicals.
Broom and Dustpan: A stiff-bristled push broom is ideal for the large floor surface.
Shop-Vac: A standard household vacuum is no match for a garage. A shop-vac can handle everything from fine dust and sawdust to dead leaves, cobwebs, and small debris.
Buckets: You will need at least one large bucket for your cleaning solution.
Scrub Brushes: A long-handled deck brush is excellent for the floor, and a smaller, handheld stiff brush is good for corners and stubborn spots.
Cleaning Agents: A heavy-duty degreaser is non-negotiable for tackling oil and fluid stains on the concrete floor. You may also want a powdered concrete cleaner or a simple, strong all-purpose cleaner.
Rags and Sponges: A large supply of old rags is necessary for wiping down surfaces and for the final detailing.
2.Evacuation and Purge
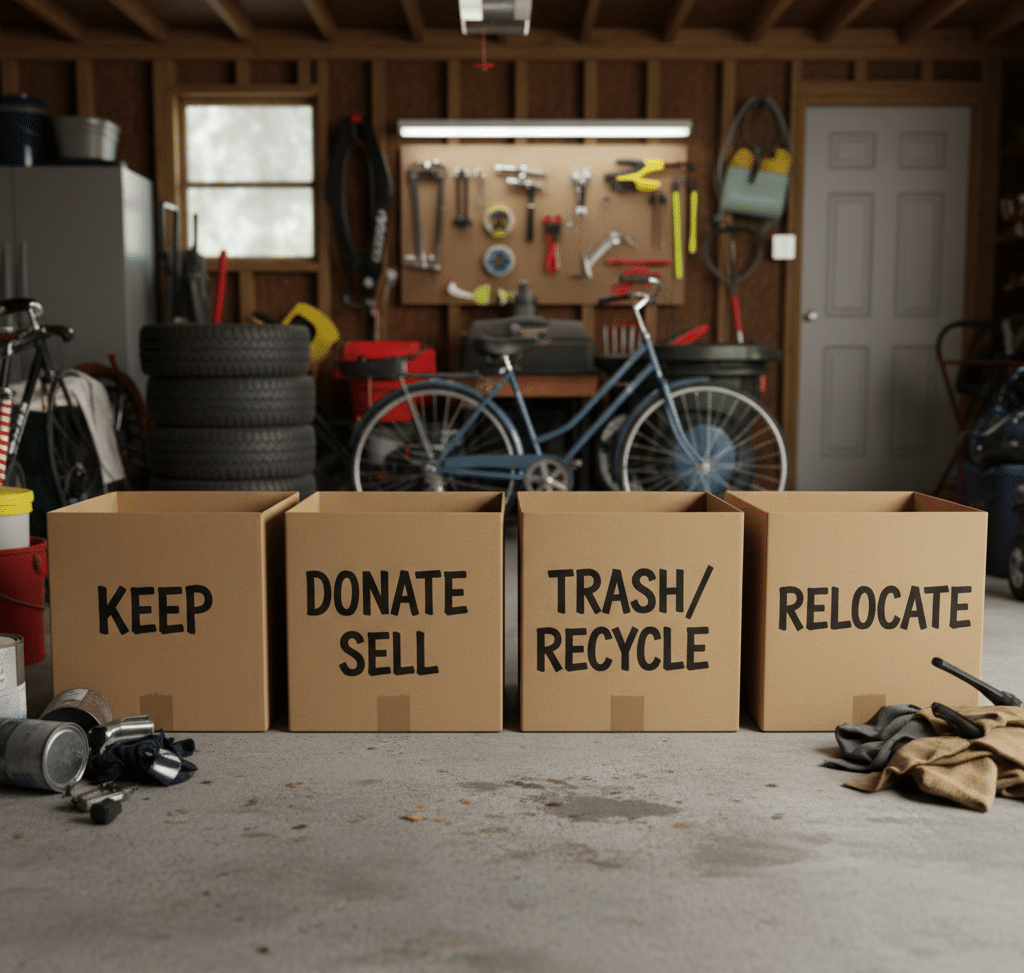
The most effective, albeit intimidating, method for decluttering a garage is to remove everything. Every single item must come out. The goal is to get the garage completely empty, creating a blank canvas for the deep clean and a forcing mechanism for decision-making. Wait for a clear, dry day and use your driveway as a staging area. As you pull items out, immediately begin sorting them into four distinct categories. This is where your boxes and labels come into play.
Keep: This category is exclusively for items that you use, need, and that belong in the garage. Be ruthless. If you haven’t used a tool in over a year, do you really need to keep it? Is that box of old cables for electronics you no longer own providing any value? The garage is functional space, not a museum of past projects.
Donate/Sell: These are items that are in good, usable condition but no longer serve a purpose for you. Old sporting equipment, tools you have duplicates of, functional but unused garden supplies. Place these directly into designated boxes. Once a box is full, tape it shut and label it. This prevents you from second-guessing your decisions.
Trash/Recycle: This will likely be your largest category. Be prepared to fill several bags. This includes broken tools, expired chemicals, dried-up paint, rotten wood, and anything that is simply junk. Pay close attention to hazardous waste. Old paint, motor oil, pesticides, and other chemicals cannot simply be thrown in the regular trash. Check with your local municipality for hazardous waste drop-off locations and procedures. Group these items together for a separate, responsible disposal run.
Relocate: You will inevitably find things that do not belong in the garage. Kitchen appliances, sentimental photo albums, out-of-season clothing. These items have been stored in the garage out of convenience, not logic. Put them in a “Relocate” box to be moved to their proper place inside the house later. Do not get sidetracked by taking them inside now; stay focused on the garage purge.
As you work, you will be tempted to create a “maybe” pile. Resist this urge. Indecision is the enemy of progress. If you truly cannot decide on an item, place it in a single “quarantine box.” Seal the box and write a date on it six months in the future. If you have not needed to open that box by that date, take the entire unopened box directly to a donation center.
3.The Deep Clean
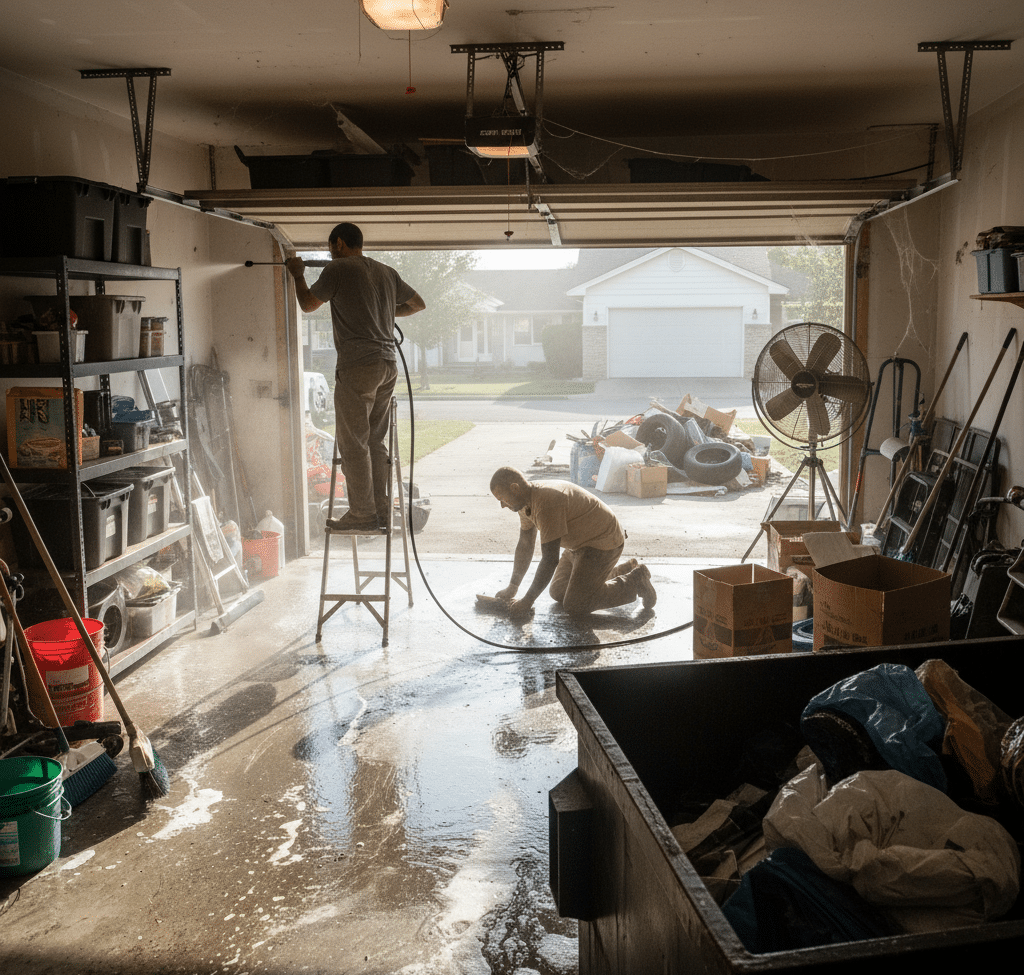
With the garage completely empty, you can now see the true state of the space. It is time for the top-to-bottom clean. This is a fundamental principle of cleaning: start high and work your way down, so that dust and debris fall to the floor, which you will clean last.
Ceiling and Walls: Use your push broom or shop-vac with a long extension wand to remove all cobwebs, dust, and insect nests from the ceiling, corners, and walls. Pay attention to the garage door tracks and the housing for the garage door opener, which are magnets for dirt.
Fixtures and Shelving: Wipe down any light fixtures, windows, and empty shelving units. If the shelves are particularly grimy, use a sponge with your all-purpose cleaner and then wipe them dry. This is your chance to clean these surfaces more thoroughly than you ever will again.
The Floor: The garage floor bears the brunt of the abuse and requires the most intensive cleaning.
Step 1: The Initial Sweep. Use your push broom to sweep the entire floor, pushing all the accumulated dust, leaves, and debris out of the garage. Follow this up with the shop-vac, paying close attention to the corners and the area where the floor meets the walls.
Step 2: Treat the Stains. The most common and stubborn stains on a garage floor are from oil, grease, and other automotive fluids. Concrete is porous, so these stains soak in. Apply your heavy-duty degreaser directly to these spots. Follow the product’s instructions, which will typically tell you to let it sit for a period to penetrate the stain. After it has soaked in, use a stiff-bristled brush to scrub the area vigorously. You may need to repeat this process for very old or dark stains.
Step 3: Wash the Entire Floor. For a truly deep clean, the entire floor needs to be washed. The most effective tool is a pressure washer, which will blast away years of ingrained dirt. If you don’t have one, you can achieve a good result with a deck brush, your cleaning solution (a powdered concrete cleaner mixed in a bucket of hot water works well), and a hose with a spray nozzle. Work in sections, scrubbing the floor and then rinsing it thoroughly. Be sure to push all the dirty water out of the garage.
Step 4: Let it Dry. The floor must be completely and totally dry before you start moving anything back in. This is crucial. Open the garage door and, if possible, use a large fan to speed up the process. This can take several hours, or even a full day, depending on the humidity.
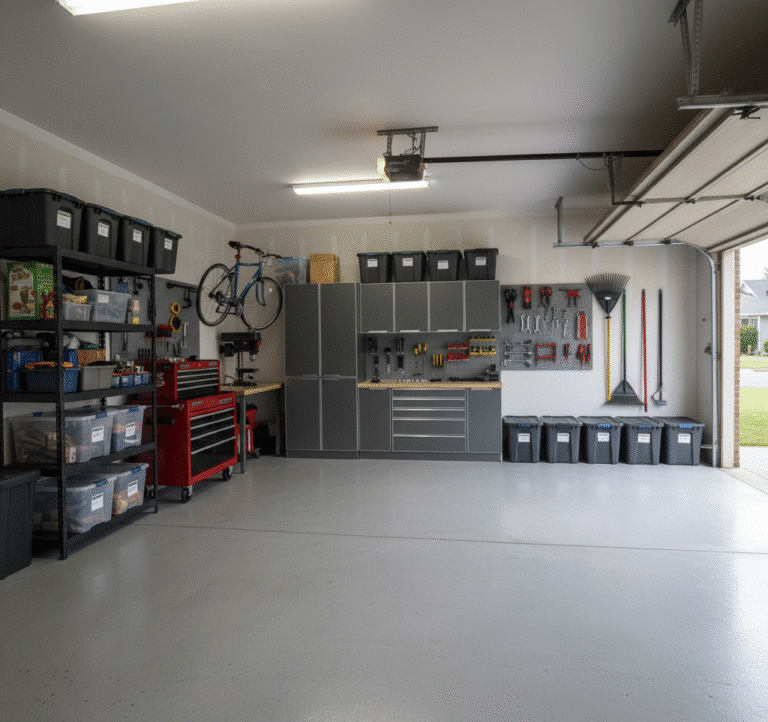
4. Strategic Reorganization
Moving everything back into the clean garage is not the final step; it is the beginning of the new system. Do not make the mistake of simply piling everything back in. This is your opportunity to create a logical, organized, and functional space.
Create Zones: Mentally divide the garage into zones based on function. For example:
Automotive Zone: Car maintenance supplies, oil, fluids, tire gauges.
Tool Zone: Workbench, hand tools, power tools.
Gardening Zone: Lawn mower, shovels, rakes, soil, pots.
Storage Zone: Seasonal items, long-term storage bins.
Sports & Recreation Zone: Bikes, balls, camping gear.
Go Vertical: The key to maximizing garage space is to get as much as possible off the floor. This is where shelving and wall systems come in.
Shelving Units: Heavy-duty, freestanding shelving units are perfect for storing bins and bulky items.
Pegboards: A pegboard over a workbench is the classic, and still one of the best, ways to organize hand tools. It keeps everything visible and within easy reach.
Wall Hooks: Use strong wall hooks for hanging shovels, rakes, bicycles, and ladders.
Use the Right Containers: Now is the time to get rid of the collection of decaying cardboard boxes. Invest in a set of sturdy, clear plastic bins with secure lids. Clear bins allow you to see the contents at a glance, saving you from having to open ten boxes to find one item. Label every single bin, no matter how obvious the contents seem. The lids will protect your belongings from dust, moisture, and pests.
Prioritize Placement: As you place items back into their designated zones, think about frequency of use. Items you use often should be in the most accessible locations. Things you only use once or twice a year, like holiday decorations, can be placed on higher shelves or in the back corners.
5. Long-Term Maintenance
A garage clean-out is a major project, and the last thing you want is to have to do it all over again in a year. Maintaining your newly organized space requires a few simple habits.
The One-In, One-Out Rule: For every new item you bring into the garage, an old one must be removed.
A Place for Everything: Everything now has a home. Get in the habit of returning a tool or item to its designated spot immediately after use.
Regular Sweeping: A quick sweep of the floor once a month will prevent the heavy buildup of dust and leaves.
Reclaiming your garage is a tough job involving a complete purge and a serious deep clean. It’s a transformative project that adds a truly functional and valuable room to your home. For the final, professional touch on floors, walls, and forgotten corners, Toronto Shine Cleaning offers the heavy-duty cleaning services to make your newly organized space truly spotless.