Screen Cleaning: A Step-by-Step Guide to Cleaning Your Laptop and TV Screens
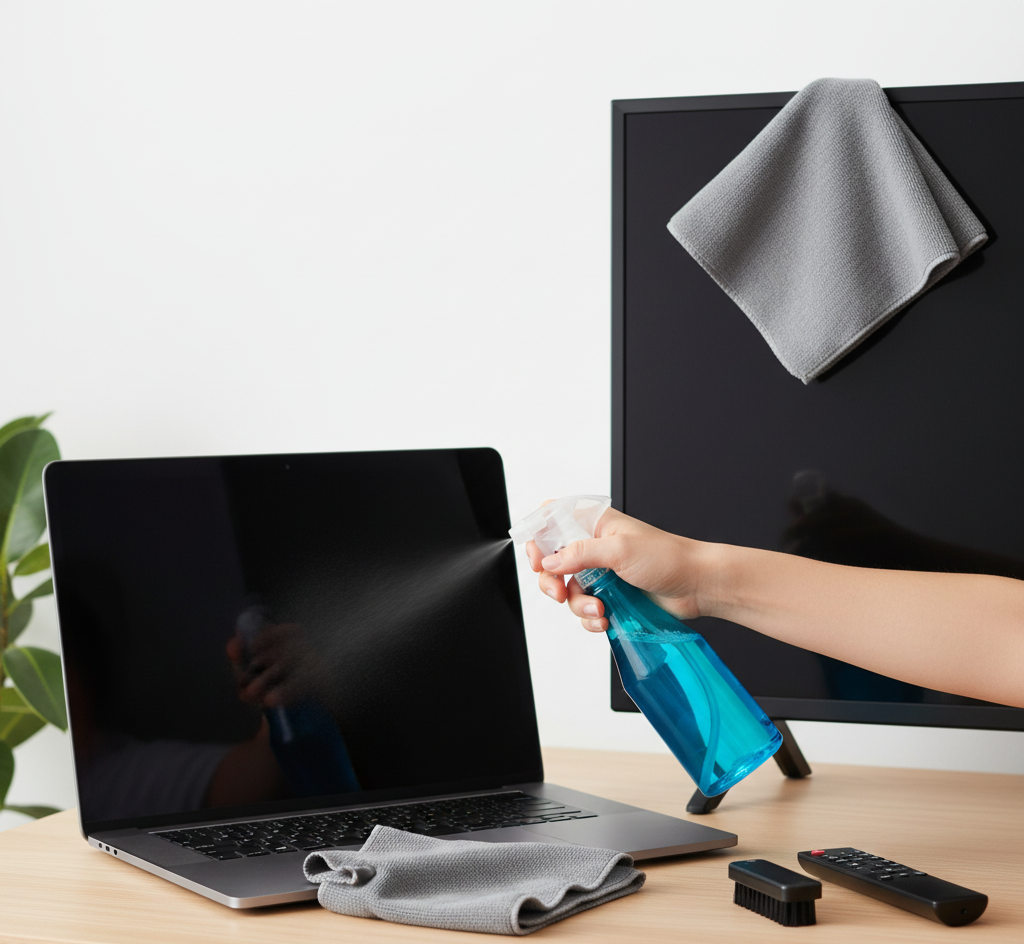
The screens on our televisions and computer monitors are our windows to the world of information and entertainment. They are high-precision pieces of technology that we interact with daily. As such, they are magnets for dust, fingerprints, smudges, and the occasional unfortunate sneeze. Keeping these screens clean is not just a matter of aesthetics; a clear, spotless display provides a better viewing experience and can even reduce eye strain. However, modern screens are incredibly delicate surfaces, often coated with sensitive anti-glare and anti-reflective layers. Cleaning them with the wrong tools or chemicals can lead to permanent damage, including scratches, stripped coatings, or streaks that are far more distracting than the original smudges. What you Shouldn’t use Before ever touching your screen, the most critical lesson is understanding what not to use. This is a situation where avoiding the wrong thing is more important than finding the right one. First and foremost, you must never use any cleaning solution that contains harsh chemicals like ammonia, alcohol, acetone, or toluene. These are the primary ingredients in most general-purpose glass cleaners, like Windex, and they are catastrophic for modern screens. These chemicals are designed to cut through grime on durable, non-porous glass like windows and mirrors. On a television or monitor, they will aggressively strip away the delicate anti-glare and anti-reflective coatings, leaving behind a cloudy, permanently hazy finish. The tool you use to wipe the screen is just as important as the liquid. Never use paper towels, toilet paper, or facial tissues. While they feel soft to our hands, paper products are made of wood pulp and contain abrasive fibers that can leave a network of fine, microscopic scratches on the screen’s surface. Over time, these tiny scratches will accumulate and create a noticeable dullness. They also have a frustrating tendency to shed lint, leaving behind more debris than you started with. Similarly, avoid using any kind of rough cloth, such as a dish towel, a t-shirt, or a terry cloth rag. The texture of these fabrics can also be abrasive and cause damage. At the end, the technique itself requires a gentle approach. You should never apply significant pressure while wiping, as this can damage the liquid crystals or pixels underneath the surface, leading to permanent dark spots or lines. And most importantly, never, under any circumstances, spray any liquid directly onto the screen. Gravity will cause the liquid to run down the surface and seep into the bezel at the bottom edge, where it can penetrate the internal electronics and cause irreversible damage, shorting out the device completely. Preparation With the warnings established, the correct process for cleaning your screen is a gentle, multi-step approach that starts with the least invasive method and only escalates as needed. The first step is always preparation. Turn off the device completely and unplug it from the wall. This is a crucial safety measure, but it also serves a practical purpose. A black, unlit screen makes dust, smudges, and fingerprints far more visible than a bright, active one. You should also let the screen cool down to room temperature, as cleaning a warm screen can sometimes lead to streaking. For the majority of cleaning situations, where the only issue is a light layer of dust and perhaps a few minor smudges, a dry wipe is all that is required. The undisputed champion for this task is a large, clean, dry microfiber cloth. Microfiber is a synthetic material with fibers that are incredibly fine, much thinner than a human hair. This structure makes them exceptionally soft and non-abrasive. Furthermore, when used dry, the fibers create a natural static charge that actively attracts and traps dust particles rather than just pushing them around the screen. Starting from one of the top corners, gently wipe the screen in a broad, sweeping motion, either horizontally or vertically. Do not scrub in small, tight circles. Use light, even pressure, letting the cloth do the work. This single, simple step will safely remove about ninety percent of the grime that accumulates on a typical screen. When a dry cloth is not quite enough to remove stubborn fingerprints or oily smudges, it is time to introduce a minimal amount of moisture. The best and safest liquid to use is distilled or deionized water. Tap water contains minerals like calcium and magnesium which, while harmless to drink, can leave behind a faint, chalky residue or streaks on the screen as the water evaporates. To use distilled water, you must never apply it directly to the screen. Instead, lightly dampen a clean microfiber cloth. The cloth should be just barely moist to the touch, not wet. If you can wring any drops out of it, it is too wet. Once the cloth is properly dampened, wipe the screen with the same gentle, sweeping motions you used for the dry wipe. Again, apply minimal pressure. This will be enough to break down and lift most common smudges. Greasy Marks For more stubborn, greasy marks that distilled water alone cannot handle, you may need a slightly stronger, yet still safe, cleaning solution. You can purchase commercially prepared screen cleaning sprays, which are specifically formulated to be free of harsh chemicals. Alternatively, you can create your own highly effective solution by mixing equal parts of distilled water and plain white vinegar. The mild acetic acid in the vinegar is excellent at cutting through oily residue from fingerprints. As with the water, this solution should be applied to your microfiber cloth, never directly to the screen. After wiping the smudges away with the lightly dampened cloth, it is an essential final step to immediately go over the screen again with a second, completely dry microfiber cloth. This final dry buff will remove any lingering moisture and prevent any streaks from forming as the solution dries, leaving a perfectly clear, uniform finish. The frame and stand of your television or monitor, often made of glossy plastic, can be cleaned with the same methods. A dry microfiber cloth
Screen Cleaning: A Step-by-Step Guide to Cleaning Your Laptop and TV Screens Read More »