Let’s Compare 6 Different Types of Brooms so You Know The Best Ways To Use Them.
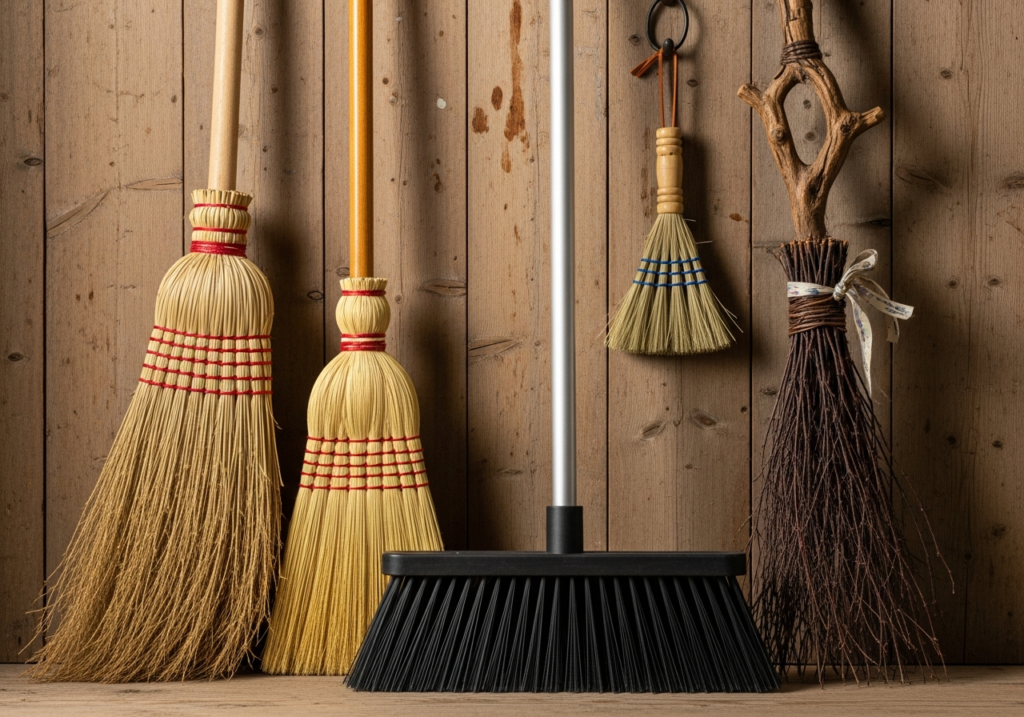
The humble broom is often the most underrated tool in the cleaning arsenal. To the uninitiated, it is simply a bundle of fibers attached to a stick, a primitive device designed to push debris from one location to another. However, this oversimplification is the primary cause of inefficient cleaning, damaged flooring, and unnecessary physical fatigue. The evolution of this implement has diverged into a complex taxonomy of shapes, materials, and specialized functions. Just as a carpenter would not use a sledgehammer to drive a finishing nail, a homeowner should not use a stiff straw sweeper to clean a polished hardwood floor. Understanding the mechanics of these tools—the stiffness of the bristle, the angle of the head, and the composition of the fibers—is essential for mastering the art of the sweep. Using the correct instrument transforms a chore into a seamless maintenance routine, ensuring that dirt is actually removed rather than simply redistributed into the air or the gaps between floorboards. Corn Broom The most recognizable silhouette in the world of sweeping is the traditional corn broom. Crafted from the natural fibers of the sorghum plant, this tool is a relic of agricultural history that has survived into the modern era due to its sheer durability. It is characterized by its stiffness and its rough texture. It is a heavy-duty instrument designed for high-friction environments. Its domain is the outdoors—the concrete patio, the sidewalk, the garage floor, and the barn. The rigid, straw-like bristles are strong enough to move heavy debris like wet leaves, gravel, and snow. They act as a rake and a sweeper combined. However, bringing this natural fiber tool indoors is almost always a mistake. The stiff straws are too abrasive for delicate surfaces like laminate or polished hardwood, potentially leaving micro-scratches in the finish. Furthermore, they are notorious for shedding their own bristles, adding to the mess they are supposed to be cleaning. They lack the fine, split ends required to trap microscopic dust, meaning they push the big rocks while leaving the fine silt behind. Synthetic Angle Broom For the interior of the home, particularly the kitchen and the dining room, the synthetic angle broom is the superior choice. These are typically made from plastic or nylon fibers. The genius of this design lies in its geometry. The head is cut on a diagonal bias, creating a sharp point at one end. This design acknowledges the architectural reality of a room: corners exist. A flat-headed sweeper struggles to reach the dust bunnies trapped where the baseboard meets the cabinet, but an angled head can be maneuvered into tight crevices and under the lips of appliances with precision. The bristles on these tools are usually “flagged.” If you look closely at the tips of the plastic strands, you will see they are frayed or split into tiny hairs. This flagging increases the surface area exponentially, creating a dense web that traps fine flour, pet dander, and dust particles. This implement is designed for the “pull” stroke, gathering light debris gently without kicking it into the air. Push broom When the task involves large, open spaces such as basements, driveways, or warehouses, the standard upright broom becomes inefficient. The biomechanics of the sweeping motion—twisting the waist and pulling the arm across the body—is tiring over large areas. This is where the push brush dominates. This tool features a wide, rectangular block head, ranging from eighteen to thirty-six inches, attached to a handle at an angle. The motion is a forward thrust, utilizing the power of the legs and the body’s weight rather than the lower back. These wide sweepers come in a variety of bristle textures. “Fine” versions have soft, dense fibers for moving dust on smooth concrete. “Coarse” versions have thick, stiff bristles for moving heavy mulch or rocks on asphalt. Many modern iterations utilize a dual-bristle system: a stiff inner core to move heavy objects and a soft outer border to catch the fine dust, providing a comprehensive clean in a single pass. Rubber Broom A relatively modern innovation that addresses a specific biological nuisance is the rubber broom. For households with pets, this device is nothing short of miraculous. Traditional bristle tools are ineffective against pet hair; the static electricity generated by the sweeping motion causes the hair to fly away or float over the bristles. A rubber sweeper features a head made of molded rubber nubbins or thick, flexible fingers. When dragged across a carpet or a hard floor, the rubber creates friction and a static charge that acts as a magnet for fur. It pulls hair out of the weave of a rug that a vacuum cleaner might miss. Furthermore, the head often includes a squeegee edge, making it a dual-purpose tool for cleaning up liquid spills or scrubbing a tile floor with soapy water. It is a hygienic option as well, as the rubber head can be easily washed and sanitized, unlike a straw sweeper which absorbs bacteria. Whisk Broom There is also the specialized category of the whisk broom. This is essentially a handheld version of the traditional corn sweeper or a stiff synthetic brush. It lacks a long handle, forcing the user to get close to the work. Its utility is found in the small, localized mess. It is the tool for the staircase, the upholstery of the car, or the spilled potting soil on a workbench. Because the user is closer to the debris, they can apply more directed pressure to dislodge stubborn dirt. This handheld device often pairs with a dustpan, forming a unit that is essential for “spot cleaning” rather than whole-room maintenance. “Dust Mop” The “dust mop” is technically a cousin of the broom, but it deserves inclusion in the conversation regarding dry floor cleaning. Unlike a sweeper that uses bristles to flick dirt, a dust mop uses a flat head covered in cotton or microfiber loops to glide over the surface. This is the tool of choice for large expanses of gymnasium floors, hospitals, and long hallways. It does not lift heavy
Let’s Compare 6 Different Types of Brooms so You Know The Best Ways To Use Them. Read More »